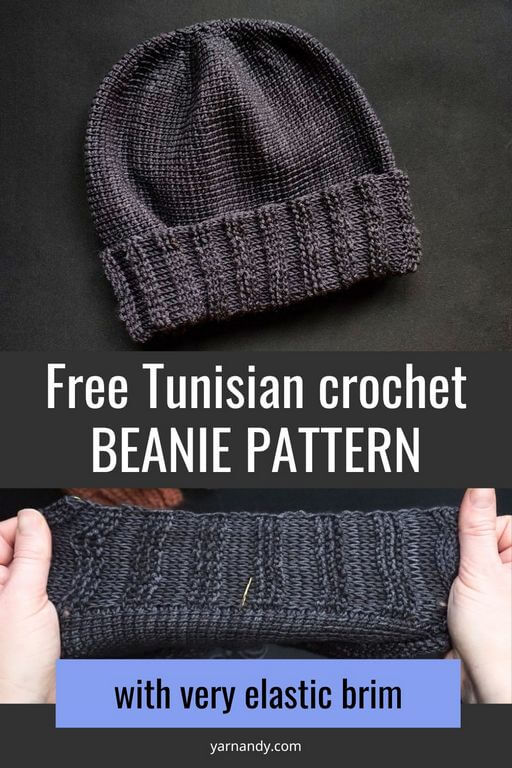
Use this free pattern for a Tunisian crochet beanie with sideways construction to make cozy hats for your loved ones.
Using a thin yarn, you can get great drape and still a pretty thick fabric because of the nature of Tunisian crochet.
The elastic ribbing is incorporated and you can adjust the length of the beanie for a folded brim or you can skip several stitches for a shorter version without the folded brim.
You change the finished size of the beanie by increasing or decreasing the number of pattern repeats, which are easy to make and easier to remember.
This pattern is a variant of the beanies made with short rows in a sideways construction. You’ll find the chunky version here.
Use any color of sock or sock weight yarn, hand dyed or plain colors. They will all be shown off beautifully by this simple construction.
Contents
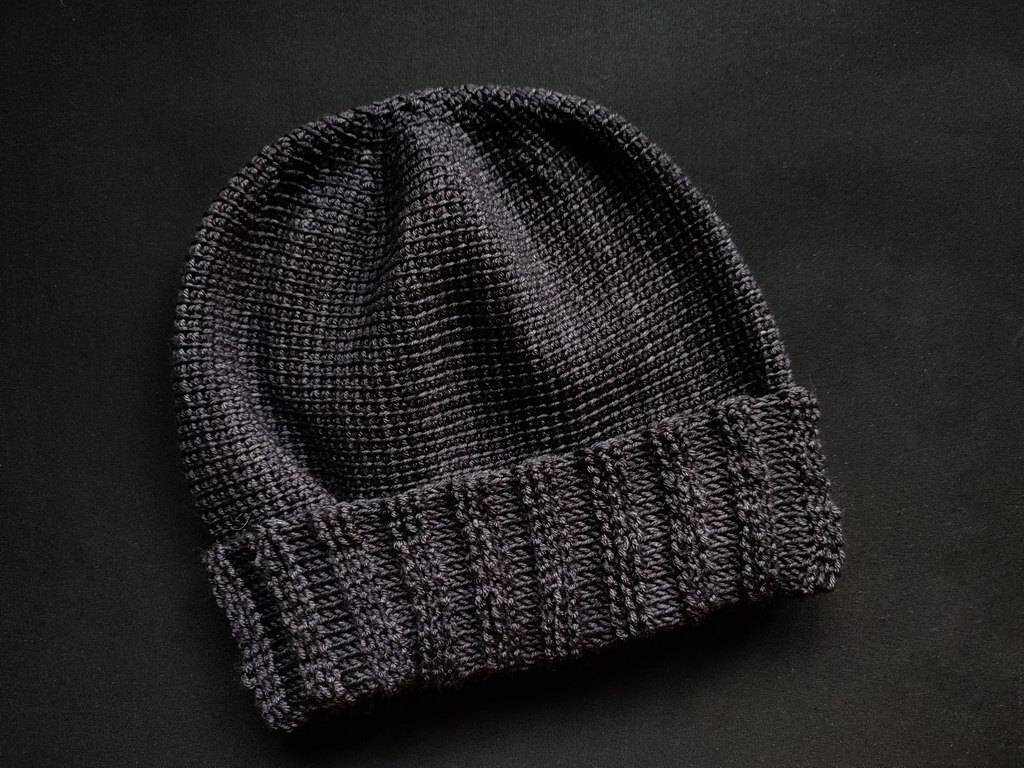
About this Tunisian crochet beanie pattern
A simple and versatile beanie, with a very elastic brim. You can adapt this pattern to your preference, to be used as a slouchy beanie, a plain or folded up brim, or a snug fit.
You choose your length from the beginning and then work to your desired circumference using short rows.
If you want to, you can add tiling mosaic designs to the body, a different color for the brim, or even use a plain brim that you fold over.
Working this sideways means that we make the most of the vertical elasticity of Tunisian crochet, which can lead to a snug fit and more comfort than when working vertically.
It’s great for keeping your ears warm in the cold weather if you use wool to make it.
You can use up a skein of beautiful hand-dyed yarn or two-three balls of sock yarn.
Printable pattern with charts
If you want to buy the PDF version, here are the different platforms where you can do so:


Size and measurements
Check out the table for head sizes and finished sizes.
The sizes range between head sizes of 41 and 64 cm (between 16″ and 25″) with no ease or slight negative ease.
The table provides sizes for the height of the beanie. You can change the length of the hat by changing the starting chain.
Pick your size based on your measurements and desired length.
The table also includes stitch counts that you can use as shortcuts for future hats once you’ve made one.
| Size | A | B | C | D | E | F |
|---|---|---|---|---|---|---|
| Head (cm) | 41 | 46 | 52 | 56 | 60 | 64 |
| Hat size (cm) | 40 | 46 | 51 | 57 | 60 | 63 |
| Head (“) | 16 | 18 | 20 1/2 | 22 | 23 1/2 | 25 |
| Hat size (“) | 15 1/2 | 18 | 20 | 22 1/2 | 23 1/2 | 25 |
| No. of rows | 84 | 96 | 108 | 120 | 126 | 132 |
| No. of repeats | 14 | 16 | 18 | 20 | 21 | 22 |
| Hat height no brim (cm) | 16 | 19 | 22 | 24 | 25 | 26 |
| Hat height w/ brim (cm) | 22.5 | 26 | 29.5 | 32 | 33.5 | 35 |
| Hat height no brim (“) | 6 1/2 | 7 1/2 | 8 1/2 | 9 1/2 | 10 | 10 |
| Hat height w/ brim (“) | 9 | 10 | 11 1/2 | 12 1/2 | 13 | 14 |
| Beginning chain | 47 | 55 | 62 | 67 | 70 | 74 |
| Cast on loops | 48 | 56 | 63 | 68 | 71 | 75 |
| Brim | 13 | 15 | 16 | 17 | 17 | 19 |
| Middle | 24 | 30 | 31 | 35 | 33 | 35 |
| Crown | 10 | 10 | 15 | 15 | 20 | 20 |
The stitch and loop counts are shown in pattern as follows: A, B (C, D) [E, F].
The schematic shows the construction of this beanie, with wedges that are shaped with short rows and repeated as many times as needed to get the correct size.

Skill level
Intermediate in Tunisian crochet, due to working with short rows in a magic ring and ribbing made up of two types of stitches.
Gauge
21 Tss and 21 rows for a 10 cm by 10 cm square (4″ by 4″).
Make a gauge swatch by following these instructions.
Row 1. Ch 25, pick up 25 loops in the back bumps of the chains, R –– 26 loops
Row 2. 24 Tss, Ls, R –– 26 loops
Repeat Row 2 another 24 times for a total of 26 rows.
Block the swatch by washing it and laying it flat to dry.
Measure a 10 by 10 cm (4″ by 4″) square in the middle of the swatch and count the stitches and rows.
If you get fewer stitches and rows, go down a hook size (0.5 mm), if available, and make another swatch.
If you get more stitches and rows, go up a hook size (0.5 mm), if available, and make another swatch.
Repeat the swatching process until you reach the recommended gauge. Make a note of the hook size used.
Notions
Yarn: sock weight or size 2, with 400 meters per 100 grams; approximate usage per size: 160, 210 (270, 310) [350, 390] meters (or more, if you intend on making your hat taller).
Hook: 5 mm Tunisian crochet hook with cable or long hook or hook that gets you gauge.
Tapestry needle, scissors, tape measure.
Optional: 6 stitch markers to mark the short rows.
In sample: Lana Grossa Meilenweit, 80% wool, 20% Polyamide, 210 meters per 50 g. Size C made of 2 balls in colorway 1323, red.
Gazzal Wool Star, 100 % superwash merino, 350 meters per 100 g. Size C made of 70 g in colorway 3802, Forged Iron.
Observations
This hat is worked flat, then seamed. See the provided tutorial on how to seam up the two edges.
You can make the hat taller or shorter by varying the number of chains you start with and varying the number of stitches in the middle section.
The very elastic ribbing is shown in this tutorial. You can choose between 1×1, 2×2 or 3×3 ribbing, depending on your desired finished look. The sample has 3×3 ribbing.
You can replace the ribbing at the bottom with a different type of ribbing (see video links below).
The fit of this hat is relatively tight, so for a more relaxed hat make an extra pattern repeat. The pattern repeat consists of 6 rows.
Make a gauge swatch before you start.
Loop counts, including the first loop before the return pass, are noted in the first row, after the — symbols.
Abbreviations
- Ch – chain;
- MR – magic ring;
- Rep – repeat;
- SM – stitch marker;
- SRR – short row return: Rep [YO and pull through 2 stitches on hook] until you are left with one loop on the hook;
- St – stitch;
- Tks – Tunisian knit stitch: insert the hook between the two vertical bars of the next St, YO and pull up a loop;
- Trpks – Tunisian reverse purl knit stitch: bring the yarn to the front of the hook, insert the hook from back to front between the 2 vertical bars of the next St, YO and pull up a loop;
- Tss – Tunisian simple stitch: insert the hook under the vertical bar of the next St, YO and pull up a loop;
- YO – Yarn over.
Video tutorials
The firs link is the right handed version, the second the left handed.
Starting a Tunisian crochet project in the magic ring.
Tunisian reverse purl knit stitches.
Tunisian crochet elastic ribbing.
Other types of ribbing.
Instructions
Highlight the stitch counts relevant to your chosen size and only follow those instructions.
Middle and crown stitch counts are separated for easier counting.
Place a SM each in the last St of the middle section and in the ends of the short rows. Move the stitch markers up every few rows.
Row 1. Start with a MR, Ch 47, 55 (62, 67) [70, 74], pick up 47, 55 (62, 67) [70, 74] loops in back bumps of chains, pick up 1 loop in MR, SRR –– 49, 57 (64, 69) [72, 76] loops
Leave the MR open until you finish seaming the hat.
Row 2. 13, 15 (16, 17) [17, 19] Trpks, 24, 30 (31, 35) [33, 35] Tss, 9, 9 (13, 13) [17, 17] Tss, SRR –– 47, 55 (61, 66) [68, 72] loops
Row 3. 13, 15 (16, 17) [17, 19] Tks, 24, 30 (31, 35) [33, 35] Tss, 7, 7 (10, 10) [13, 13] Tss, SRR –– 45, 53 (58, 63) [64, 68] loops
Row 4. 13, 15 (16, 17) [17, 19] Trpks, 24, 30 (31, 35) [33, 35] Tss, 5, 5 (7, 7) [9, 9] Tss, SRR –– 43, 51 (55, 60) [60, 64] loops
Row 5. 13, 15 (16, 17) [17, 19] Tks, 24, 30 (31, 35) [33, 35] Tss, 3, 3 (4, 4) [5, 5] Tss, SRR –– 41, 49 (52, 57) [56, 60] loops
Row 6. 13, 15 (16, 17) [17, 19] Trpks, 24, 30 (31, 35) [33, 35] Tss, 1Tss, SRR –– 39, 47 (49, 54) [52, 56] loops
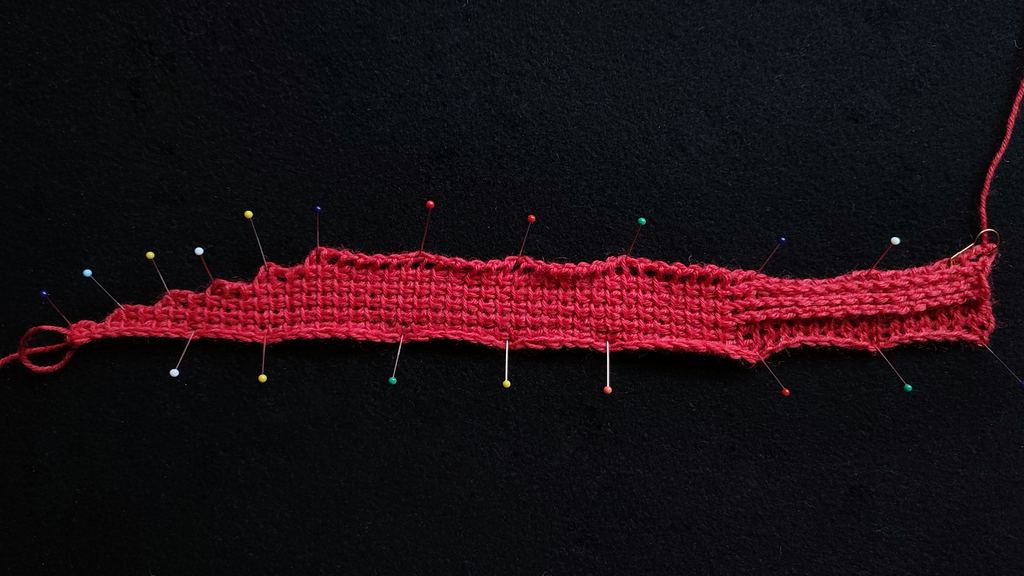
Row 7. 13, 15 (16, 17) [17, 19] Tks, 24, 30 (31, 35) [33, 35] Tss, 10, 10 (15, 15) [20, 20] Tss, pick up 1 loop in MR, SRR –– 49, 57 (64, 69) [72, 76] loops
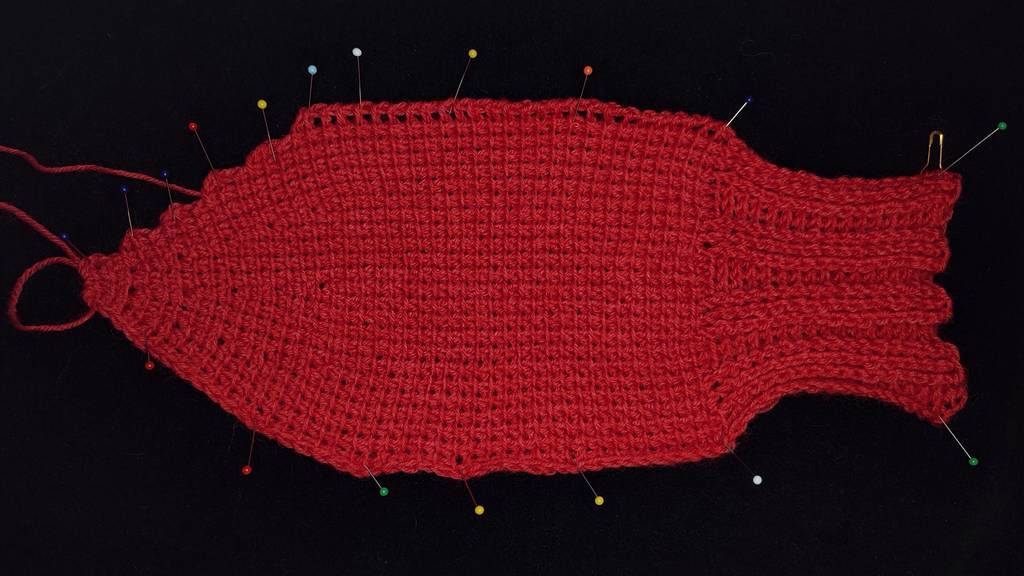
Repeat Rows 2-7 another 12, 14 (16, 18) [19, 20] times. Repeat Rows 2-6 once more.
Leave a long tail for seaming.
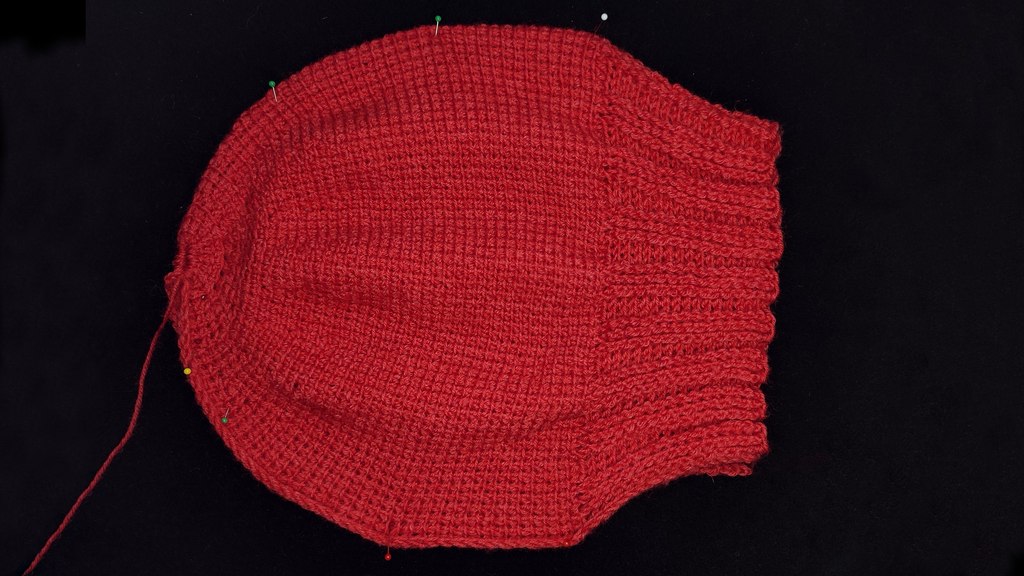
Seaming
Leave the magic ring open until you complete seaming.
Fold the hat with the right side facing you, aligning the two sides to prepare them for sewing.
Make an invisible join at the bottom where the two sides meet, using the tail.
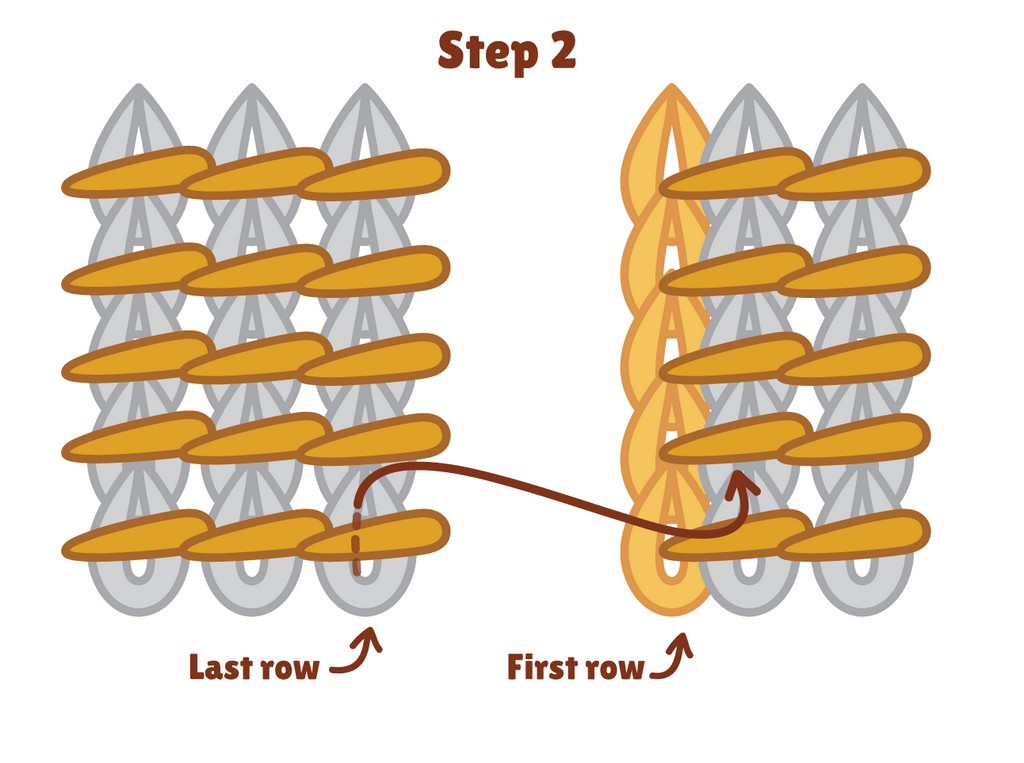
The steps will be demonstrated below for Tks, which is relevant for the brim.
Steps 1 and 2 show the creation of an invisible join on the edge.
Step 1. Thread the needle with the tail left after the last return pass and go around the second St on the second side.
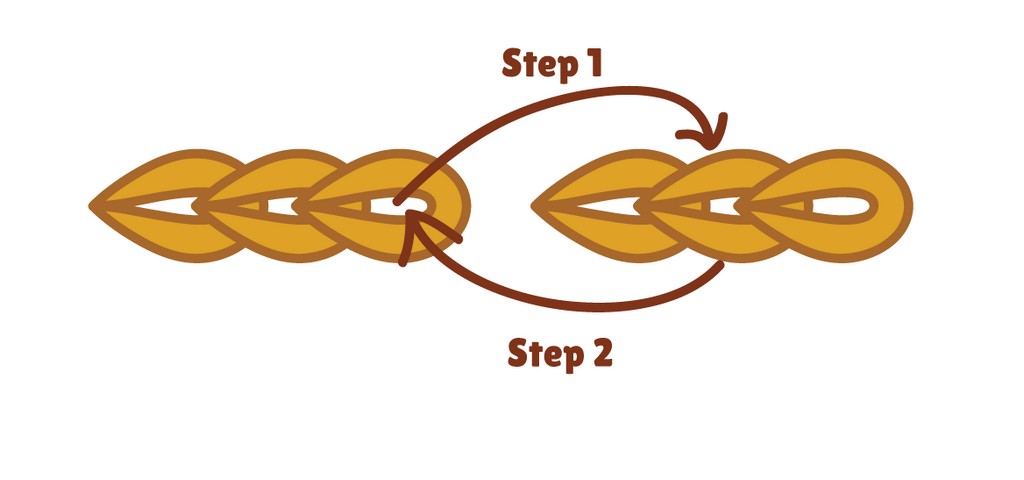
Step 2. Return to the first side and go back through the first stitch to make the invisible join.
Start seaming the fabric.
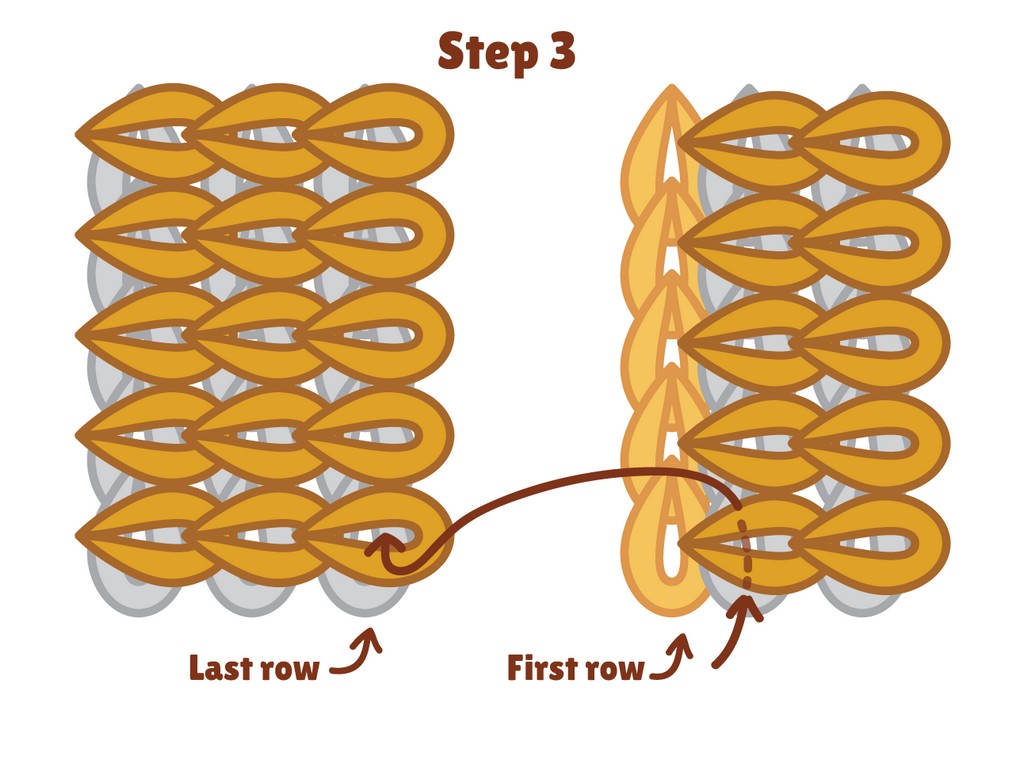
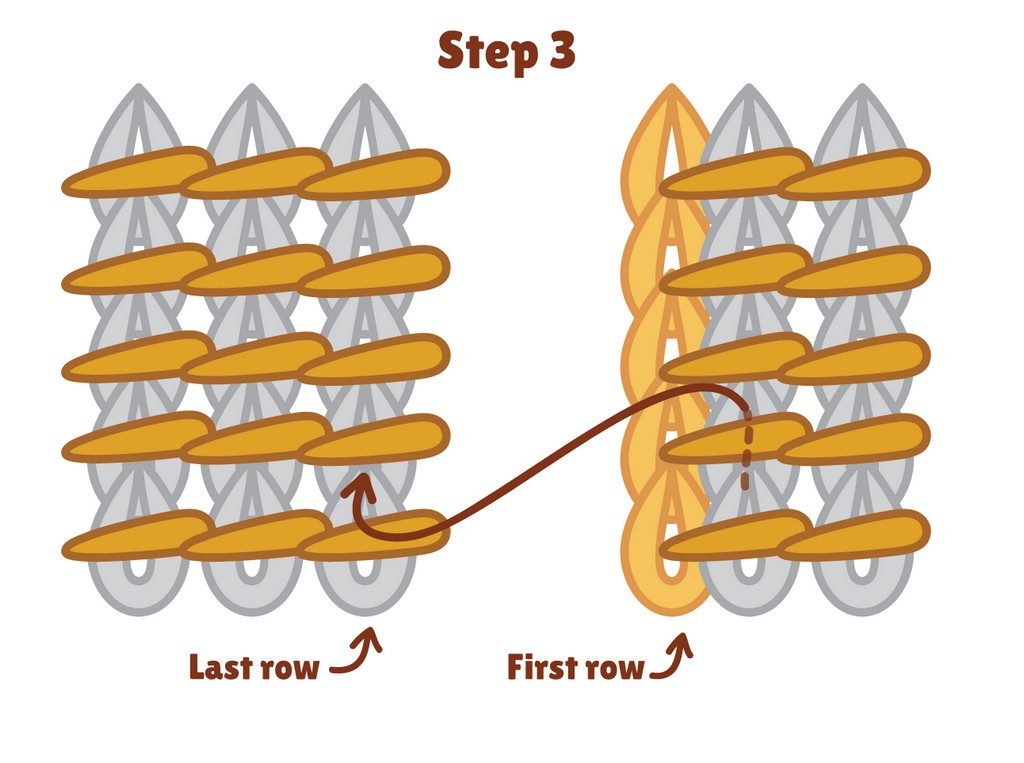
Step 3. Go with the needle under the first Tks on one side (the side with the first row).
Return to the first side and insert the needle between the 2 vertical bars of the first stitch and come back up between the 2 vertical bars of the second stitch.
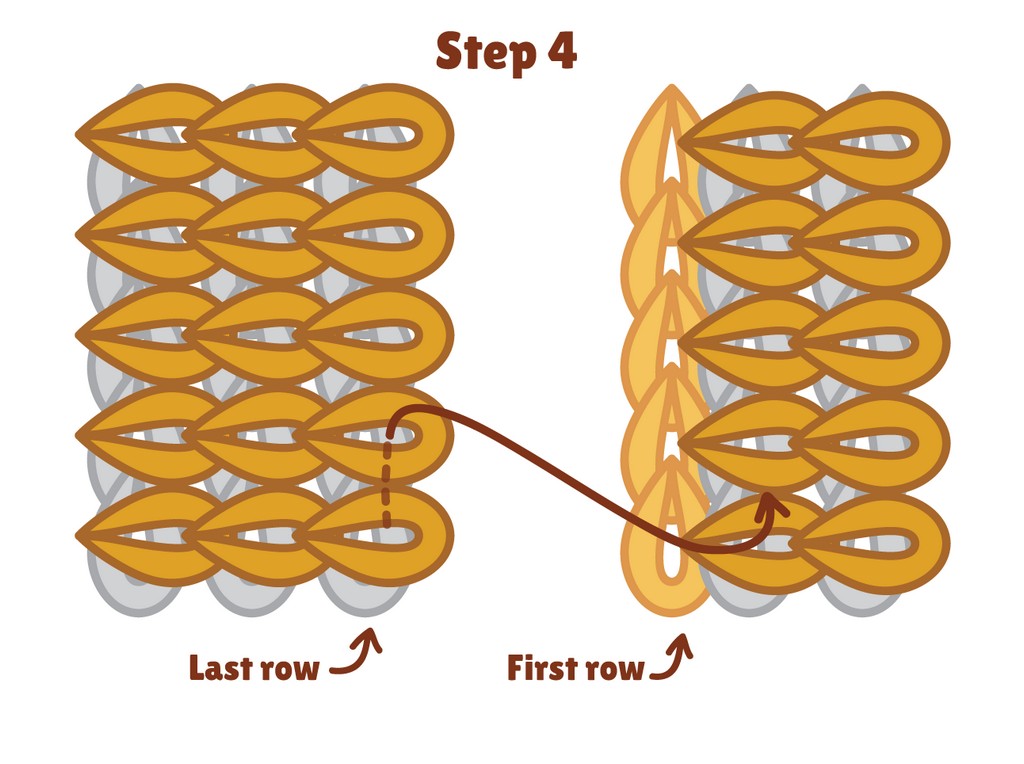
Step 4. Go with the needle under the second Tks on the first side.
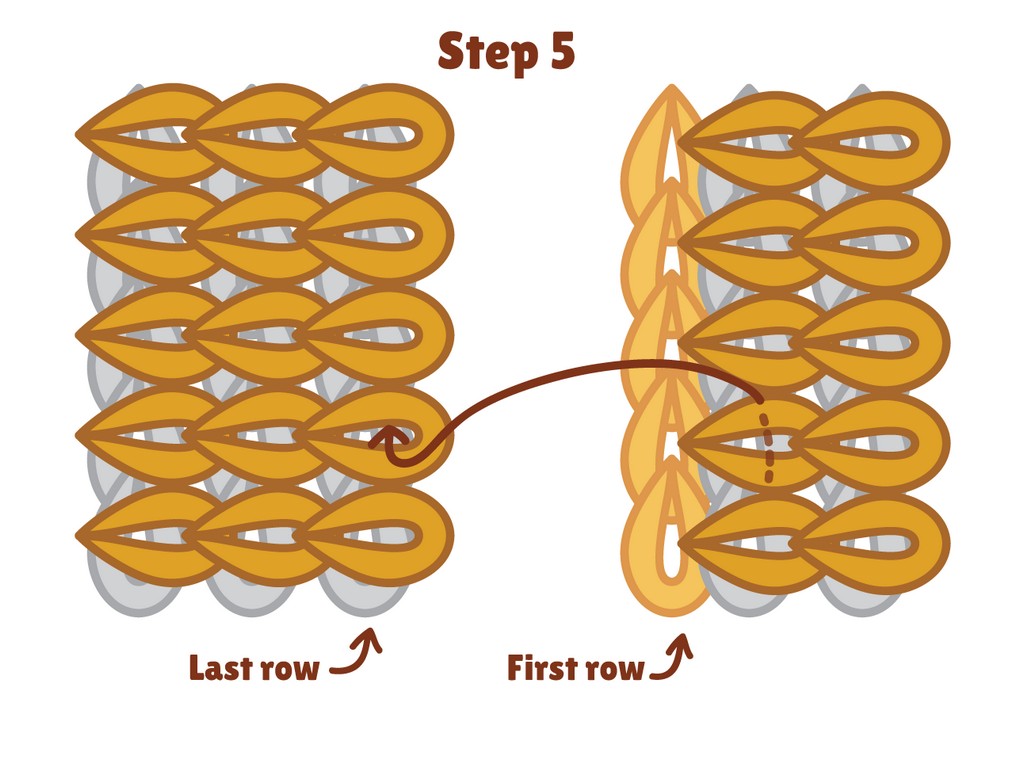
Step 5. Return to the second side and insert the needle between the 2 vertical bars of the second stitch and come back up between the 2 vertical bars of the next stitch.
Return to the first side.
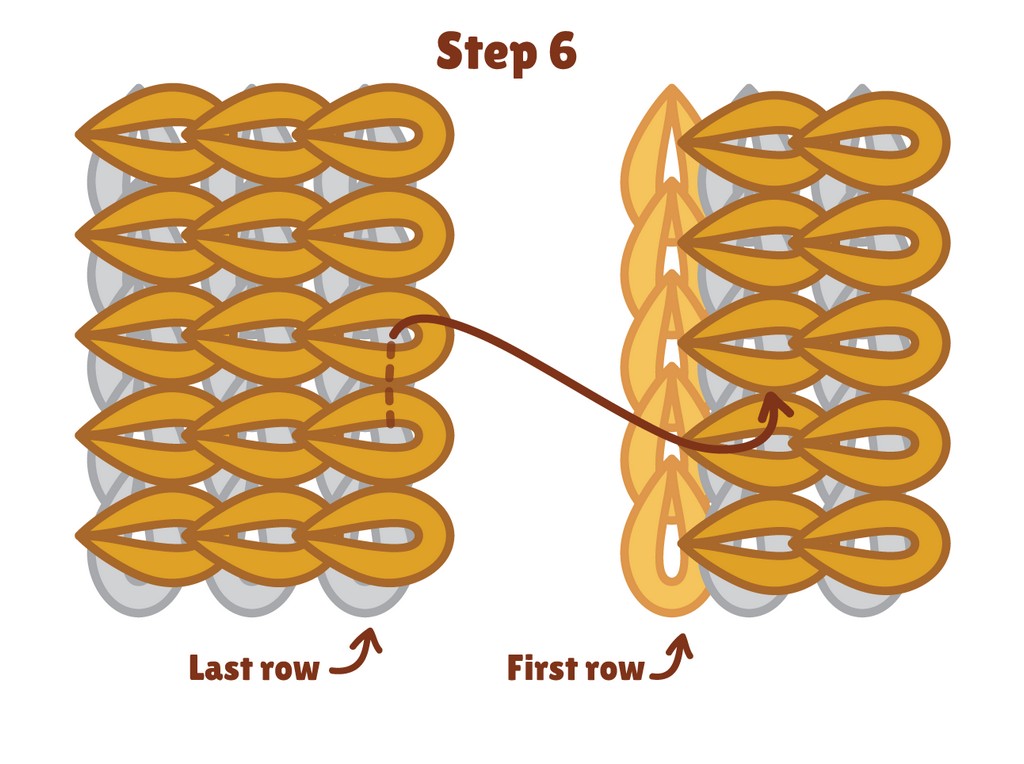
Step 6. Go with the needle under the second Tks on the first side.
Return to the second side.
Step 7. Insert the needle between the 2 vertical bars of the stitch you came out of before and come back up between the 2 vertical bars of the next stitch.
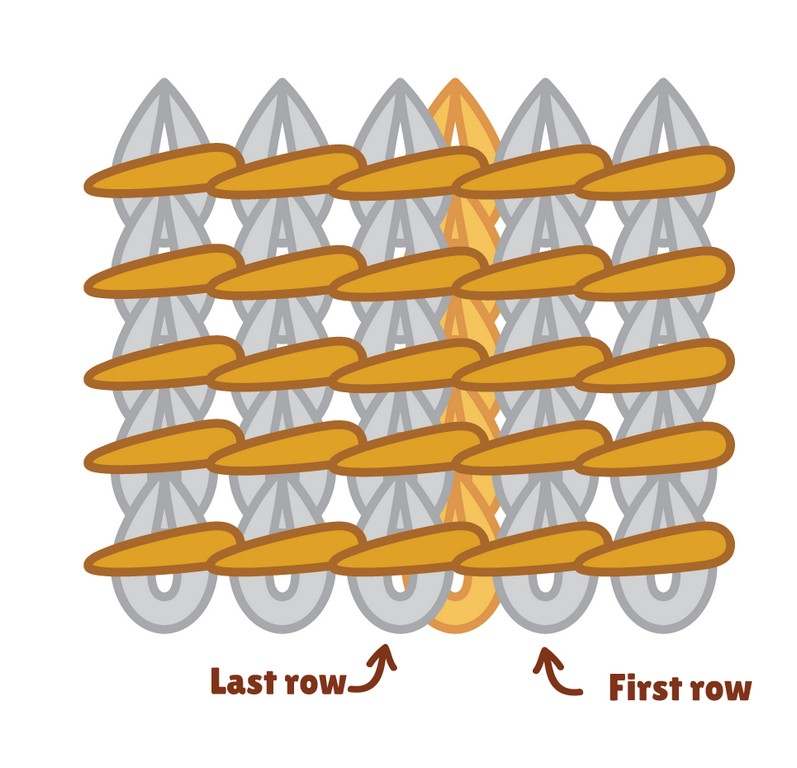
Continue working in this manner until you run out of stitches in the brim. Pull on the tail. to close the gap.
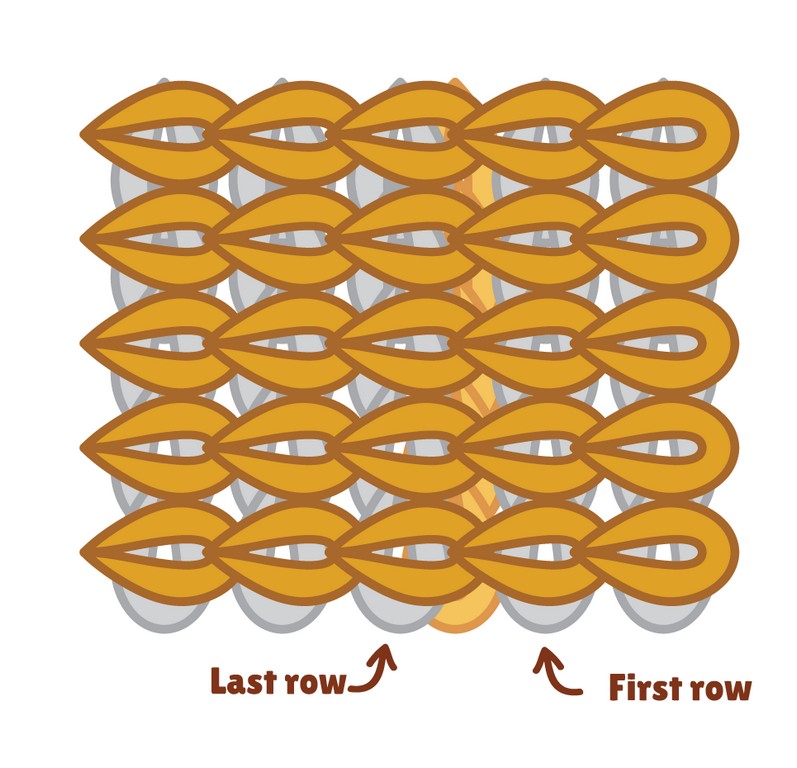
The starting chain should move to the back of the fabric or the inside of the hat.
Continue in a similar way for the Tss fabric.
Step 1. Go with the needle first through the return pass chain and under the first stitch on the first side.
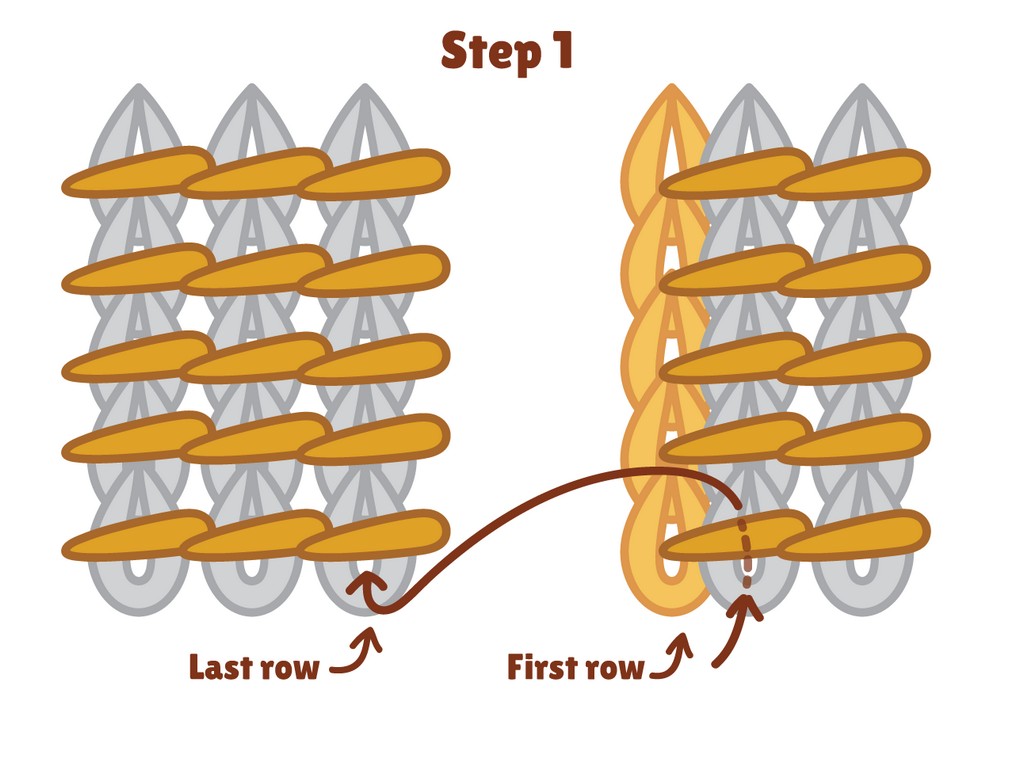
Step 2. Go under the corresponding stitch on the second side, then return to the first side.
Steps 3-4. Repeat this action, by going through the return pass chain and under the stitch on one side, then under the stitch on the other side.
Pull on the tail regularly to close the gap. The starting chain should move to the back of the fabric.
Pull the magic ring closed and weave in the ends.
The hat is finished and ready for gentle washing and wearing.
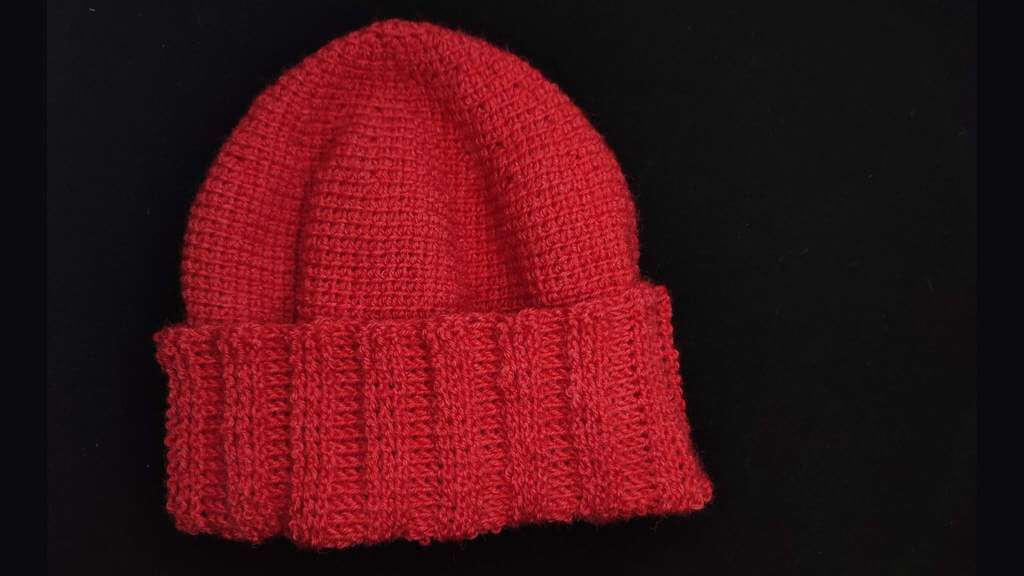
Now you can wear or gift your completed beanie.
I think the red one looks better with my complexion, but you should choose a yarn color that goes best with yours or your recipient’s.

If you enjoyed this pattern, you might like another free pattern from my blog:
Free pattern for leaf lace Tunisian crochet bandana
Free Tunisian crochet sweater pattern with 12 sizes
Free Tunisian crochet beanie pattern in 9 sizes – baby to adult hats
Tunisian crochet blanket square – Asparagus stitch
Free Tunisian crochet mosaic pattern – Giroc square
Tunisian crochet lace pattern video tutorial – Wheat fields
Manna cowl and headband – Tunisian crochet patterns
Tunisian crochet asymmetrical rounded triangle shawl tutorial
Advanced Tunisian crochet mosaic tutorial
Phyllite – free Tunisian crochet shawl pattern for beginners
Or if you prefer PDFs, you will find them in the Yarnandy shop, on Payhip, on Etsy or on Ravelry.
Sign up to my email updates below if you want to know when I publish the next tutorials, patterns, videos and so on.
