How do you sew two pieces of Tunisian knit stitch together? What about seaming the bottom of a Tunisian knit stitch fabric to the top?
Do you know how to sew the Tunisian knit stitches invisibly, to create a continuous fabric?
In this tutorial I will show you the easy way to seam Tunisian knit stitches horizontally (a row to another row).
Maybe you want to make a sideways beanie using the very stretchy Tunisian crochet ribbing and don’t know how to seam the beginning of the ribbing to the end.
Or maybe you want to make a cowl worked sideways and close the loop.
Or you want to seam together the front and back shoulders of a sweater or a top that you made in Tunisian knit stitch.
This photo and video tutorial will teach you how to seam the top row of a Tunisian knit stitch fabric to the bottom row of a Tunisian knit stitch fabric and also how to seam two top rows together, as there is a small difference between the two cases.
I’ve used this method successfully when making the Malleable beanie with a very elastic ribbing. I’ve also used it to make sleeve cuffs and neckline ribbing on cardigans and sweaters.
Contents
Video tutorial
Right handed video tutorial.
Left handed video tutorial.
Seaming a top row to a bottom row
First of all, you need two fabrics with the same number of stitches per row.
They can be the two ends of the same fabric (the top and bottom row) or the top row of one fabric and the bottom of a different fabric.
In my case I made two swatches in Tunisian knit stitch in two different colors to show you the seam clearly.
You can use a seaming yarn that’s the same weight and color as the original yarn (like a long tail, at least as long as the width of the fabric, plus extra for weaving in) or a thinner thread.
In the video I used a thinner thread, but in the photo tutorials below I’m using the same type of yarn in a different color only for demonstration.
You should not bind off the last row of the piece that you’ll be seaming.
If the seaming thread is not attached to the first stitch on the last row of the bottom piece (the one with the top row), do it now, securing it well.
Then go with the needle behind the two vertical bars at the beginning of the row of the top piece. This prepares the two pieced to be seamed.
To begin seaming, insert the needle behind the back vertical bar of the first Tks (Tunisian knit stitch) in the bottom piece and bring it up.
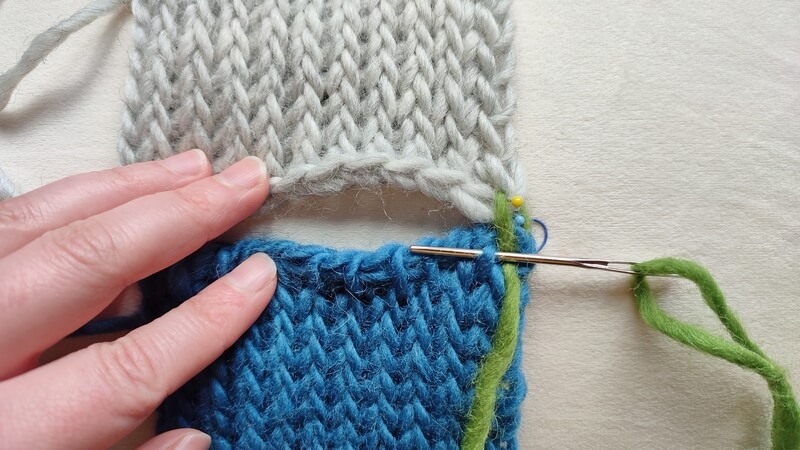
Then insert the needle behind the 2 vertical bars of the first stitch in the top piece. Pull the thread through.
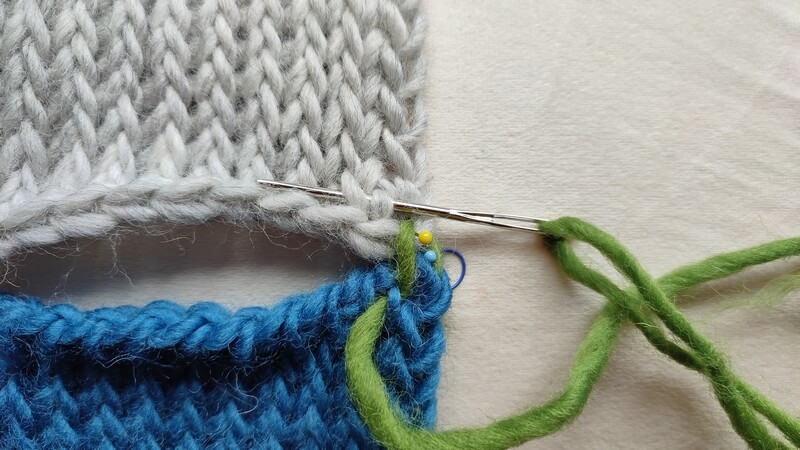
In the bottom piece, insert the needle behind the front vertical bar of the first stitch and the back vertical bar of the second stitch and pull the thread through.

In the top piece, go behind the 2 vertical bars of the next stitch.
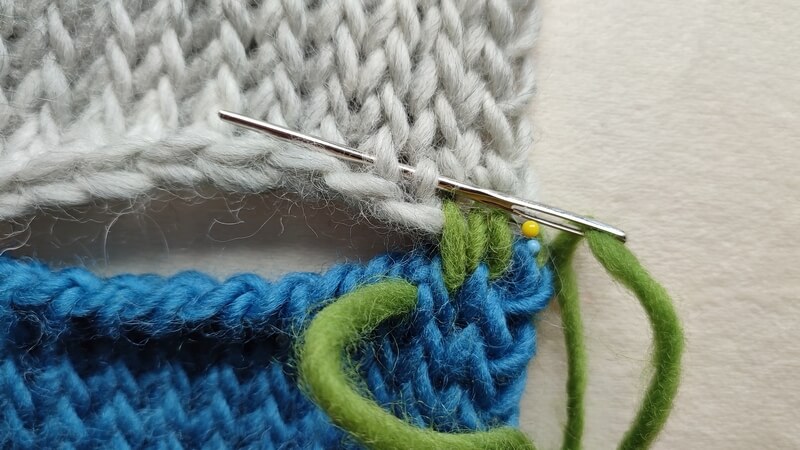
In the piece below, go behind the front vertical bar of the same stitch you used before and behind the back vertical bar of the next stitch.
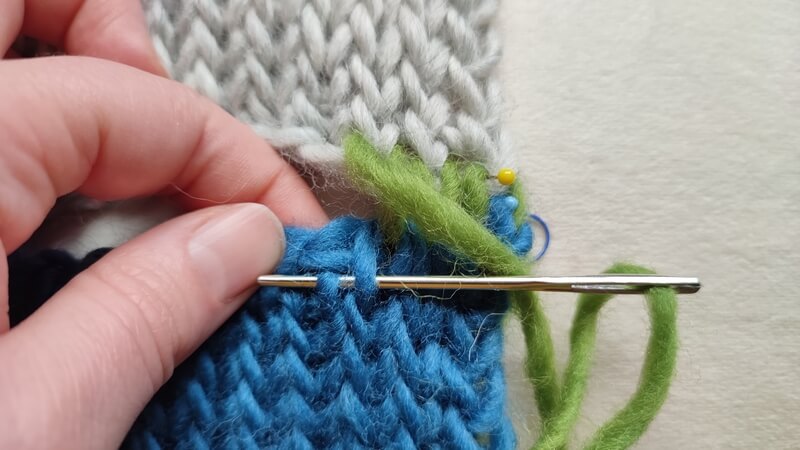
Repeat this process until you reach the last stitch on either side.
In the bottom, insert the needle behind the front vertical bar of the last Tks and behind the first bar of the Ls (last stitch).
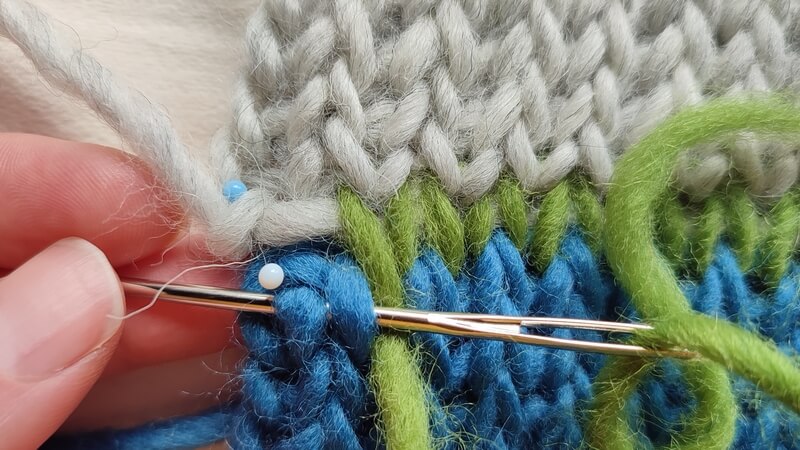
At the top, insert the needle behind the 2 vertical bars of the Ls. This is a special case with Tunisian knit stitches, as the last stitch looks like a regular Tks.
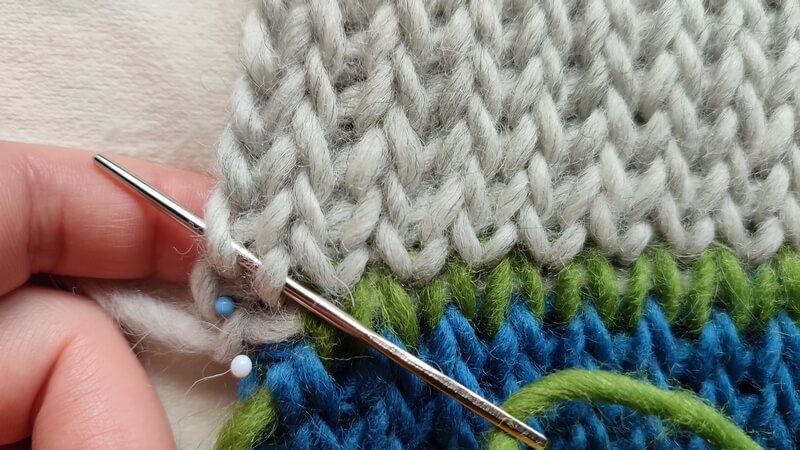
To finish the seam, insert the needle behind the back loop of the Ls of the bottom piece and take the thread to the back.
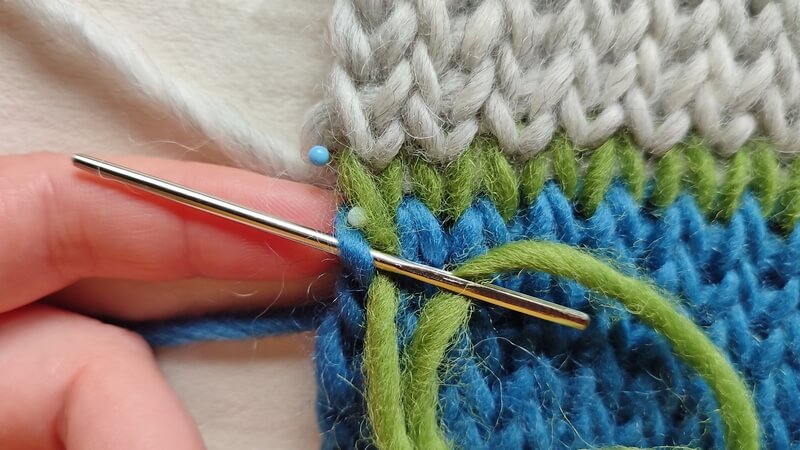
The resulting seam looks like an extra row of knit stitches. If you like the look, you can weave in the ends. This looks like grafting in stockinette in knitting.
This seam still retains some elasticity and it’s best for fixing a fabric that you had to cut, for example if you made some mistakes in your project or if you want to make a cowl sideways using knit stitches.
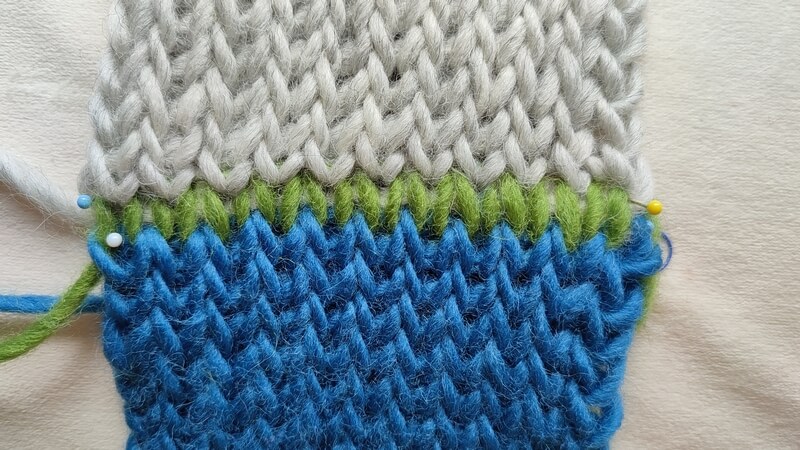
Otherwise, pull on the seaming thread until it goes straight through the fabric and pulls the two sides together, as if they were made at the same time.
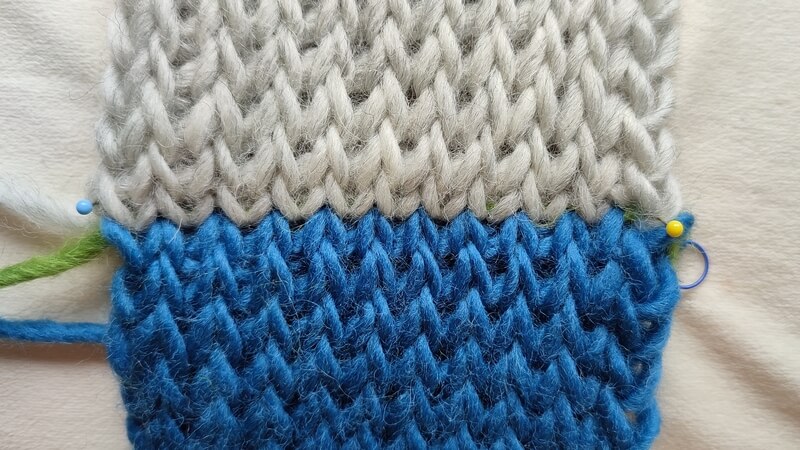
Weave in the ends to secure the seam. Now the seam will be tight and sturdy.
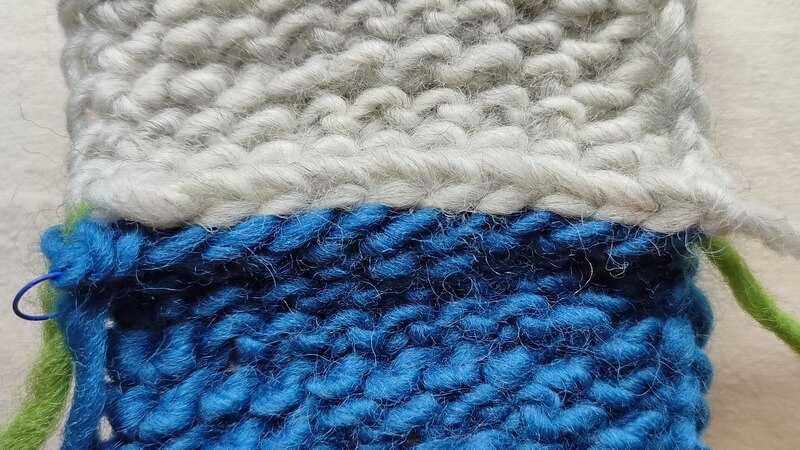
On the back you will have a ridge, which is composed of two chains that were pushed to the back. One is the foundation chain and the other is a return pass chain.
Seaming a top row to a top row
Similarly to when seaming a top row to a bottom row, you should not bind off either of the rows.
In this case you can seam the same row to itself (for example if making a balaclava flat) or the top rows of two pieces (for example, if you want a shoulder seam on a bottom-up vest or sweater).
You can use the same method to seam two bottom rows together. In that case, I recommend that you cast on using one of the thinner options, such as a long tail Tunisian crochet cast on.
I’ll be using the same two swatches in Tunisian knit stitch in two different colors, just one of them is turned upside-down.
Again, you can use a seaming thread in the same weight and color as the original yarn, or a thinner thread.
If the seaming thread is not attached to the first stitch on the last row of the bottom piece, do it now, securing it well.
Then go with the needle behind the two vertical bars at the beginning of the row of the top piece. This prepares the two pieced to be seamed.
To begin seaming, insert the needle behind the front vertical loop of the edge stitch and the back vertical bar of the first Tks in the top row.
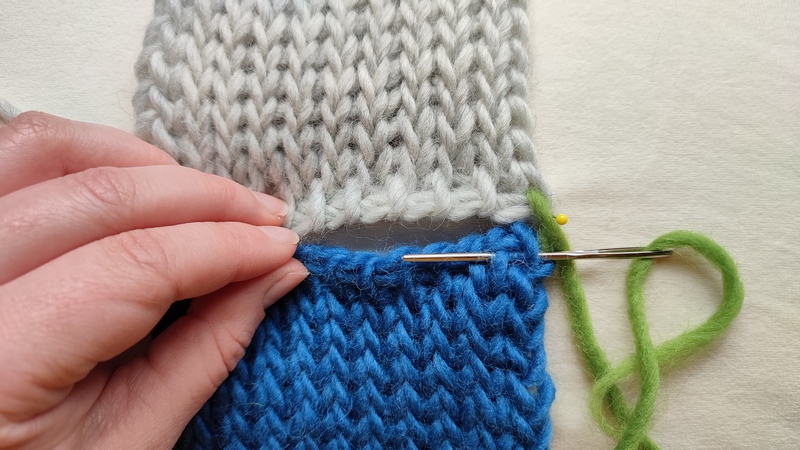
Then insert the needle behind the 2 vertical bars of what appears to be* the first stitch in the top piece. Pull the thread through.
* this only appears to be a Tks, but it’s in fact made up of one loop of the Ls and the front vertical bar of the last Tks on the last row of the top piece.
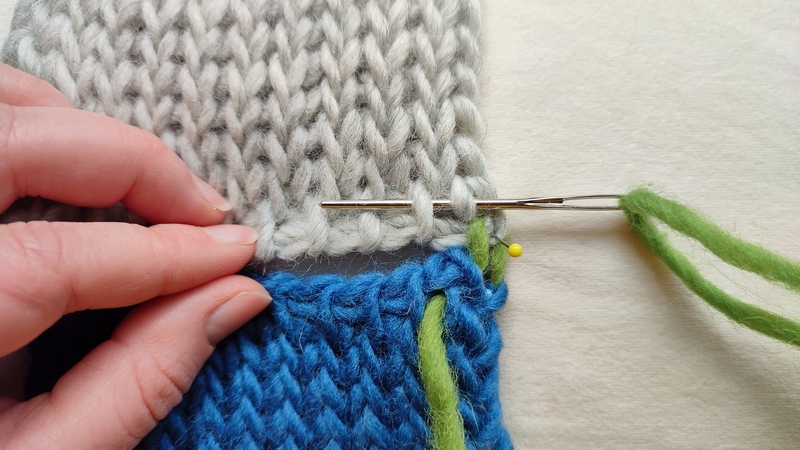
In the bottom piece, insert the needle behind the front vertical bar of the first stitch and the back vertical bar of the second stitch and pull the thread through.
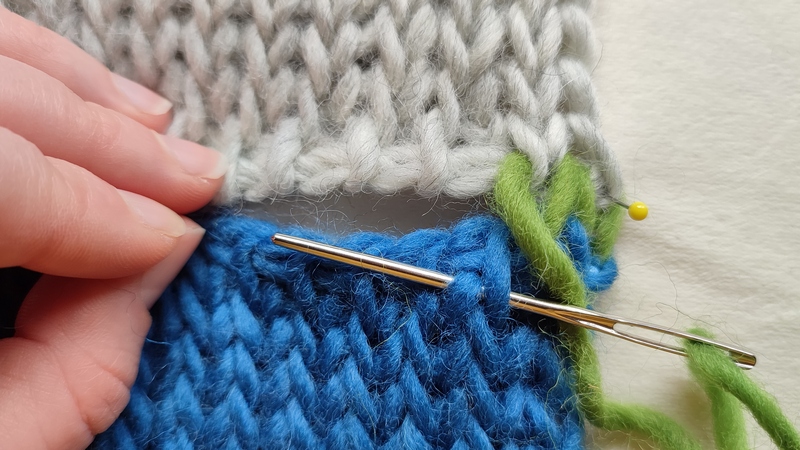
In the top piece, go behind the 2 vertical bars of what appears to be the next stitch.
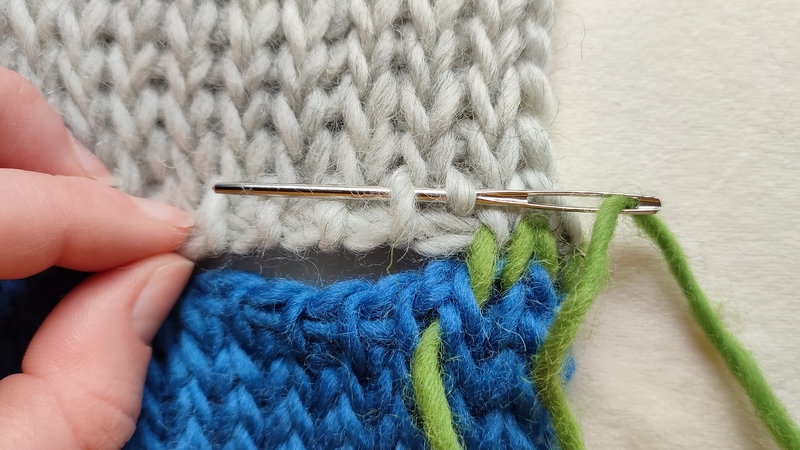
In the piece below, go behind the front vertical bar of the same stitch you used before and behind the back vertical bar of the next stitch.
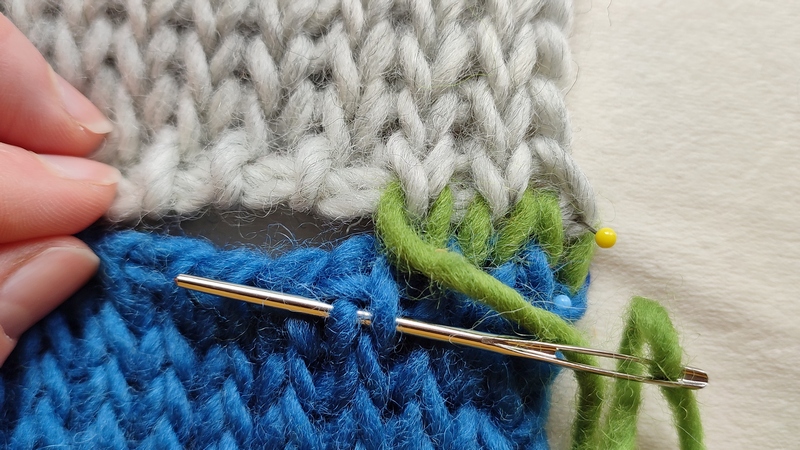
Repeat this process until you reach the last stitch on either side.
In the bottom, insert the needle behind the front vertical bar of the last Tks and behind the first bar of the Ls (last stitch).
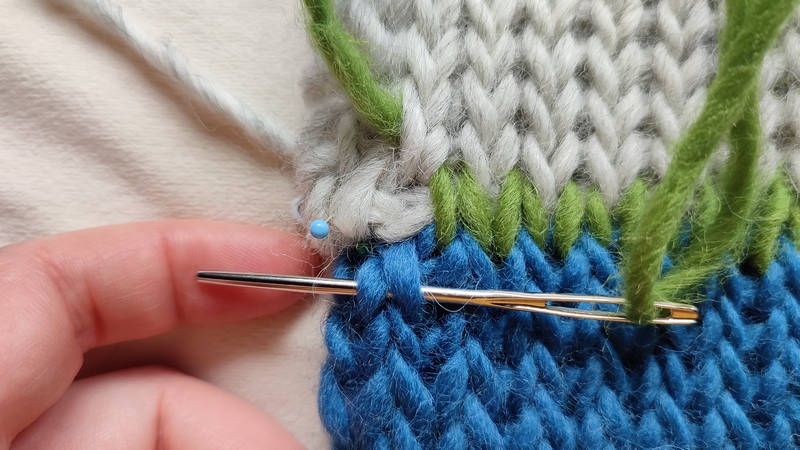
At the top, insert the needle behind the 2 vertical bars of what appears to be the Ls.
In reality, this is made up of the back vertical bar of the first Tks of the row and the front vertical bar of the Fs (first stitch in Tunisian crochet or the stitch we don’t work into usually), but the piece is upside-down.
I seem to have made a mistake here (it’s correct in the video). I will fix it when time allows.
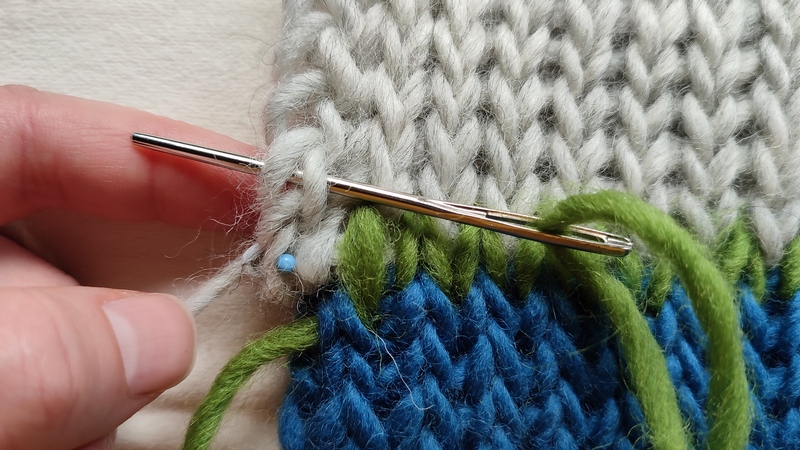
To finish the seam, go back to the bottom piece and insert the needle behind the back loop of the Ls and take the thread to the back.
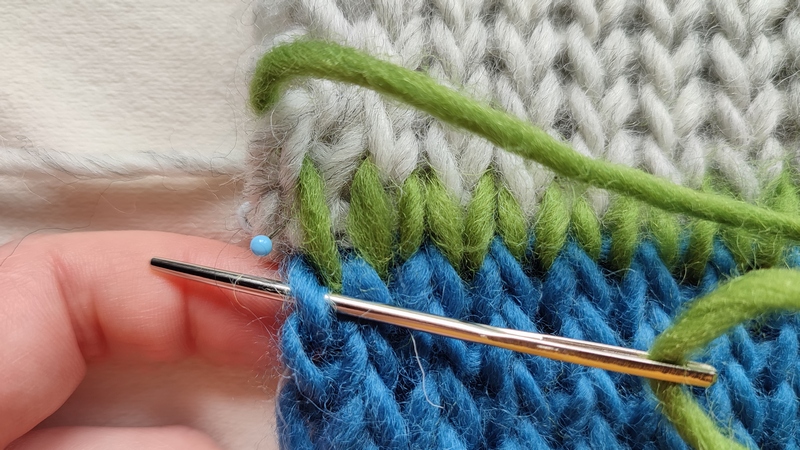
The resulting seam looks like an extra row of knit stitches. If you want to keep this extra row, you can weave in the ends.
You will notice that the two pieces are offset by half a stitch. That is the nature of such grafting, even in knitting.
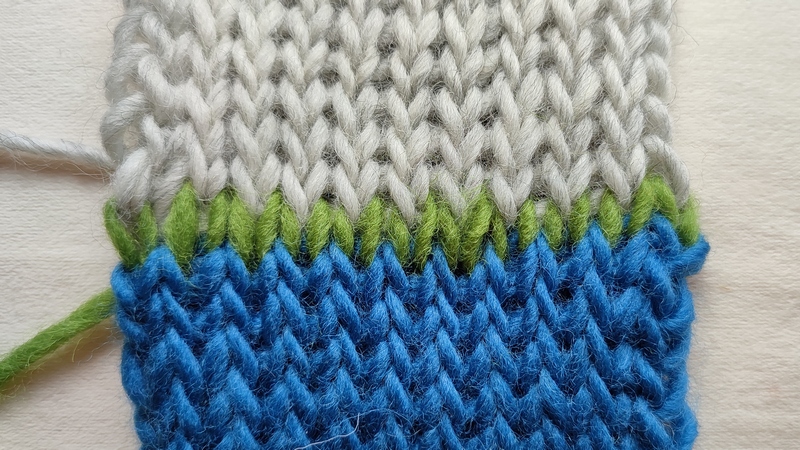
Since this type of seam is normally used to put garment pieces together, I recommend you tighten it.
Pull on the seaming thread until it goes straight through the fabric and pulls the two sides together, almost as if they were made at the same time.

Weave in the ends to secure the seam. Now the seam will be tight and sturdy.
This seam is best for attaching garment pieces together, where the seam is essential in supporting the garment and is a structural element.
On the back you will have a ridge, which is composed of two return pass chains that were pushed to the back.

There is a way to reduce the bulk of this seam, by using the tails to flatten out the two chains while weaving in the ends.
I will demonstrate that in a future video. It works for vertical and horizontal seams.
In the near future I will also create a tutorial for seaming Tunisian knit stitches vertically and we will take advantage of the knit stitch appearance of the first and last stitches in fabric made with Tks.
If you want to know when that is ready, make sure to subscribe to my email updates (see below).
And if you’d like to expand your Tunisian crochet skills, here are some tutorials for you:
- Tunisian crochet in the round with a double ended hook
- How to make Tunisian crochet mosaic and how to read mosaic charts
- How to make filet Tunisian crochet6 different types of Tunisian crochet ribbing
- Free pattern for a border to stop Tunisian crochet projects from curling
- The most elastic Tunisian crochet ribbing
- Does crochet use more yarn than knitting? How about Tunisian crochet?


