If you’re curious about the process of designing a crochet pattern, in this article I go in detail into my own process, as a designer with almost a decade of experience in publishing patterns.
This was prompted by someone asking in one of the crochet groups I’m in how people go about designing their own patterns.
It was not clear if they were asking about patterns for personal use or for selling, so I answered both. Because the process differs, based on your intention with the pattern.
Do you want to design something that fits you or is suitable for some yarn in your stash, or do you want to design professionally and publish crochet patterns?
In either case, I will share what I do, step by step, with explanations of what exactly happens at each step.
This article assumes that you have already chosen the yarn you’ll be working with and have enough of it to make your desired project.
Contents
Designing a crochet pattern for personal use
When designing for yourself, there is very little pressure to make something polished or even comprehensible by anyone else but yourself.
This is what I do for a personal pattern:
- first make a rough sketch of the project;
- make a swatch or several with the chosen yarn and take measurements to know what gauge I’m working with;
- make a list of measurements that are needed to get the thing to fit as desired (including ease);
- calculate the needed numbers of stitches/rows/motifs using the gauge and the measurements;
- draw chart(s), if applicable (I do this most of the time);
- make the sample, keeping track of stitches/rows.
A personal pattern is something that you may use once or several times.
This means that you might write it up or not at the end, but I usually just keep the charts.
Let’s go into some detail for each of these steps.
1. Sketching the project
I always start with a sketch. It helps me visualize what I want the final project to look like, but also the process through which I need to arrive at that product.
Some patterns are easy to sketch (a rectangular blanket), while others not so much (a set-in sleeve sweater with wavy lace), but it always helps to just draw stuff and have a rough idea of:
- what goes where;
- what shaping will be needed;
- how many pieces there will be;
- rough shape and placement of lace or cable or colorwork.

Based on what you are making, this will help you decide on the construction (top-down or bottom-up, sideways, single piece, multiple pieces, short rows or no short rows) and whether you need multiple pieces or you can work it all in one piece.
You can also use this opportunity to plan colors and color disposition, if you’re making a multicolored project.
This is a great time to just pick up a pencil or several and have fun, sketching multiple things, until you arrive at your desired design.
The sketch doesn’t need to be professional or even big, just big enough that you can use it to visualize your project.
You can use it later on to add measurements to it, or you can sketch various elements of the design in more detail later on.
2. Swatching for gauge
This is an extremely important step that you should not skip, unless you’ve worked with the same yarn before and have used the same stitch pattern.
For most cases, you’ll need to make a swatch with your chosen yarn. Or several, depending on how many different stitch patterns you intend on using.
Swatch making is a process into itself and you can read more about that in the article I wrote about swatching in Tunisian crochet or making a swatch in regular crochet.
Once you have made and blocked your swatch (using the method suited to your yarn), keep your swatch flat and count stitches and rows in a 10 cm by 10 cm or 4″ by 4″ square in the middle of your swatch to get your gauge.
I like to count in multiple spots, using a simple gauge ruler, just to be sure.
You can express the gauge in stitches or rows per 10 cm or stitches or rows per cm, whichever option you prefer.
You need the gauge for each stitch pattern you plan to use.
3. List of measurements
In many cases, you can’t plan a proper design without measurements. The needed measurements vary based on project type:
- For a blanket, a rectangular wrap/stole or a scarf, you’ll want width and length;
- for a hat you want crown diameter or circumference and hat depth;
- for mittens or gloves you want wrist circumference, hand circumference, individual finger lengths (at least thumb and middle finger);
- for a sock/slipper you will need the ankle, calf and foot circumferences, plus foot length;
- for a sweater or cardigan you want at least:
- upper bust and full bust circumference;
- hip circumference;
- bicep circumference;
- wrist circumference;
- armhole depth;
- torso length;
- arm length;
- shoulder width;
Plus you need to add ease to any garment design.
For some projects you don’t need the final measurements, since you can make them as big as you like, especially triangle or crescent shawls that grow from a point.
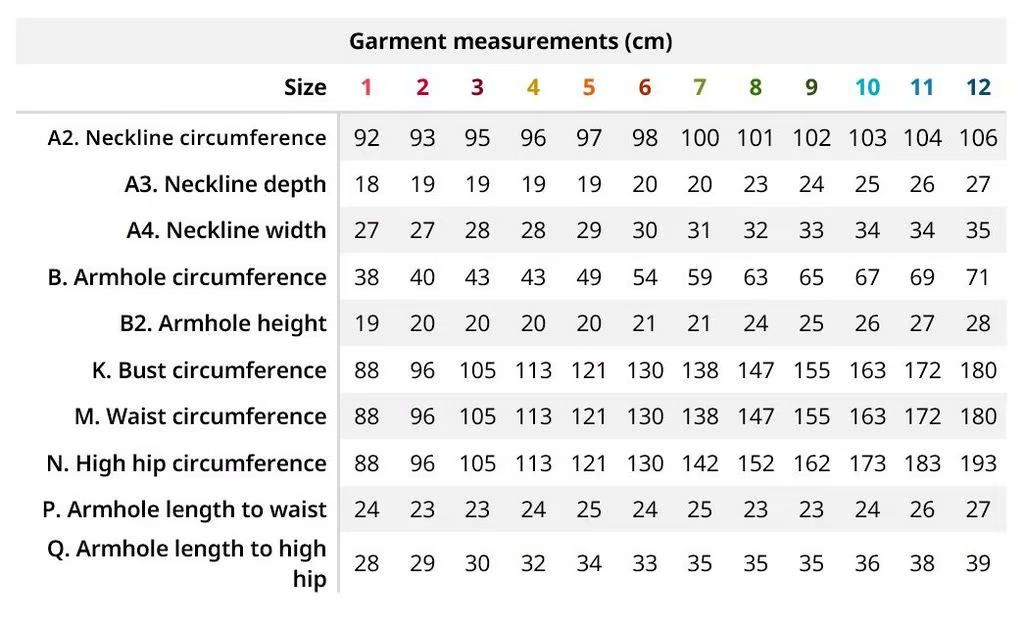
4. Calculating stitches/rows/motifs
Once you have your measurements, the shape sketched out, and your gauge, you can start calculating the various stitch counts and row counts needed to achieve your desired shape.
The easiest way is to use cross multiplication to find out how many stitches or rows you need for each edge of your design.
For a rectangle, this is easy. You will have 2 resulting numbers. If you use multiple stitch patterns, you will have to calculate each section separately.
For a more complex shape, like the front of a sweater, for example, you can divide the piece into sections and calculate stitch and row counts for each section.
See the example below, where I divided the front of a sweater into the lower body, upper body, upper side and shoulder shaping.
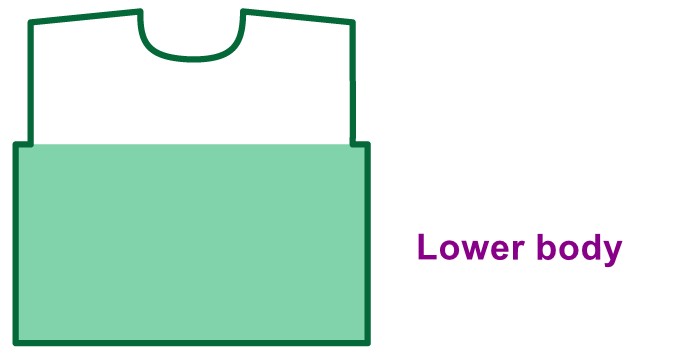
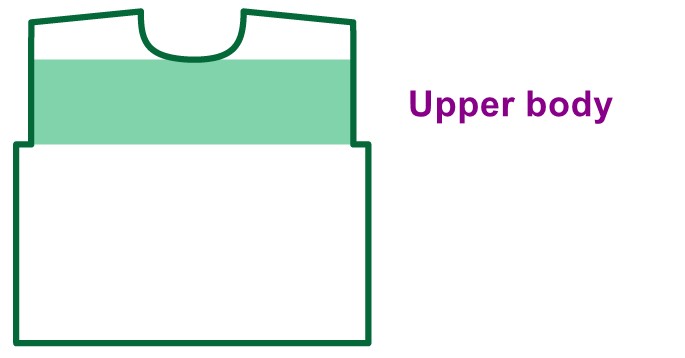
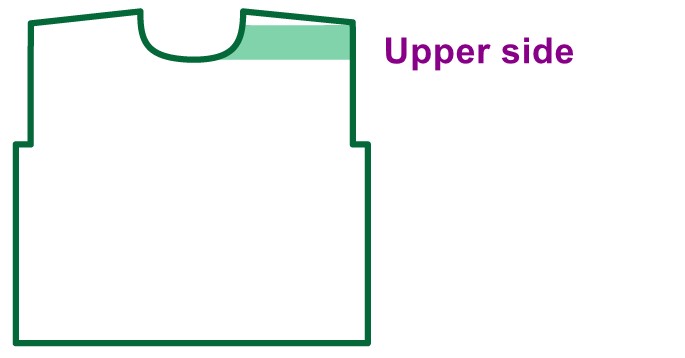
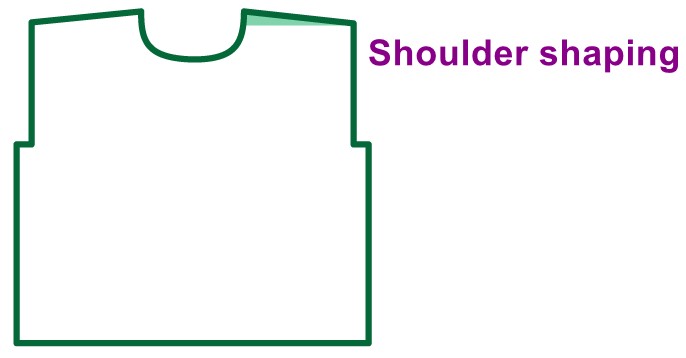
For such a shape, you will calculate stitch and row counts for each section, so you can also plan the shaping needed to reach those stitch counts.
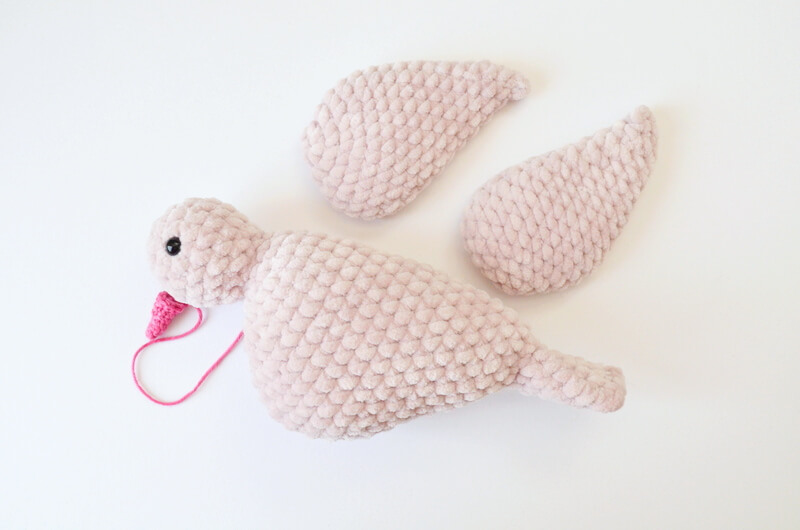
For a 3D object, like amigurumi, you use the same principles, except you work with circumferences more than flat pieces.
5. Drawing chart(s)
Once you have your basic shapes down, plus your stitch count, you can either start working on your project, or start drawing charts.
Since I usually enjoy working with complex stitch patterns or colorwork designs (mainly Tunisian crochet mosaic at the moment), this step is not optional.
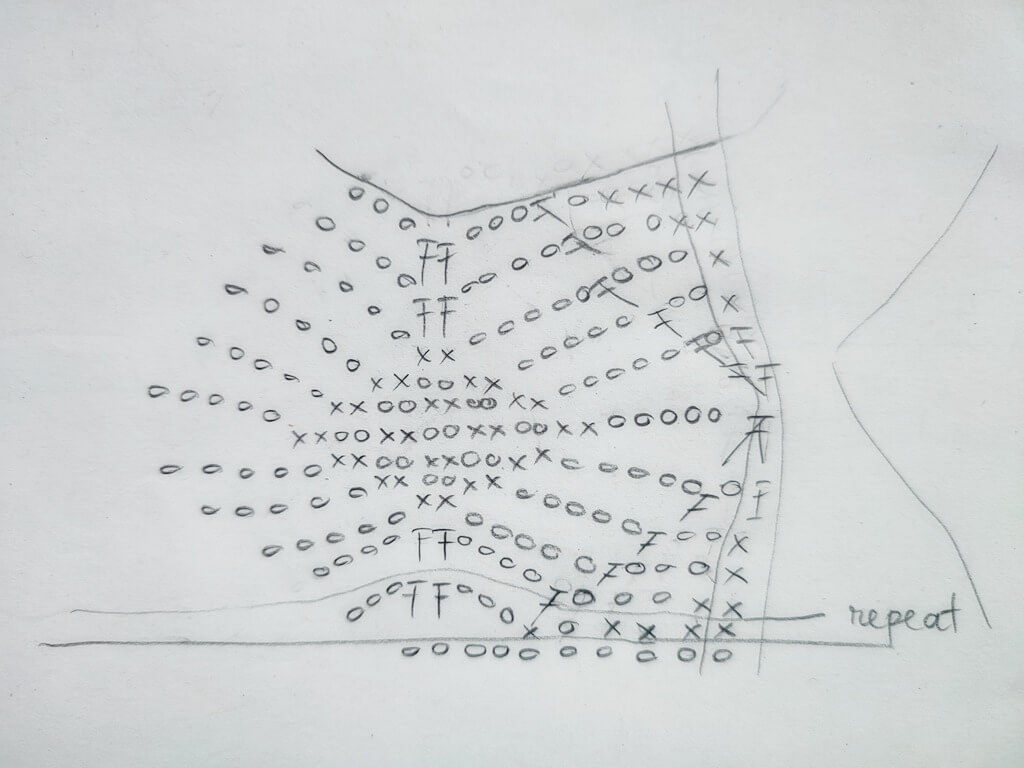
I like to draw regular crochet charts by hand on paper, and Tunisian crochet and knit charts in Stitch Fiddle.
There’s a lot of trial and error that goes into making a chart or several, which is why I prefer to draw by hand when it comes to regular crochet.
I use a soft pencil lead (2B) and a high quality eraser to draw on off-white paper (the bright white of printer/drawing paper gives me headaches) and to erase and redraw until the pattern looks right.
For Tunisian crochet and knit designs, it’s easier to use a grid and the convenience of the copy and paste tools in Stitch Fiddle.
Sometimes, though, I draw out Tunisian crochet stitches by hand as well. It all depends on the complexity of the project.
6. Making the sample
Only once all of the other steps are done, do I start making the actual project, using the chart and the stitch counts as a guide.
The whole planning/swatching/sketching/drawing process takes me usually between a couple of hours and a few days, but the actual project can take months.
So it’s better to have all of this stuff done and out of the way, so I can then just have fun making the thing.
Sometimes I write down on paper what I’m doing as I’m doing it, with row numbers and instructions.
Sometimes I just write down the starting stitch count and read the chart and make the thing, stopping to write down only something out of the ordinary.
This is a process I arrived at over the years, with hundreds of projects completed up to this point (no, I don’t put them all up on Ravelry, but I do seem to have listed 195 completed projects on there at the time of writing).
This might not be your exact process of planning an original design, but this is what I do when working on personal projects.
If you’re curious about my process for patterns that get published, then read on.
Designing a commercial crochet pattern
You may have noticed that in the list above I did not include “writing out the entire pattern”.
That’s because it’s not necessary for me to have a written pattern, as I prefer to work from charts and minimal instructions.
But if I want to publish the pattern, then I write it all out. I still do everything above, but also a lot more afterwards.
The following is for you if you want to design professionally and publish your patterns for sale. I have previously written about finding your niche as a crochet designer and about making your own charts.
For a commercial pattern, these are the extra steps:
- compile a table of measurements for the different sizes;
- pick an amount of ease for all sizes;
- grade the different sizes (using a spreadsheet);
- write up the pattern, including all sizes;
- take photos of important steps;
- film tutorials of new/unusual stitches where applicable and edit them;
- digitize the chart(s);
- export the chart(s) in the proper format that will look good printed and is easy to read/follow;
- take sample photos and video;
- organize the text and charts in a document;
- tech editing/testing;
- converting from US to UK terms to give people options;
- optional: convert both to easy read version (big text, no images/charts).
Now let’s go into detail for each of these steps.
1.a. Table of measurements
Usually patterns come (or should come) with multiple sizes of project, and here I’m referring to all sorts of project types, not just garments:
- accessories like hats, cowls, socks, mittens and gloves;
- home decor projects like blankets, pillow cases, tapestries, drapes.
That means that the first thing you need for designing professionally is a table of measurements for the type of project you want to design.
Having a design in only one size usually reflects poorly on the designer (in my opinion) and doesn’t inspire trust in their ability as a pattern creator.
You can have these measurements organized in a table or several, based on the type of project you want to design.
There are multiple tables of measurements available for free, including mine for garments (upper body only), which I share in the hopes that fellow designers can use as a starting point to create their own.
1.b. Choosing garment ease
This happens at around step 3 in the first list and it mainly happens for garments, not so much for accessories.
It’s an important step that will influence how the garment fits across the range of sizes and how much wiggle room there is for people who fall between sizes (which is most people).
Since I use a wide range of measurements, as I am all for size inclusive garment design, the circumferences usually increase by 10 cm from size to size, so the ease should balance out these differences
Different parts of the body require different amounts of ease for a comfortable fit, though. For sleeves I like 5 cm of ease, while for the body I like between 10-20 cm of ease, depending on the thickness of the fabric and the drape of the stitch pattern.
Fabrics with lots of drape look and feel better with a lot of ease, which more structured fabrics fall nicer on a body with less ease. Even negative ease in the case of knits, which are elastic for the most part.
Using the table of measurements and the desired ease at the various points, you compile a new table of garment measurements that includes the ease in the essential points.
2. Grading using a spreadsheet
Once you have your table of garment measurements, the process is similar as in step 4 of the first list, where you calculate all the needed stitches and rows, but this time you do it for all the sizes in the pattern.
I do this in a spreadsheet and I recommend that you do it too. You can use a formula in one cell and copy it across, to make calculating everything easy.
I don’t currently have an example of a spreadsheet that doesn’t look like clown barf (I like to color-code rows in a variety of colors because otherwise I lose my place and get distracted and forget what I was doing).
However, Claire from Sister Mountain has done a great job of showing you the process of grading in a spreadsheet here.
She also shares various formulae that you can use. I most often use:
- cross multiplication with a fixed value for gauge (press F4 to fix a value);
- MROUND or ROUNDDOWN to round numbers (here’s a breakdown of functions for rounding);
- MOD for calculating leftover rows after decreases;
- obviously SUM for calculating sums over ranges.
You can grade each piece individually, if you have multiple, or just make a long list.
I like to separate the grading into chunks, as it makes it easier to write the instructions.
3. Making digital charts
Even before the sample is made and the pattern is written, I usually focus on making the chart easy to print and follow.
For regular crochet, I digitize the hand-drawn chart and for Tunisian crochet or knitting I clean up the chart and draw repeats.
This helps me not only to make the sample, but also to write the pattern.
4. Writing the instructions
Writing from the spreadsheet
Once you have a complete grading spreadsheet, you use it to write the instructions for all the sizes together.
I like to write them like this: 1, 2, 3 (4, 5, 6) [7, 8, 9] {10, 11, 12}, where the numbers represent each size in the pattern.
This layout is easy to read and parse by someone glancing at a pattern. I’ve seen other designers use different layouts, such as 1 (2, 3, 4, 5, 6) or 1, 2, 3 (4, 5, 6) (7, 8, 9) and various other variants.
If an instruction is missing for a particular size, I usually put a dash instead of the number corresponding to the specific size, like this 5, -, – (10, -, 2) and so on.
To write the instructions from the spreadsheet, you read each row from the spreadsheet and write a corresponding row of instructions, including the stitch or row counts for all the sizes.
Then you go to the next row and repeat the process, until you’ve gone through the entire spreadsheet.
Writing from charts
I use a pointer (a long Tunisian crochet hook…) to keep track of each stitch in the chart, while writing down the abbreviation for each stitch.
Yes, this is a very manual process and I sometimes make mistakes, but I check each row by reading the chart and the instructions while I make the sample.
For Tunisian crochet and knitting I have an easier process, as I use Stitch Fiddle to generate the instructions from the charts.
As long as the chart is correct and I set up all the proper bits and bobs (there’s a bunch of those), the text that is generated only needs a little bit of editing.
Spreadsheets and charts
If you need to use both a grading spreadsheet and a chart or several, there are different ways to go about it.
- You can include the pattern repeat in the written instructions, along with the different sizes.
- You can write out the pattern repeat from the chart separately and then refer to the row number in the chart when writing the instructions for the different sizes.
In knitting patterns that I’ve used so far, the second option is more popular, but I use one or the other, depending on the shape of the design.
Extra parts of the pattern
Besides the actual written instructions, you also need to add all the other details that make a pattern a pattern, namely:
- title;
- introduction;
- skill level;
- schematic and measurements;
- abbreviations;
- observations or notes;
- gauge swatch instructions;
- optional: charts, photo tutorial.
These are all things that should appear in your pattern to make it professional.
I go into more detail on what each section of a crochet pattern should include in this separate article.
This part sometimes takes weeks to complete.
After you have a made a few patterns, you can reuse elements from them for new patterns, such as specific abbreviations or observations that are universal, but everything else will be original to the current pattern.
For regular crochet, I use two monitors. On one the chart is open, with the current row highlighted, on the other I have my text editor.
5. Photo or video tutorials of important steps
One of the optional elements in a pattern are photo or video tutorials, which you can create while making a sample of your design.
I said “a” sample, instead of “the” sample because usually in this case you make more than one sample and generally use the second one for tutorials.
Usually the first sample shows you if your pattern works, then the second one can be used to illustrate things.
Of course, if you’re designing socks or gloves or other things that come in pairs, you can use the second item for the tutorials.
6. Sample photos and video
Once the sample is complete (or samples, if you have made several), nice photos need to be taken, to show folks what the finished object looks like, so they want to make one.
This means blocking the sample and finding the right time and background for a nice session of photography.
I’m not great at this part, but I do my best to showcase the sample in the best light (ideally outdoors on an overcast day) and to show multiple views of the item.
People want to see:
- the item spread out flat;
- on a person, if applicable, from the front and the back;
- the right side and the wrong side of the fabric, if it’s not reversible;
- a close-up of the stitches;
- a close-up of unique design elements.
You can also film a few short clips to use for promotional purposes on social media and on Etsy, if you plan on selling on Etsy.
7. Organizing everything in a document
Once you have everything, including the sample photos, it’s time to put everything together.
I like to add a big photo of the project on the title page, so people know at a glance what type of item it is, plus the name in big letters.
Then I’ll add all the things listed in section 4, one after the other, with big headings to make the pattern easy to parse and to make it easier for folks to find their way.
If the pattern is longer than 10 pages, I usually add a table of contents too, right after the instroduction.
The text is organized in two columns, as I find this saves space and makes the instructions easier to read.
There are also many paragraph breaks and the spacing between paragraphs is generous, to make it easy to discern where the instructions for one row begin and end.
I also ensure that all the lines of instructions for a row stay together.
After the written instructions come the charts, with the legend on the first page with the charts, or on the page with the explanations about the correct way of reading the charts.
It’s important to add the photo tutorial to a separate section towards the end of the pattern, after the charts, so the people who print your pattern can skip those pages and save ink.
Ideally you’ll either caption the photos, and refer to them in the pattern, or you will add a short description of each step that is illustrated in the photos. I prefer the latter.
8. Tech editing and testing
Some designers send patterns to tech editors before putting it into a printable, easy to read version.
I prefer to have the nice looking, nearly finished version to send out to anyone, be it a tester or a tech editor.
Currently, I don’t use tech editing services, as I am pretty confident in my pattern-writing and editing abilities, so I only send my patterns to testers.
Testing usually lasts for 2-3 months for the big patterns that I normally hold testing calls for. The testers find minor errors, which I correct quickly.
I wrote a separate article about what makes testing a good experience, in my opinion, and you could take a look at that if you want ensure a good testing process for your testers.
9. Converting from US to UK terms and easy read version
Before testing, for regular crochet I usually convert the testing file from US terms (that I write in) to UK terms for any testers that are from the UK or prefer those terms.
It is always easier to convert from US to UK terms.
During testing, when things come up, I usually update both files.
Then I often convert these both into an Easy Read or Low Vision version.
I honestly rather recommend these as mobile-friendly versions, since they are so easy to read on mobile and most folks with severe vision loss don’t crochet or know of my patterns.
Wrapping up the pattern design process
The final step is always enjoying the final project, as I always design things that I find useful or interesting to have and/or to wear.
This is the reason I started designing in the first place.
I hope this overview of my design process helps you create your own.
If you want a quick checklist with everything included in this article, subscribe to my emails in the box below and get the checklist.
I’ll see you in there!
