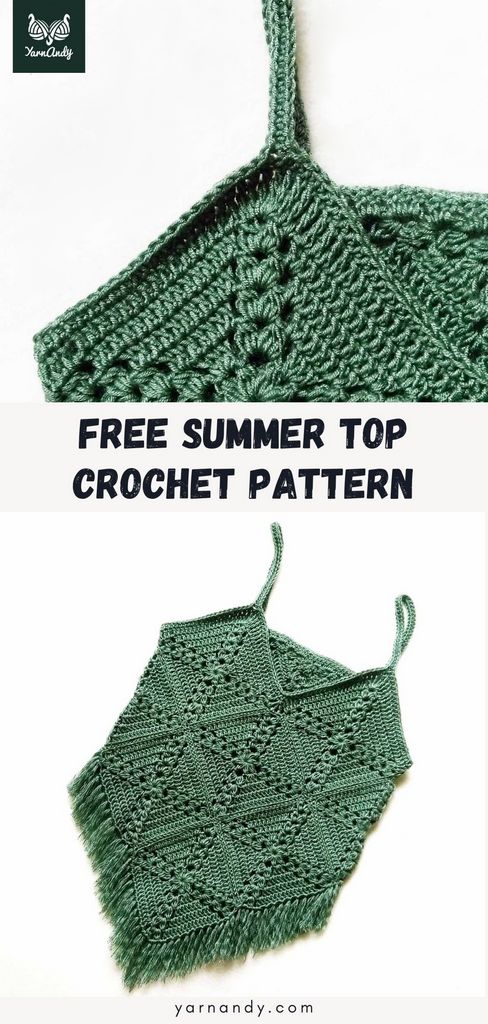
Getting ready for summer? Here’s a free pattern for a crochet summer top that you can make yourself. It is fully size inclusive, up to a bust of 75″, with lots of layout options.
Contents
About this crochet summer top pattern
A beginner crochet pattern made up of squares arranged in one of many layouts, to fit any body size.
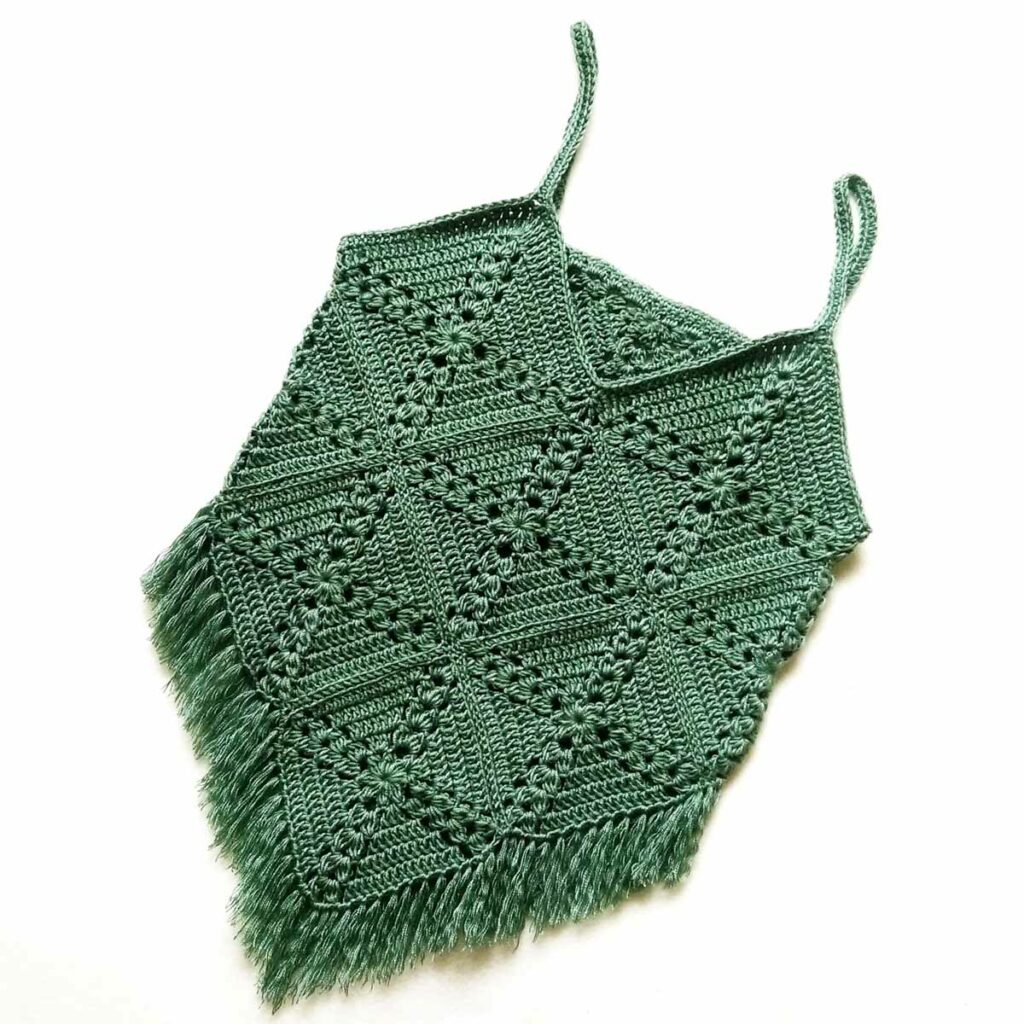
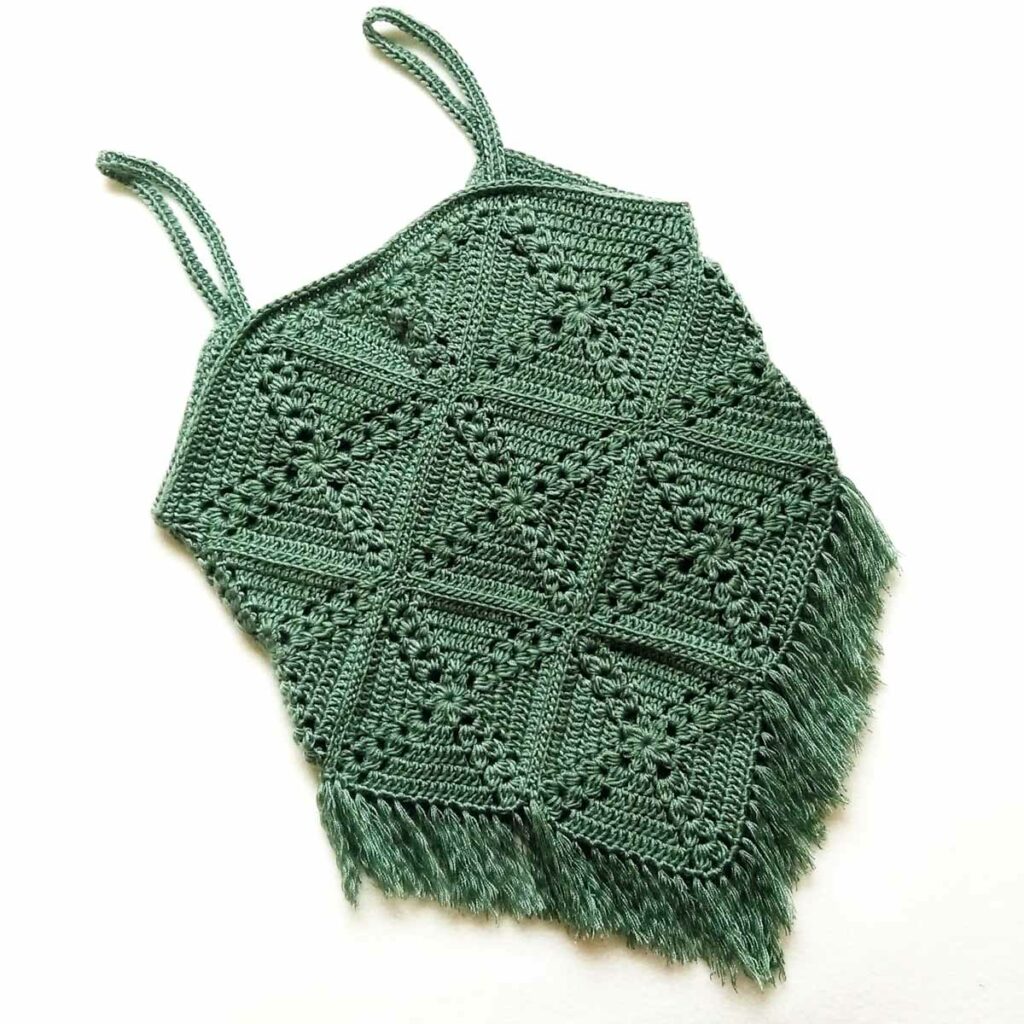
The disposition of the squares on a diagonal makes the fabric lay on a bias and allows it to mold to the body.
The diagonal crosses of puff stitches on each square create a mesmerizing texture on the surface of the garment, and the optional fringe adds a bit of playfulness to this simple design.
If you want to play with other granny square designs, you might try this granny square design from the blog or this granny square inspired by vintage designs, although that one is easier to scale up than down.
Note. An earlier version of this pattern has been available as a free download for several years. That version was not size-inclusive and only had one layout.
For an updated PDF version with US and UK terms, plus charts and a printer-friendly page layout, please visit the pattern shops at the links below.
Finished dimensions
See the size chart below.
The sizes in the text are ordered as follows: 1, 2, 3, 4 (5, 6, 7, 8) [9, 10, 11, 12], where applicable.
| Size | 1 | 2 | 3 | 4 | 5 | 6 | 7 | 8 | 9 | 10 | 11 | 12 |
| Square side (cm) | 10.5 | 12.5 | 14.5 | 10.5 | 16.5 | 12.5 | 10.5 | 14.5 | 16.5 | 12.5 | 14.5 | 16.5 |
| Square side (“) | 4.25 | 5 | 5.75 | 4.25 | 6.5 | 5 | 4.25 | 5.75 | 6.5 | 5 | 5.75 | 6.5 |
| Square diagonal (cm) | 15 | 18 | 21 | 15 | 24 | 18 | 15 | 21 | 24 | 18 | 21 | 24 |
| Square diagonal (“) | 6 | 7 | 8.25 | 6 | 9.5 | 7 | 6 | 8.25 | 9.5 | 7 | 8.25 | 9.5 |
| Bust circumference (cm) | 60 | 72 | 84 | 90 | 96 | 108 | 120 | 126 | 144 | 144 | 168 | 192 |
| Bust circumference (“) | 23.5 | 28.3 | 33 | 35.5 | 37.8 | 42.5 | 47.3 | 49.5 | 56.8 | 56.8 | 66.3 | 75.5 |
| Layout | A/B | A/B | A/B | C/D | A/B | C/D | E/F | C/D | C/D | E/F | E/F | E/F |
Skill level
Beginner – you will work with simple repeats of plain and puff stitches.
Observations
This pattern includes multiple layouts for your preferred shape and size.
Multiple combinations of layouts and square sizes are possible for the same body measurements.
The suggested layouts are based on standard measurements, as seen in the table above.
There is no ease included in the pattern. You should choose a size with sufficient ease for your comfort.
Depending on your chosen seaming method, some ease might be introduced when seaming the squares.
If desired, work the squares in a join-as-you-go fashion, following the layout for your size.
All the rows begin at the corner, which is why there will be a Dc instead of chains in the last corner.
When beginning a row, work around this Dc as if working around a chain.
If you prefer to follow charts, go to page 12 for charts for the square and the triangle.
An extra chart is provided for the edging around the top. Leave long tails for sewing the squares together.
Construction
Materials
- Hook: 3.5 mm for the main part, 5 mm for adding the fringe;
- Notions: yarn/tapestry needle for weaving in ends and sewing pieces together; embroidery or other thin Scissors for the fringe;
- Yarn: DK weight cotton or microfiber yarn with 125-130 meters per 50 grams.
Yarn usage per size, for layouts A, C or E: 380, 440, 520, 590 (640, 680, 1050, 810) [990, 1220, 1460, 1780] meters or 410, 480, 570, 640 (700, 740, 1150, 890) [1080, 1330, 1590, 1950] yards.
Yarn usage per size, for layouts B, D or F: 480, 560, 670, 820 (810, 950, 1260, 1130) [1390, 1460, 1750, 2130] meters or 530, 610, 730, 900 (890, 1030, 1380, 1240) [1520, 1590, 1910, 2330] yards.
These are estimates only for making the squares and actual yarn consumption might be smaller.
Use the remaining yarn for the finishing touches and the fringe.
Abbreviations
- 4TrCl – tall cluster: Rep [YO twice, insert hook in the working Sp and draw up a loop, Rep [YO and pull through two loops on hook] 2 times] 4 times, YO and pull through 5 loops on hook;
- Beg Cl – beginning of row cluster: pull up the working loop (the height of a Dc), YO using the tall loop, insert hook in the working Sp and draw up a loop, YO and pull through two loops on hook, Rep [YO, insert hook in the working Sp and draw up a loop, YO and pull through two loops on hook] 2 times, YO and pull through 4 loops on hook;
- Ch – chain;
- Cl(s) – cluster(s) (worked in same Sp): Rep [YO, insert hook in the working Sp and draw up a loop, YO and pull through two loops on hook] 3 times, YO and pull through 4 loops on hook;
- Dc – double crochet;
- HDc – half double crochet;
- MR – magic ring;
- Rep – repeat;
- Sc – single crochet;
- Sl St – slip stitch;
- Sp(s) – space(s);
- St(s) – stitch(es);
- Tr – treble crochet: YO twice, insert hook in the working Sp and draw up a loop, Rep [YO and pull through two loops on hook] 3 times;
- YO – yarn-over.
Instructions
Square pattern
All sizes begin with the same base of 4 rows.
Work with the small hook.
Begin with magic ring.
Row 1. In the MR: Beg Cl, Ch 2, Rep [Cl, Ch 3, Cl, Ch 2] 3 times, Cl, Ch1, Dc in top of first cluster.
Pull the tail of the magic ring tight enough to bring the clusters together. You can repeat this at the end, to make the tension identical in all the squares.
Do not turn. Continue working on the same side.
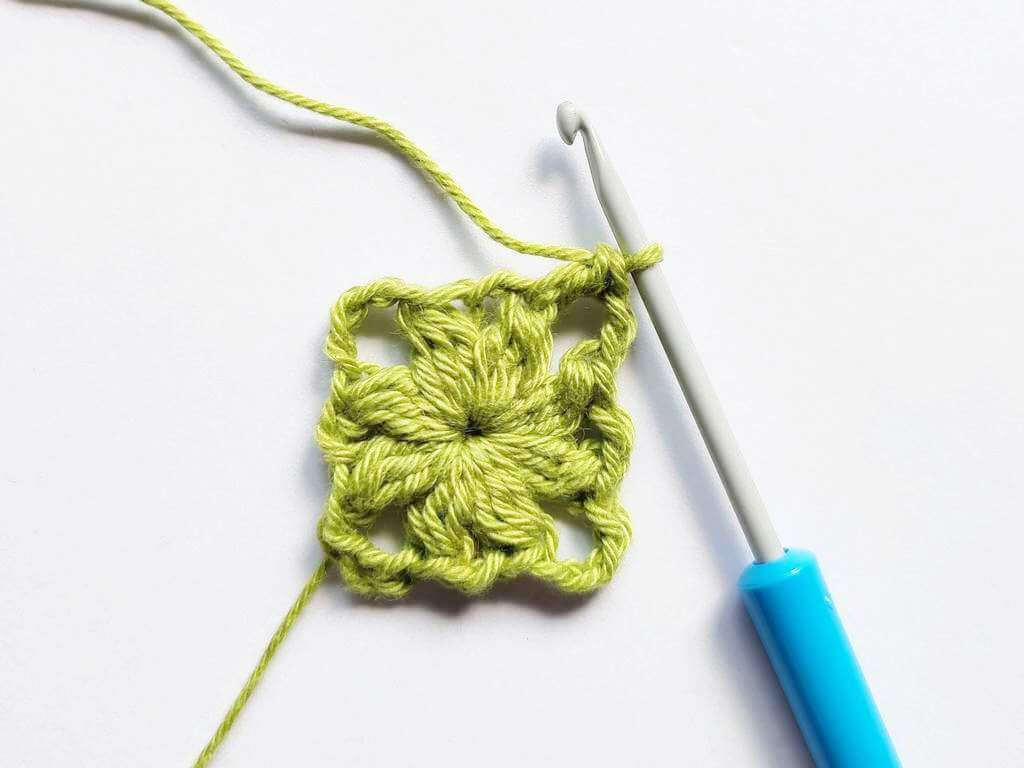
Row 2. Beg Cl in corner space, Rep [Ch 2, 3 Dc in Ch 2 Sp, Ch 2, {Cl, Ch 3, Cl} in corner Ch4 Sp] 3 times, Ch 2, 3 Dc in Ch 2 Sp, Ch 2, Cl in corner Sp, Ch1, Dc in top of first Cl.
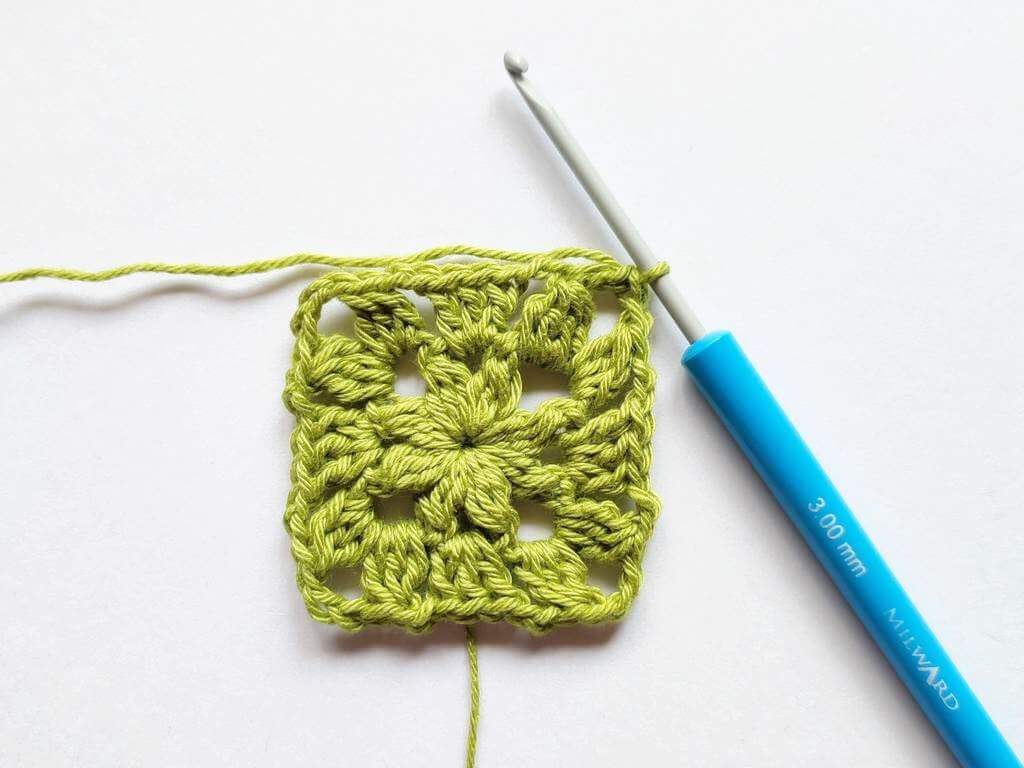
Row 3. Beg Cl in corner Sp, Rep [Ch 2, 2 Dc in next Ch 2 Sp, 3 Dc, 2 Dc in next Ch 2 Sp, Ch 2, {Cl, Ch 3, Cl} in corner Ch 3 Sp] 3 times, Ch 2, 2 Dc in next Ch 2 Sp, 3 Dc, 2 Dc in next Ch 2 Sp, Ch 2, Cl in corner Sp, Ch1, Dc in top of first cluster.
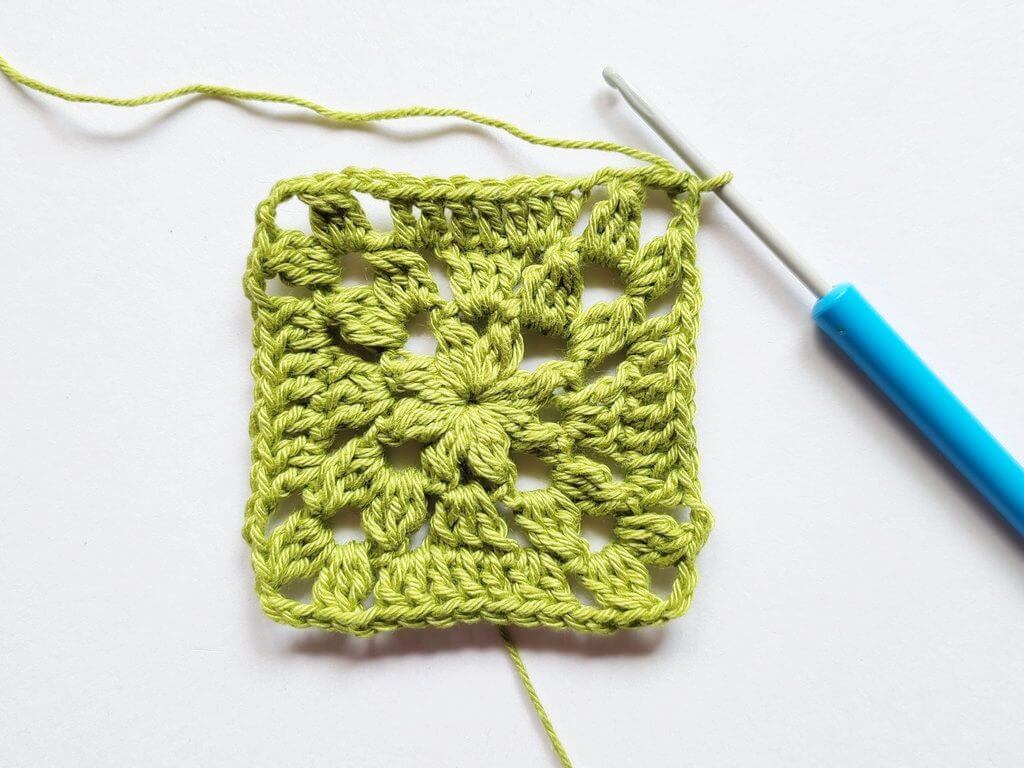
Row 4. Beg Cl in corner Sp, Rep [Ch 2, 2 Dc in next Ch 2 Sp, 7 Dc, 2 Dc in next Ch 2 Sp, Ch 2, {Cl, Ch 3, Cl} in corner Ch 3 Sp] 3 times, Ch 2, 2 Dc in next Ch 2 Sp, 7 Dc, 2 Dc in next Ch 2 Sp, Ch 2, Cl in corner Sp, Ch1, Dc in top of first cluster.
Stop here for sizes 1, -, -, 4 (-, -, 7, -) [-, -, -, -].
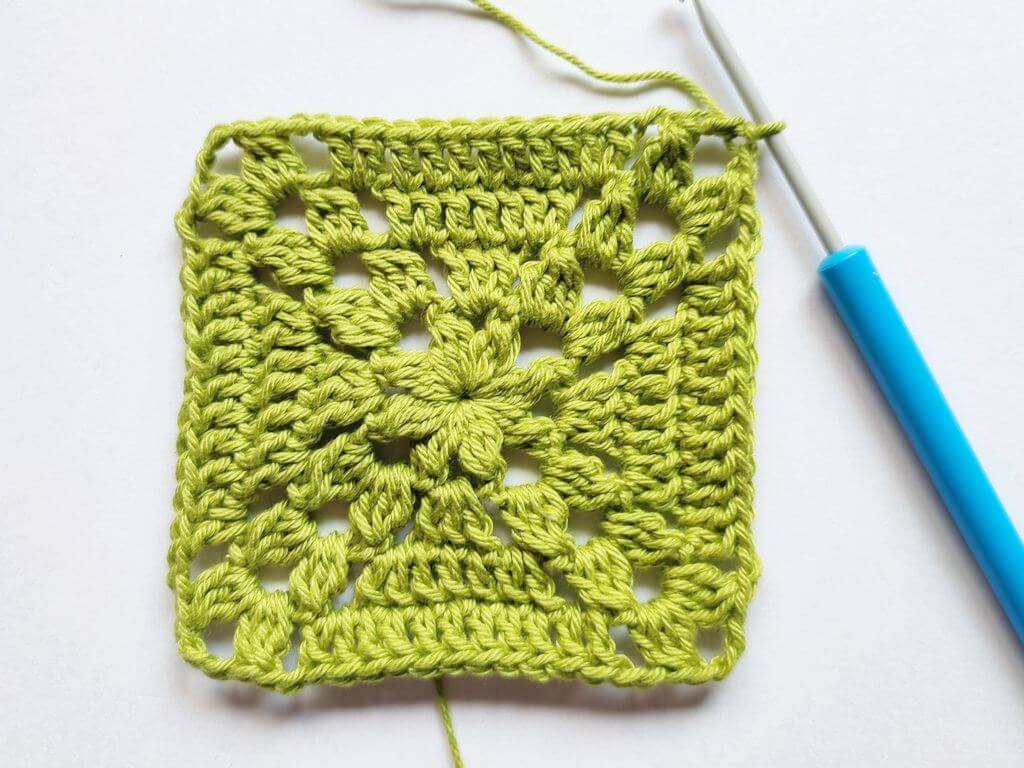
Row 5. Beg Cl in corner Sp, Rep [Ch 2, 2 Dc in next Ch 2 Sp, 11 Dc, 2 Dc in next Ch 2 Sp, Ch 2, {Cl, Ch 3, Cl} in corner Ch 3 Sp] 3 times, Ch 2, 2 Dc in next Ch 2 Sp, 11 Dc, 2 Dc in next Ch 2 Sp, Ch 2, Cl in corner Sp, Ch1, Dc in top of first cluster.
Stop here for sizes -, 2, -, – (-, 6, -, -) [-, 10, -, -].
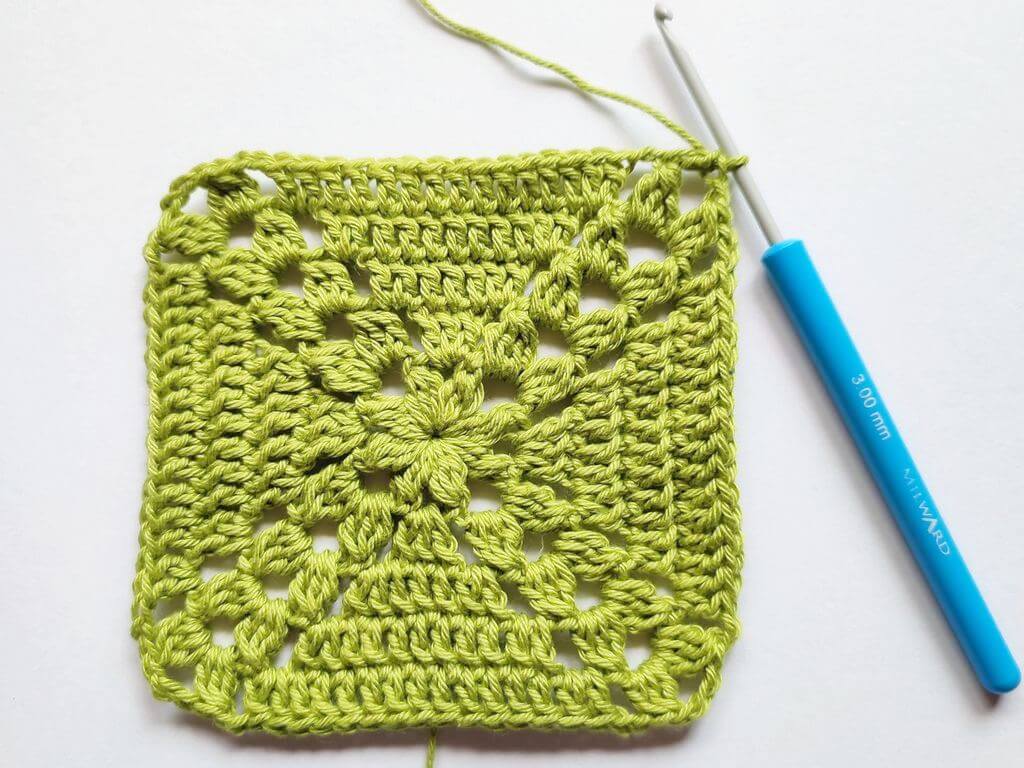
Row 6. Beg Cl in corner Sp, Rep [Ch 2, 2 Dc in next Ch 2 Sp, 15 Dc, 2 Dc in next Ch 2 Sp, Ch 2, {Cl, Ch 3, Cl} in corner Ch 3 Sp] 3 times, Ch 2, 2 Dc in next Ch 2 Sp, 15 Dc, 2 Dc in next Ch 2 Sp, Ch 2, Cl in corner Sp, Ch1, Dc in top of first cluster.
Stop here for sizes -, -, 3, – (-, -, -, 8) [-, -, 11, -].
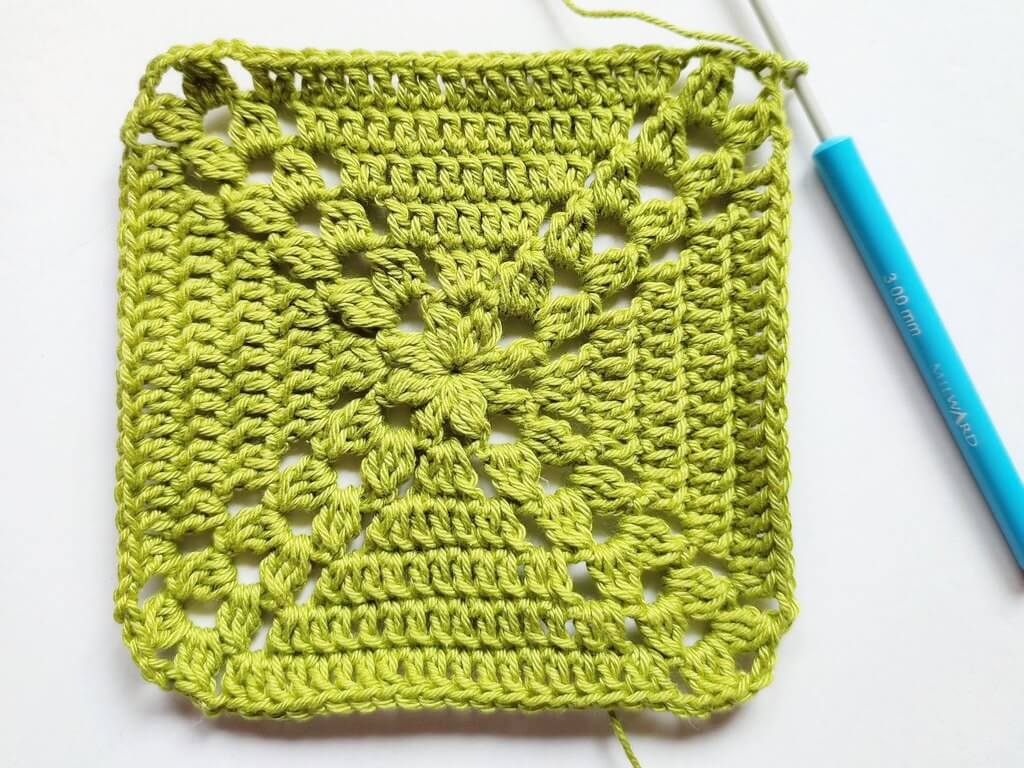
Row 7. Beg Cl in corner Sp, Rep [Ch 2, 2 Dc in next Ch 2 Sp, 19 Dc, 2 Dc in next Ch 2 Sp, Ch 2, {Cl, Ch 3, Cl} in corner Ch 3 Sp] 3 times, Ch 2, 2 Dc in next Ch 2 Sp, 19 Dc, 2 Dc in next Ch 2 Sp, Ch 2, Cl in corner Sp, Ch1, Dc in top of first cluster.
Stop here for sizes -, -, -, – (5, -, -, -) [9, -, -, 12].
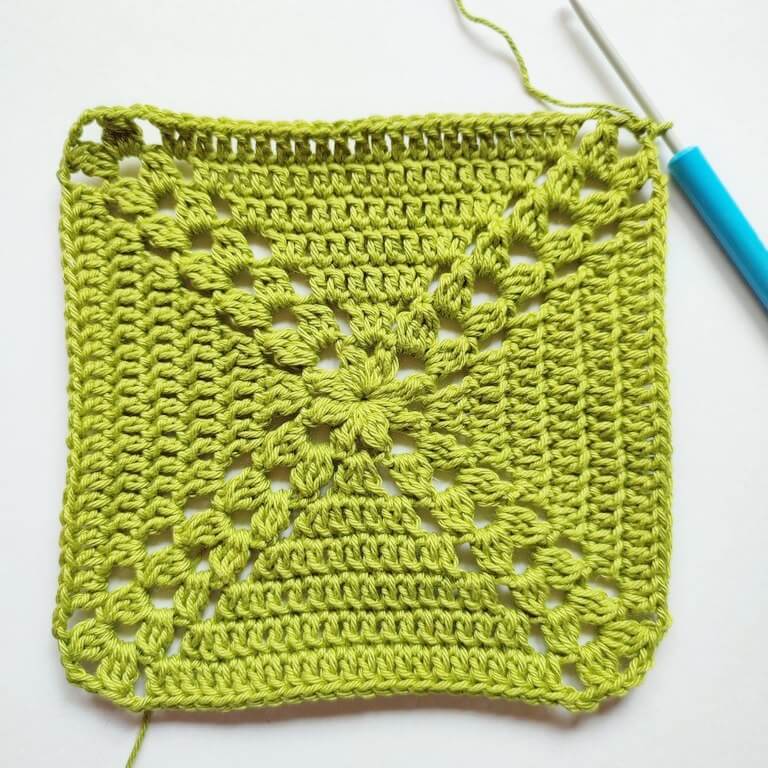
All sizes: Cut off the yarn and weave in the end or bind off, leaving a long tail, for sewing the squares together.
Make the rest of the squares, depending on chosen layout. See the size chart for square and triangle counts for each layout per size.
Half a granny square
Begin with magic ring (a double loop of yarn around your fingers).
Row 1. In MR: Ch 6 (counts as Tr and Ch 2 from here on), Cl, Ch 2, Cl, Ch 3, Cl, Ch 2, Cl, Ch 2, Tr.
Pull the tail of the magic ring tight enough to bring the clusters together. You can repeat this at the end, to make the tension identical in all the squares.
Turn. You will work back and forth along the two sides of the triangle.
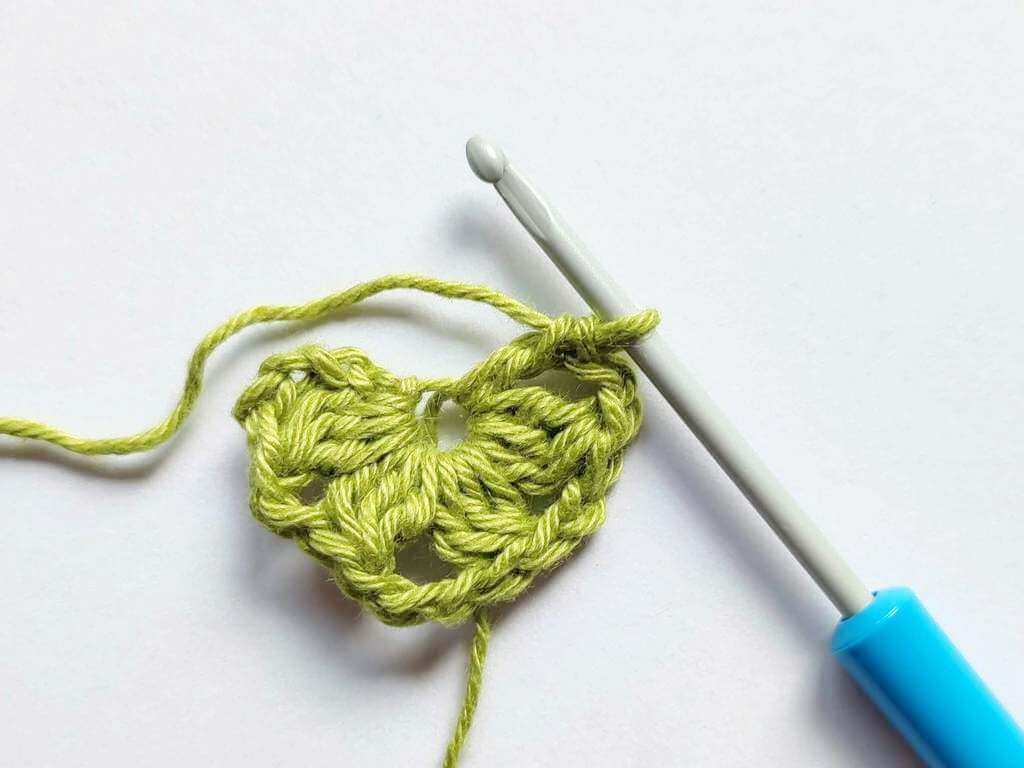
Row 2. Ch 6, Cl in Ch 2 space, Ch 2, 3 Dc in next Ch 2 Sp, Ch 2, {Cl, Ch 3, Cl} in Ch 3 Sp, Ch 2, 3 Dc in next Ch 2 Sp, Ch 2, {Cl, Ch 2, Tr} in next Ch 2 Sp, turn
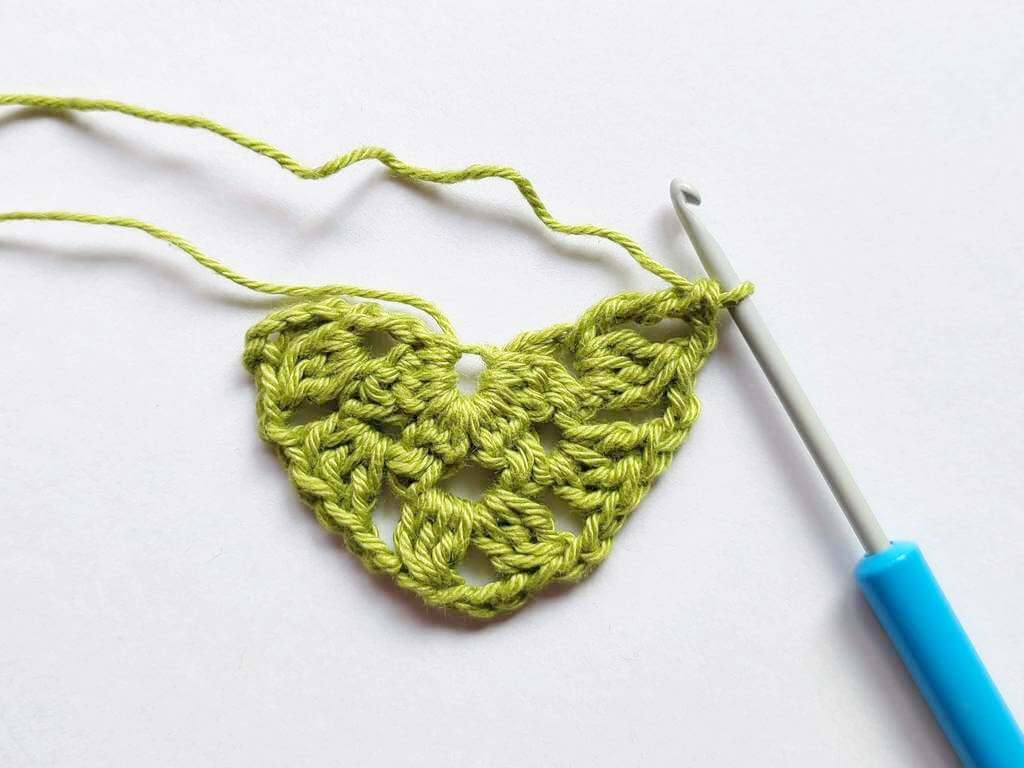
Row 3. Ch 6, Cl in next Ch 2 Sp, Ch 2, 2 Dc in next Ch 2 Sp, 3 Dc, 2 Dc in next Ch 2 Sp, Ch 2, {Cl, Ch 3, Cl} in Ch 3 Sp, Ch 2, 2 Dc in next Ch 2 Sp, 3 Dc, 2 Dc in next Ch 2 Sp, Ch 2, {Cl, Ch 2, Tr} in next Ch 2 Sp, turn
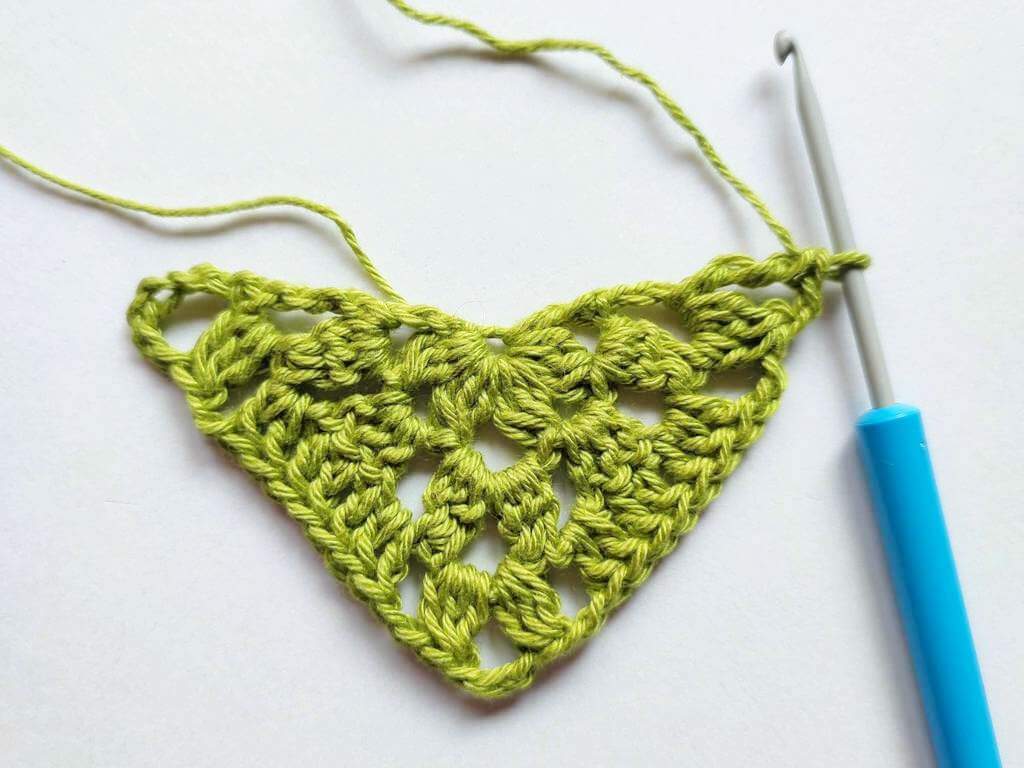
Row 4. Ch 6, Cl in next Ch 2 Sp, Ch 2, 2 Dc in next Ch 2 Sp, 7 Dc, 2 Dc in next Ch 2 Sp, Ch 2, {Cl, Ch 3, Cl} in Ch 3 Sp, Ch 2, 2 Dc in next Ch 2 Sp, 7 Dc, 2 Dc in next Ch 2 Sp, Ch 2, {Cl, Ch 2, v} in next Ch 2 Sp, turn or bind off.
Stop here for sizes 1, -, -, 4 (-, -, 7, -) [-, -, -, -].
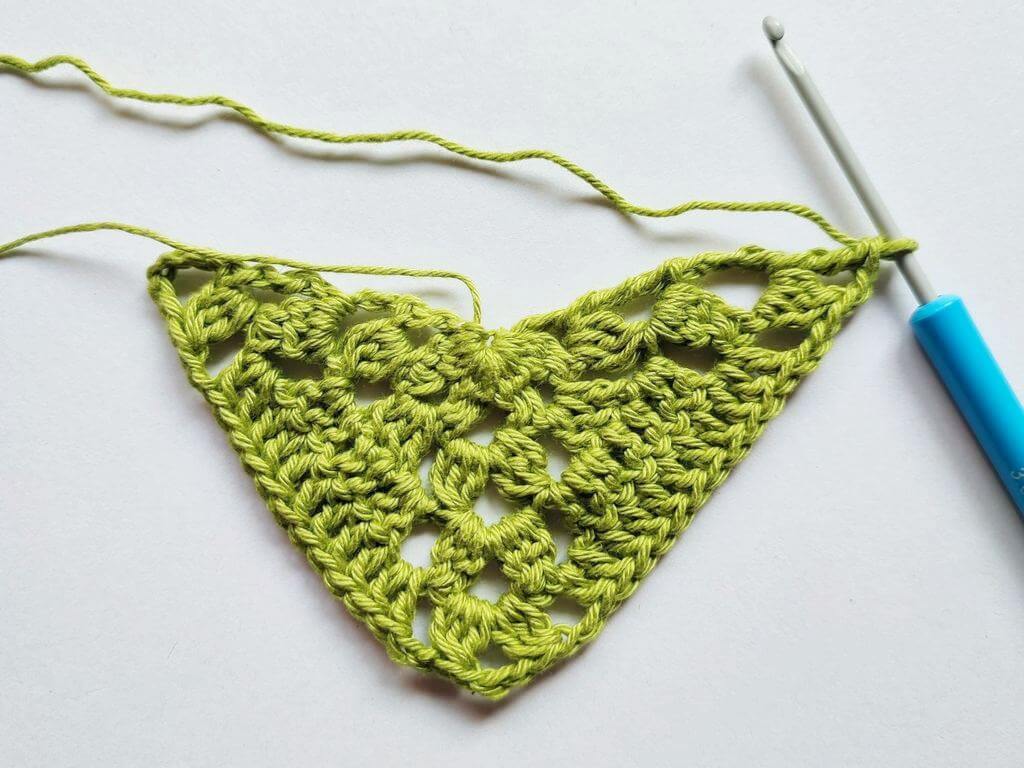
Row 5. Ch 6, Cl in next Ch 2 Sp, Ch 2, 2 Dc in next Ch 2 Sp, 11 Dc, 2 Dc in next Ch 2 Sp, Ch 2, {Cl, Ch 3, Cl} in Ch 3 Sp, Ch 2, 2 Dc in next Ch 2 Sp, 11 Dc, 2 Dc in next Ch 2 Sp, Ch 2, {Cl, Ch 2, Tr} in next Ch 2 Sp, turn or bind off.
Stop here for sizes -, 2, -, – (-, 6, -, -) [-, 10, -, -].
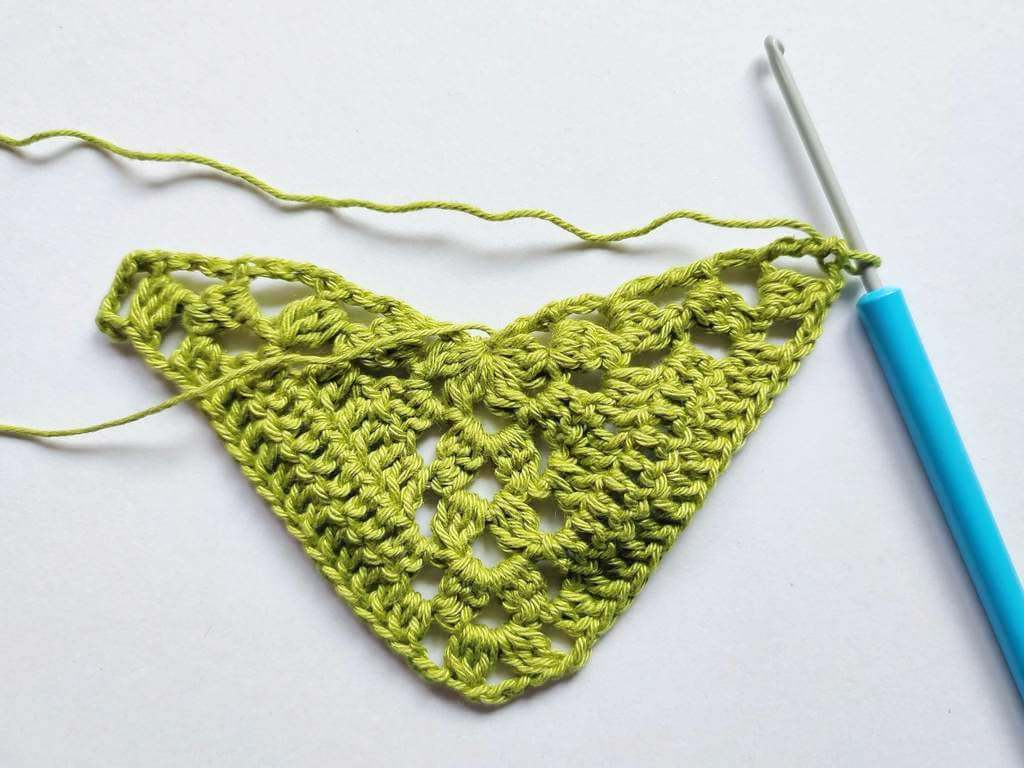
Row 6. Ch 6, Cl in next Ch 2 Sp, Ch 2, 2 Dc in next Ch 2 Sp, 15 Dc, 2 Dc in next Ch 2 Sp, Ch 2, {Cl, Ch5, Cl} in Ch5 Sp, Ch 2, 2 Dc in next Ch 2 Sp, 15 Dc, 2 Dc in next Ch 2 Sp, Ch 2, {Cl, Ch 2, Tr} in next Ch 2 Sp.
Stop here for sizes -, -, 3, – (-, -, -, 8) [-, -, 11, -].
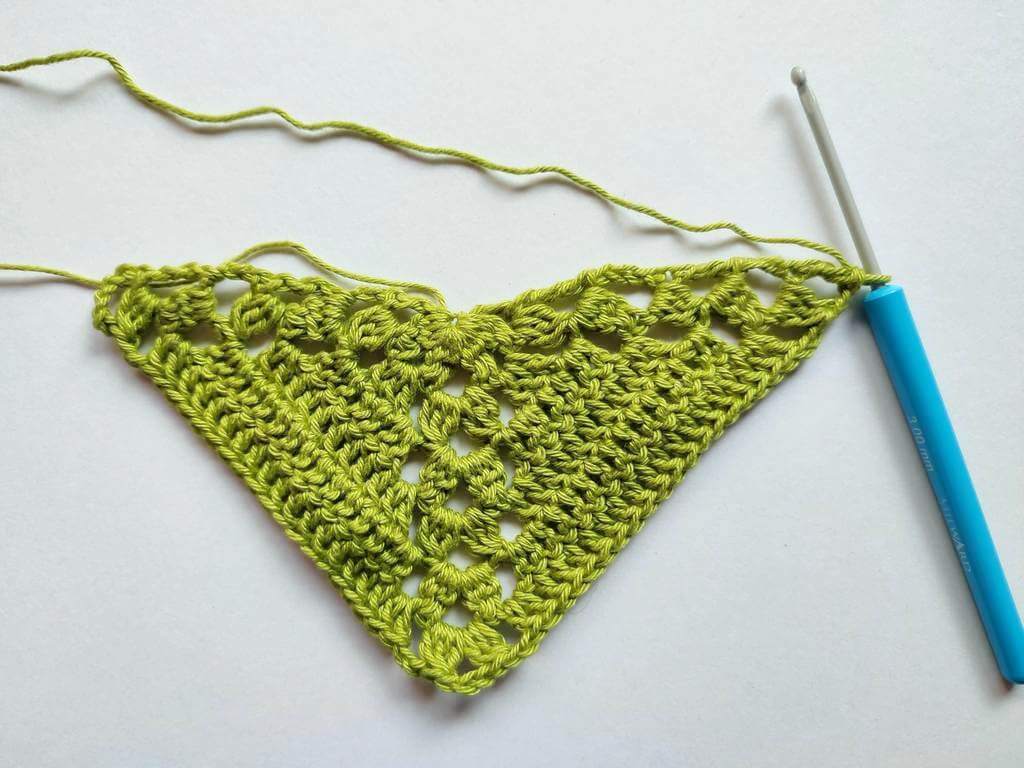
Row 7. Ch 6, Cl in next Ch 2 Sp, Ch 2, 2 Dc in next Ch 2 Sp, 19 Dc, 2 Dc in next Ch 2 Sp, Ch 2, {Cl, Ch5, Cl} in Ch5 Sp, Ch 2, 2 Dc in next Ch 2 Sp, 19 Dc, 2 Dc in next Ch 2 Sp, Ch 2, {Cl, Ch 2, Tr} in next Ch 2 Sp.
Stop here for sizes -, -, -, – (5, -, -, -) [9, -, -, 12].
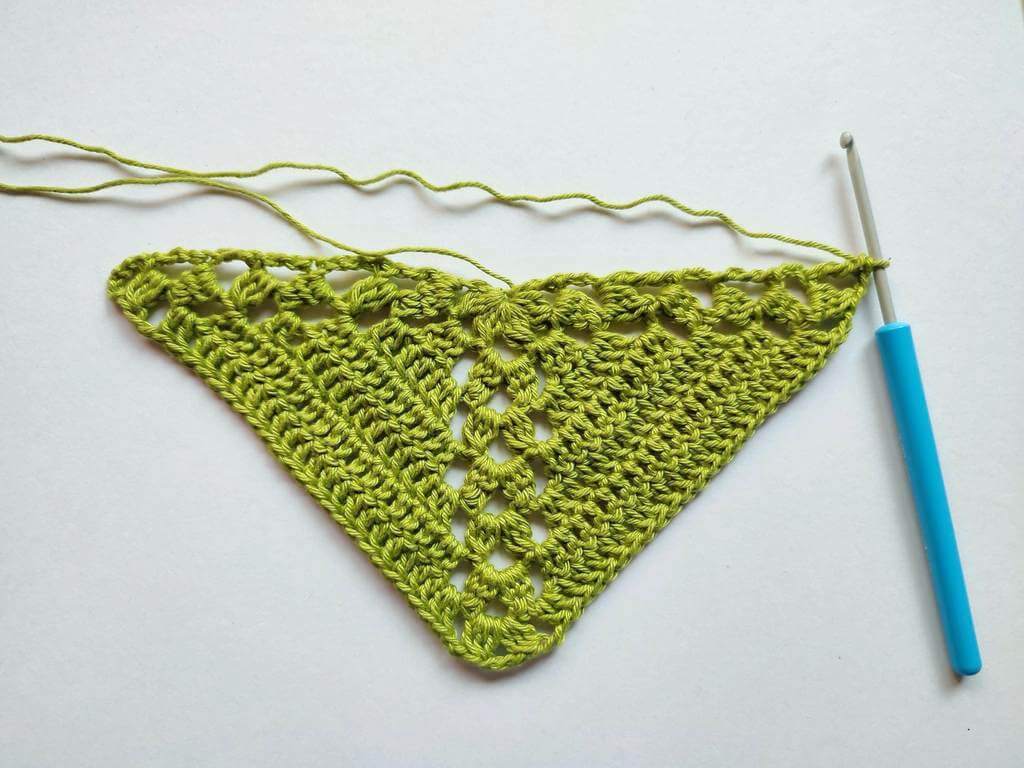
All sizes: Cut off the yarn and weave in the end or bind off, leaving a long tail, for sewing the triangles together with the squares.
Make the rest of the triangles, if applicable, depending on chosen layout. See the size chart for square and triangle counts for each layout per size.
Assembly
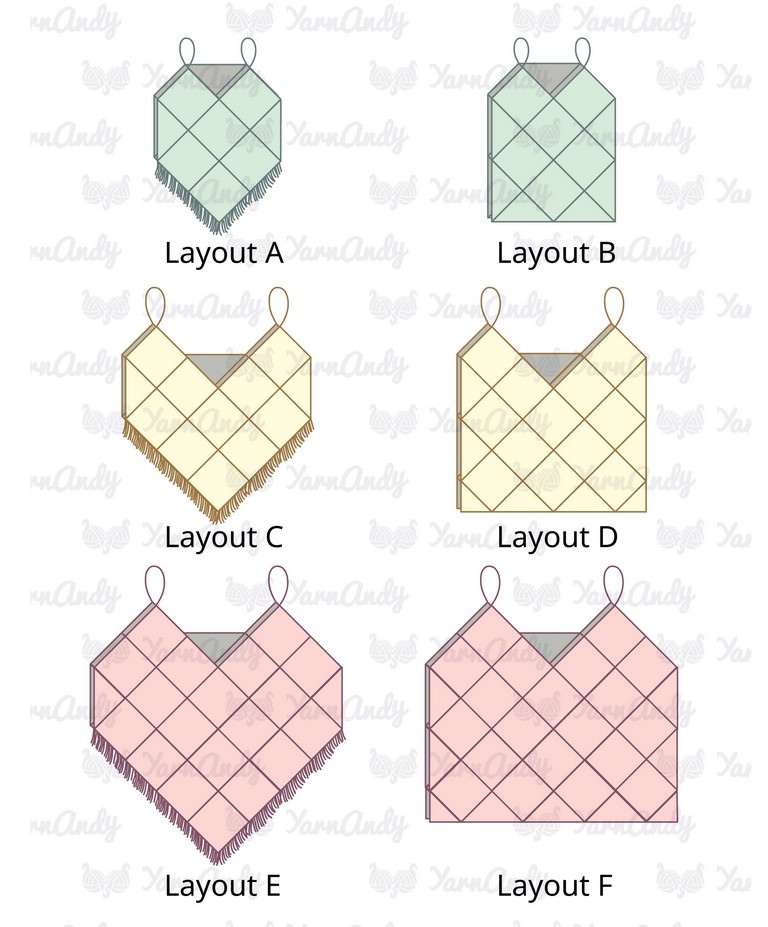
For assembly, we will use one of the six charts from below.
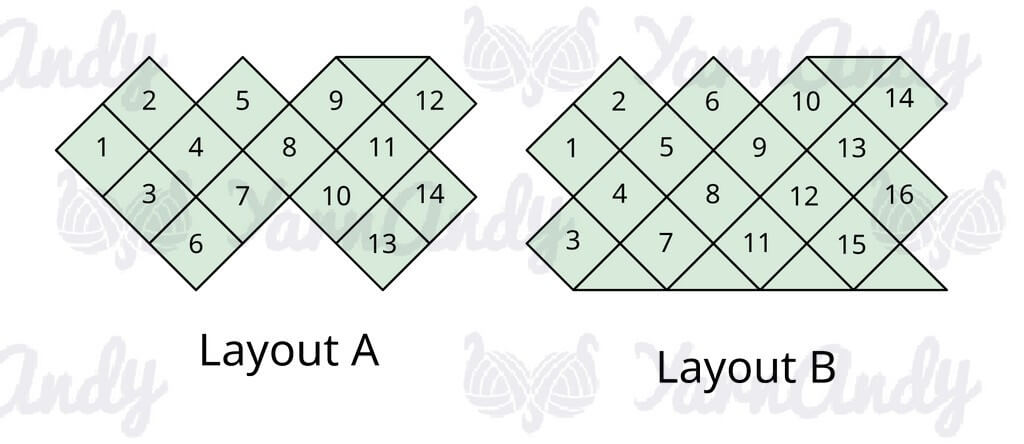


Each layout has square and triangle counts illustrated, as follows:
- A – 14 squares, 1 triangle;
- B – 16 squares, 5 triangles;
- C – 22 squares, 1 triangle;
- D – 28 squares, 7 triangles;
- E – 40 squares, 1 triangle;
- F – 44 squares, 9 triangles.
Feel free to skip triangles if you prefer a wavy bottom edge or a symmetrical front and back.
Once you have all the squares and triangles required for the design you picked, it’s time to put them together.
First weave in the center ends, leaving only the long outer ends.
Using the long tails and a tapestry needle, start stitching the squares together, following the charts. You can start from wherever you feel comfortable.
The easiest way to seam the squares together is by making strips first, for example in layout A you can seam squares 1 & 2, then 3, 4 & 5, then 6, 7, 8 & 9, and so on.
After the strips are completed, you can attach new yarn and start seaming the strips together.
You can use a whip stitch for a simple, quick seam.
If you want the top a little wider without increasing the size of the square, you could use another stitch, with a needle or crochet.
Once the squares and triangles are in place, fold the top in half along squares:
- 1 and 8 for layout A;
- 1, 3, 9 and 11 for layout B;
- 1 and 12 for layout C;
- 12, 15, 26 and 28 for layout D;
- 20 and 40 for layout E;
- 20, 24, 42 and 44 for layout F.
Seam the gaps to create a tube.
Continue with the edging to make the straps and to add any details on the bottom.
Edging
For a beautiful and uniform edge, you will work around the top and the bottom in two rows.
Finishing the top part
Depending on chosen layout, start on square 5, 6, 8, 8, 10, 11.
Row 1. Standing Dc in any stitch on the neckline side of your chosen square. Dc across, until you reach the middle of the neckline, an intersection of 3 squares.
1 Tr in the corner space, then make a 4 TrCl, placing 1 Tr in the corner of the first square, 2 Tr in the next corner and 1 Tr in the last corner.
1 Tr in the last corner.
The chart below shows the stitch placement for the cluster.
Continue with Dc along the side of the next square, until you reach the top edge of the neckline.
5 Dc in the corner.
Continue with Dc around the armhole.
When you reach the bottom of the armhole, make the clusters as before.
Repeat this process along the other side of the neckline and the other armhole.
Continue with Dc until you reach the first St, Sl St.
If you used a triangle for the back neckline, when you reach the intersection between 2 squares and 1 triangle, place 2 Dc in the Ch 3 Sp belonging to one square and 2 Dc in the Ch 2 Sp belonging to the triangle.
Continue with Dc until you reach the next intersection, where you place 2 Dc in the Ch 2 Sp belonging to the triangle and 2 Dc in the Ch 3 Sp belonging to one square.
Row 2. Ch 1, 1 HDc in each St until you reach the end of the neckline.
Make a gauge strap by chaining 11, HDc in the second Ch from hook and HDc back across the chain.
Measure the strap and calculate the necessary number of HDc for your own measurements. For a more relaxed fit, make the strap longer.
For the sample, I chained 51 and made 50 HDc for a strap that is 33 cm or 13″ long.
Keep in mind that the strap will loosen 5-10% from the original length.
After making the strap, HDc across the armhole and stop when you reach the back of the neckline.
Remove your hook from the active loop, pass it through the first HDc of the strap (the end of the strap) and pick up the active loop to continue making the HDc.
Continue along the back of the neckline, until you reach the second armhole.
Repeat this process and secure the strap on the front of the work, at the end of the second armhole.
Finish the row of HDc with an invisible join in the first St.
The bottom edge
For layouts A, C and E, start with a standing Dc in a St on any side.
Dc around until you encounter a corner (5 Dc in the corner) or an intersection of three squares (follow the instructions for the 4TrCl above).
Continue with Dc around and repeat these steps as necessary. Finish with an invisible join to the first St.
For layouts B, D and F, start with a standing Dc in any St. Dc around until you reach the first Dc. Finish with an invisible join to the first St.
For fringe, use a piece of cardboard or another stiff, flat object with a length of around 20 cm or 8″. If you want longer fringe, use a larger object. Holding the end in your hand, start wrapping the yarn around the cardboard.
When you have a sufficient number of wraps (without overlapping the yarn), keep the yarn tight to the surface and cut it at both ends with embroidery scissors.
Fold a strand in two and, using the larger hook, pull up a loop through a Dc on the edge of the work, then pull the rest of the yarn through the loop and secure it.
To make sure you have enough yarn for the whole top, start by adding the fringe every two stitches.
If enough yarn remains, keep adding one more between them. For a fluffy, softer fringe, unravel the strands in the yarn.
If you want the fringe to stay in place for a long time, with no maintenance, sew it down on the inside of the top, using a sewing needle and thread in a similar color to the yarn.
When the top is finished, you can block it, either with water or with steam. Wash it gently, using mild detergent and lukewarm water.
Remove the excess water by folding it inside a towel and pressing on it, then shape it to dry on a flat surface.
Final remarks
I’ve been thinking about revamping this pattern and making it more size-inclusive for years now.
It’s been out for 7 years (I can’t believe it either), first published in 2017, with only 3 sizes.
Ever since I started learning about making garment patterns size- and shape-inclusive, this one has been in the “to update” queue.
I’m so glad that it’s finally done. It’s like a weight off my chest. Now the question remains if I should design a few more of these tops, with different designs in the squares…
Let me know in the comments. I might use some leftover cotton from other summer tops to make one with actual granny squares.
If you want more free crochet patterns, check them out here or in the dedicated category:
Easiest waffle stitch crochet washcloth or potholder
Free textured star granny square pattern
Easy chunky slippers – free crochet pattern
Dog bone amigurumi free crochet pattern – 2 versions
Free sunflower amigurumi pattern
Free vintage granny square crochet pattern for blankets
Easy pattern for spooky crochet earrings
Strawberry Cupcake CAL – Part 4
Strawberry Cupcake CAL – Part 3
Free vintage-inspired granny square pattern
Sign up to my email updates if you want to know if that ever happens (who knows, I’m on a roll with these summer tops).
Hugs,
Andrea
