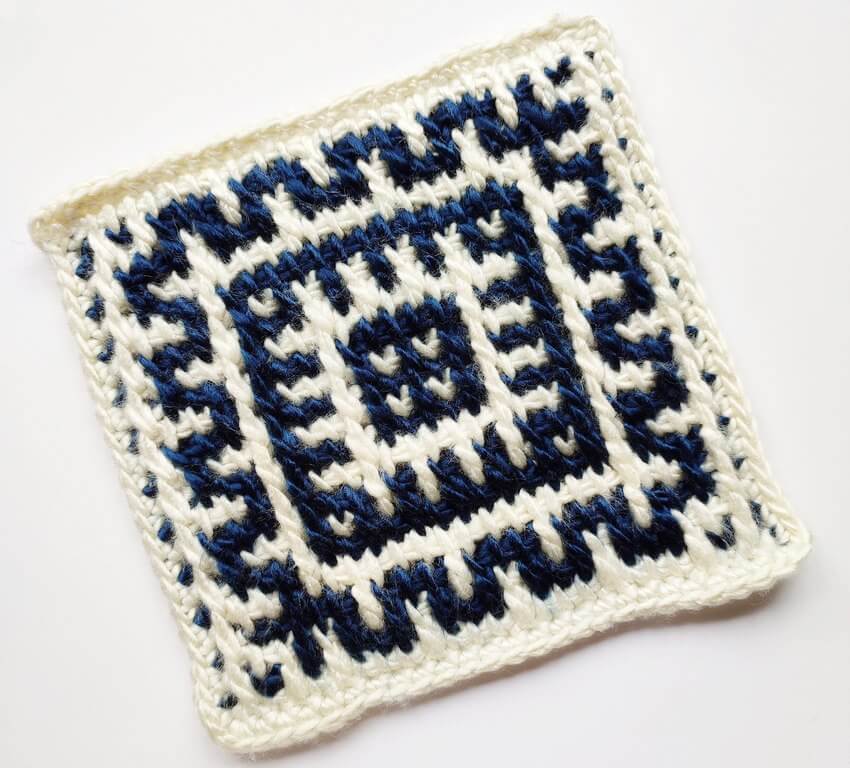
Do you like mosaic crochet and wish you could create more than blocky, square stitches?
With this advanced Tunisian crochet mosaic technique, you can now create stitches on the diagonal, opening up amazing designs that are now possible in the wonderful world of Tunisian crochet mosaic.
In this tutorial, I will demonstrate some of the diagonal stitches that you can create in Tunisian crochet mosaic, both in video and written instructions, and I will provide a stitch pattern that you can use to create intricate designs, such as cowls, scarves, table runners, blankets and so much more.
Before we begin exploring this advanced technique, you should be comfortable with regular Tunisian crochet mosaic and the stitches that are involved, like the Tunisian simple stitch and the Tunisian crochet extended stitch, which in this case is worked as a front post stitch.
In this technique we will be making Tunisian double stitches and the variations also include extended double stitches or even treble stitches.
Contents
Differences between regular and advanced Tunisian crochet mosaic
Before we dive into the actual technique, we should first understand the differences between the two, so we can better choose the technique for our projects.
Both of these techniques are worked flat in Tunisian crochet, alternating the colors each row. The tall stitches in each color are only worked in stitches of the same color, two rows below.
Regular Tunisian crochet mosaic is wonderful for expressing geometric motifs and pixel designs.
It’s a great way to translate traditional embroidery motifs, like for example this one that is inspired by Romanian embroidery.
It is also a wonderful technique for exploring tessellating or repeating motifs that include stairs, rectangles, crenellations, square spirals and so on.
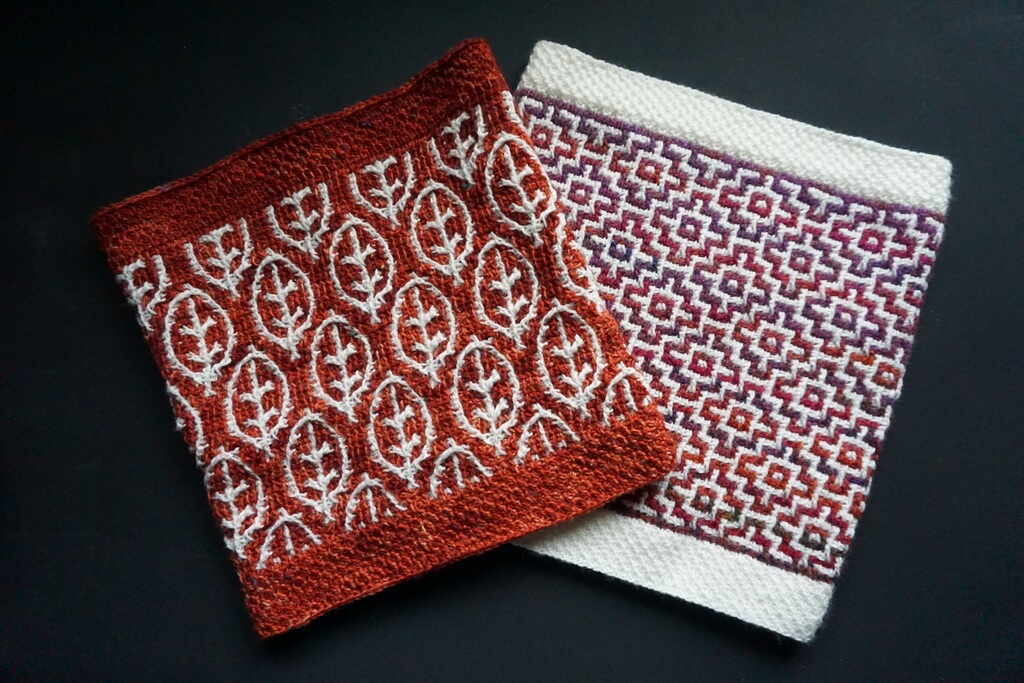
What it can’t do however is represent any kind of rounded or soft motifs. That’s where the advanced Tunisian crochet mosaic technique shines.
With the diagonal stitches and the clusters that include diagonal stitches or even simple stitches you have so many options in designing and crocheting soft curves, rounded shapes, elegant motifs that stand out.
Compare the two bee motifs below, one created with regular mosaic and one created with advanced mosaic.
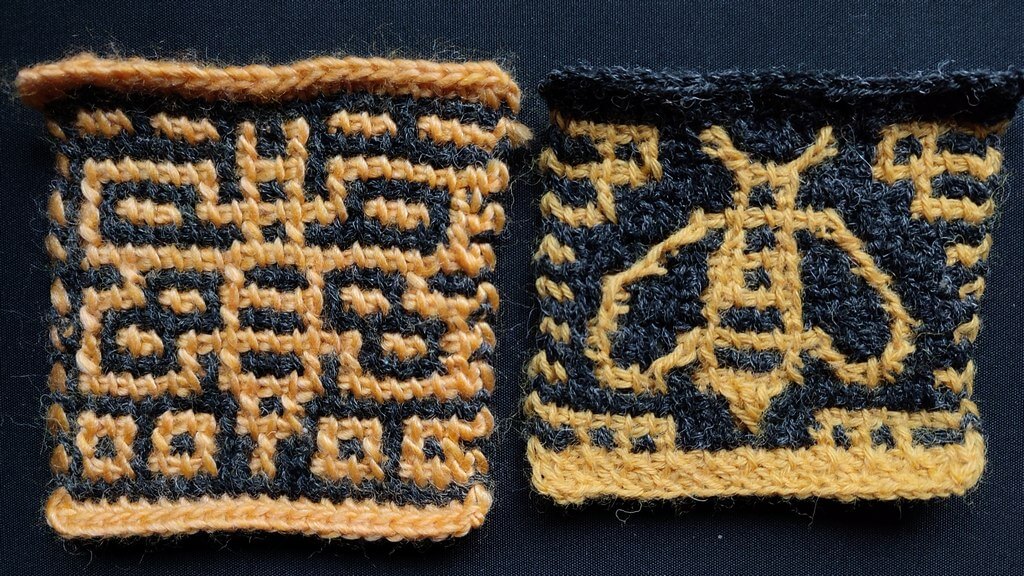
If you want the pattern for the geometric or robotic looking bee, let me know and I’ll publish that too.
Abbreviations (see special stitches below)
Reverse direction for left handed (switch right with left for all instructions).
- Ch – chain;
- Cluster;
- FpTDs2L;
- FpTDs2R;
- FpTEs;
- FpTEsL;
- FpTEsR;
- Ls – Tunisian last stitch – put hook behind the 2 vertical loops at the end of the row, YO and pull up a loop;
- R – regular Tunisian crochet return: Ch1, Rep [YO and pull through 2 stitches on hook] until you are left with only one stitch;
- Rep – repeat;
- Sl St – slip stitch;
- St – stitch;
- Tss – Tunisian simple stitch: insert the hook under the vertical bar of the next St, YO and pull up a loop;
- YO – Yarn over;
- YU – Yarn under: bring the yarn under and to the front of the hook.
Stitches used in advanced Tunisian crochet mosaic
All the diagonal stitches are some form of tall stitch worked as front post stitches. You can combine them into clusters or use them on their own.
Depending on how far away from the vertical you go with the stitches you create, you will need to give these stitches height.
You can do that by adding more yarn overs in the stitch (double, triple and so on) or extending them by adding chains within the stitch (extended, extended double, extended triple and so on).
You might want to experiment and see which stitch is more suitable for which angle. They will all be worked 2 rows below, so they will not get too long, at most 3 stitches away.
In the example below, we go as far as 2 stitches away, so I have used double stitches. You might want to use extended double stitches instead. For the stitches going 1 stitch away, you could use double stitches.
I am still experimenting with this technique, so let me know how it works for you.
FpTEs
Front post Tunisian extended stitch.
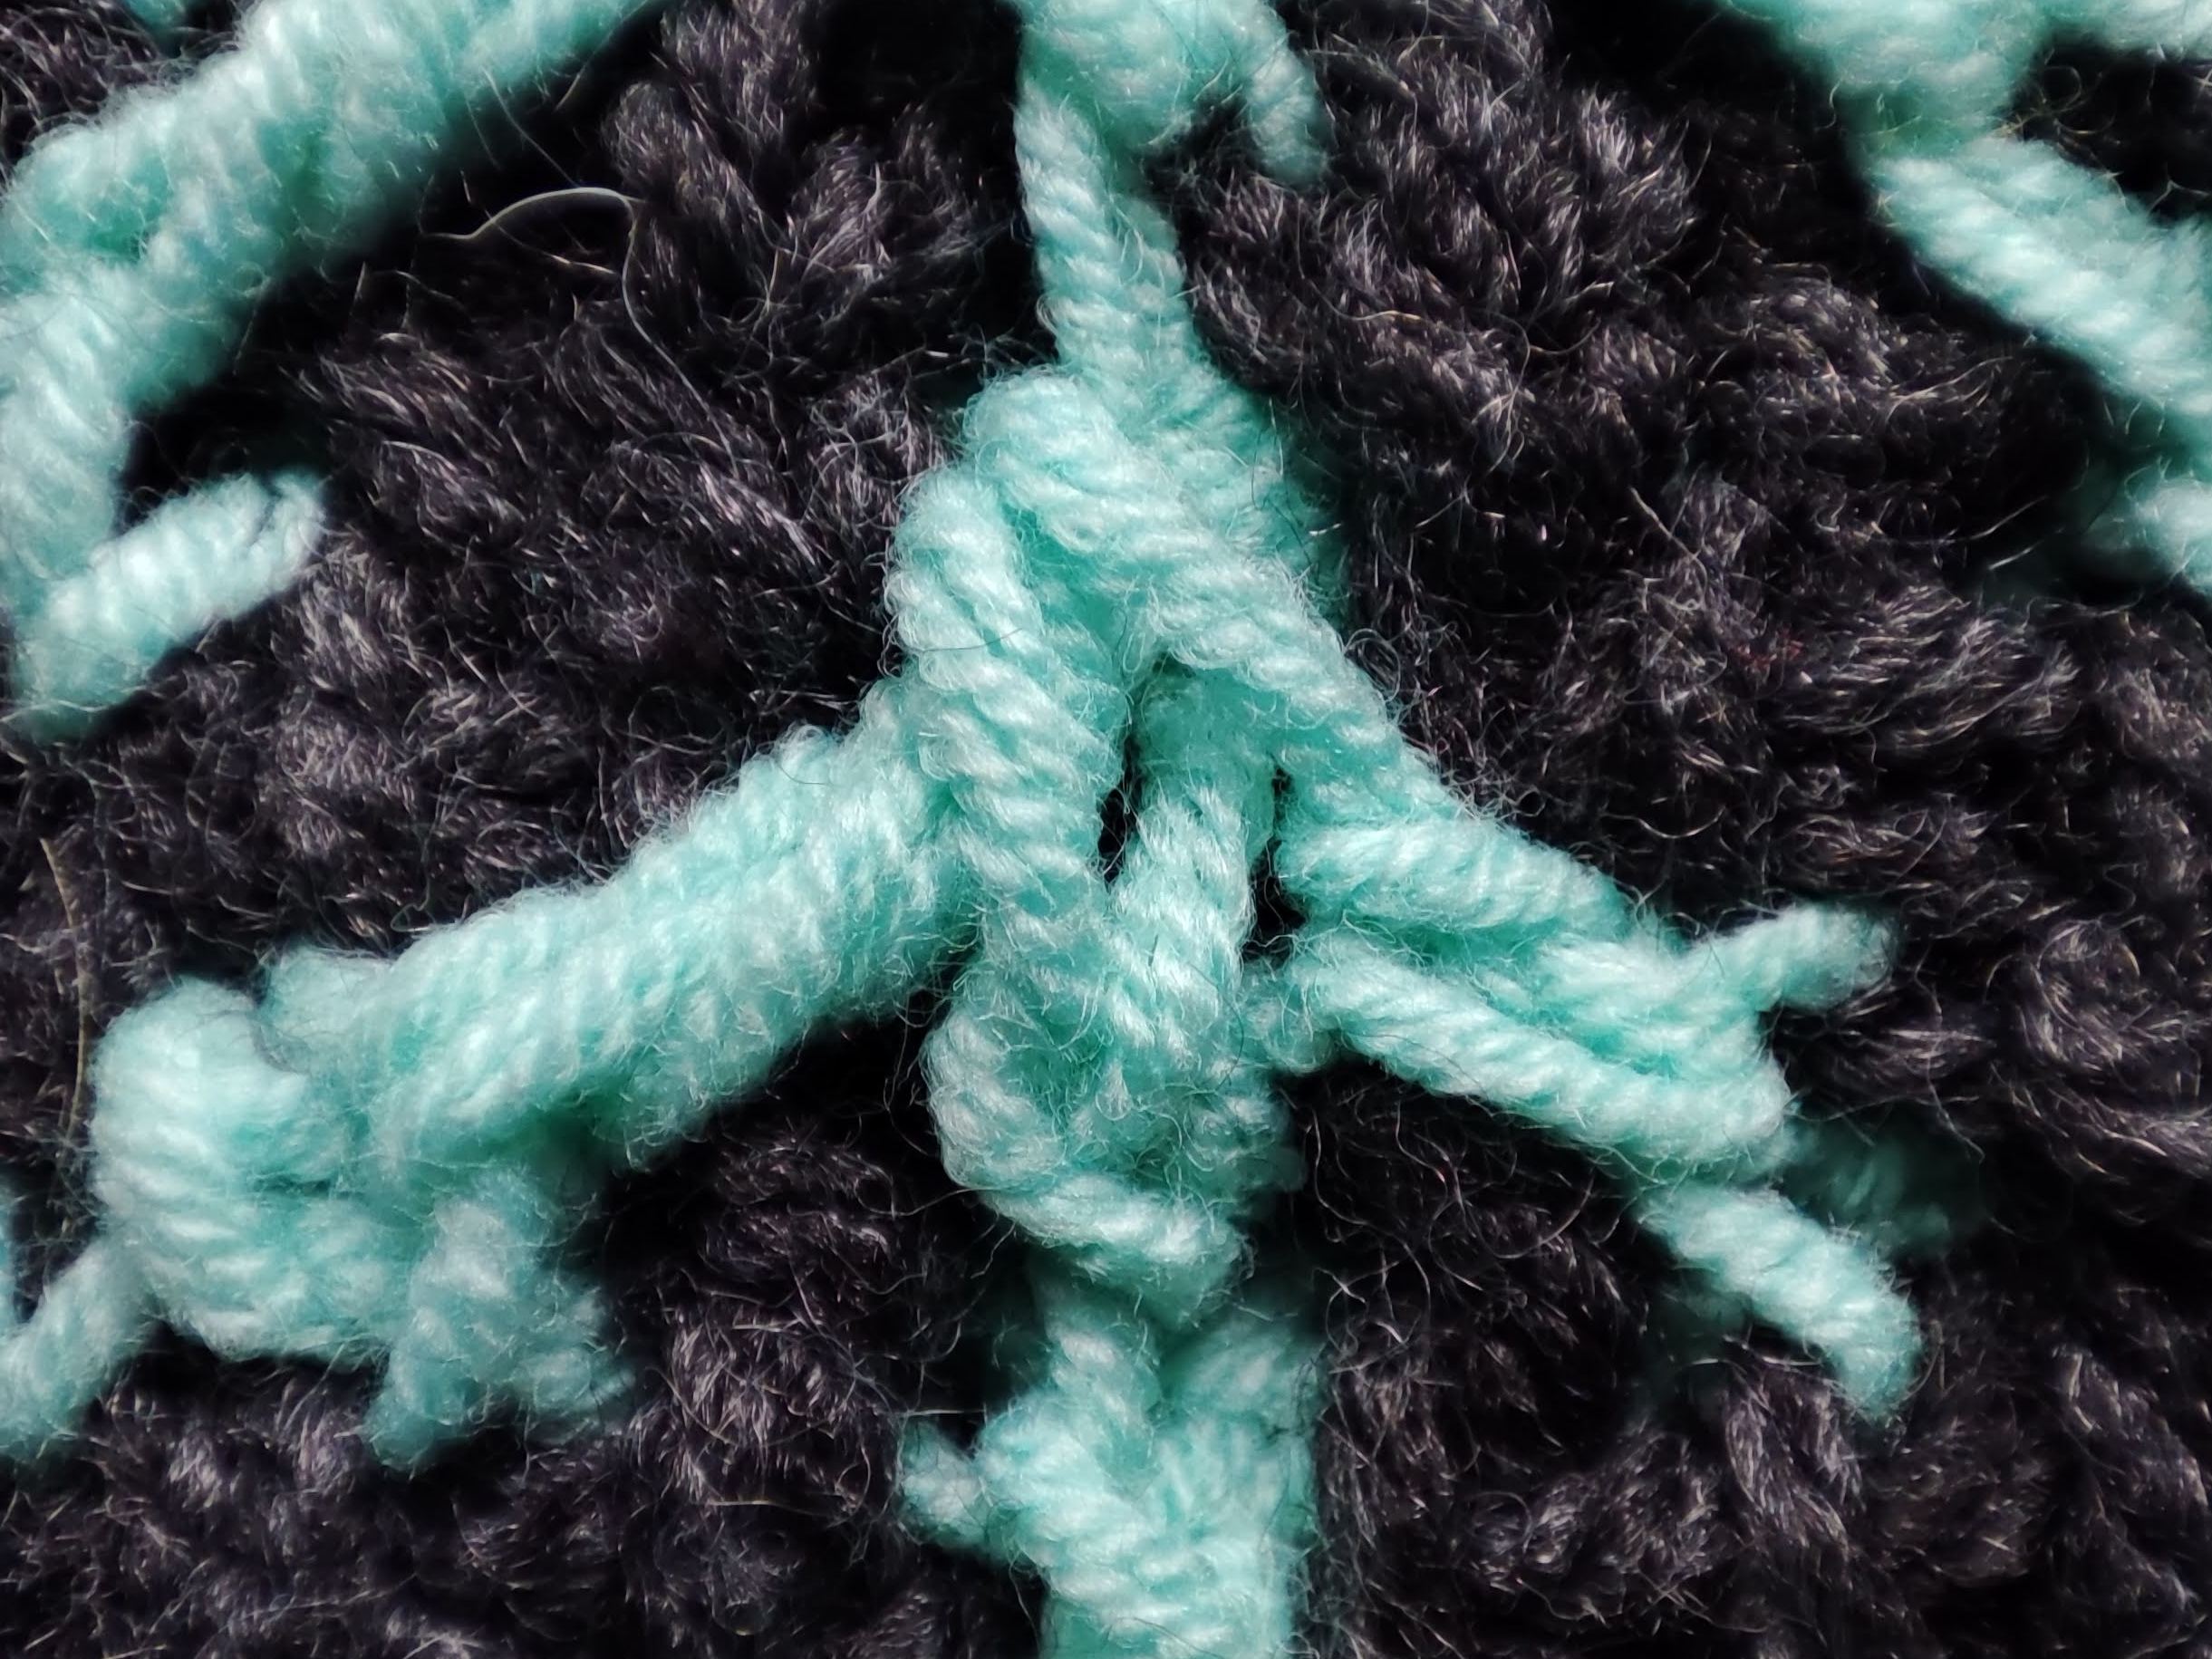
This stitch is used in regular Tunisian crochet mosaic as well.
Insert the hook behind the 2 vertical bars of the St of the same color two rows below, YO and pull up a loop, Ch 1.
FpTEsR and FpTEsL
Front post Tunisian extended stitch to the right or to the left.
These stitches are on a slight diagonal and are made in stitches next to the stitch right below where you would normally put a FpTEs.
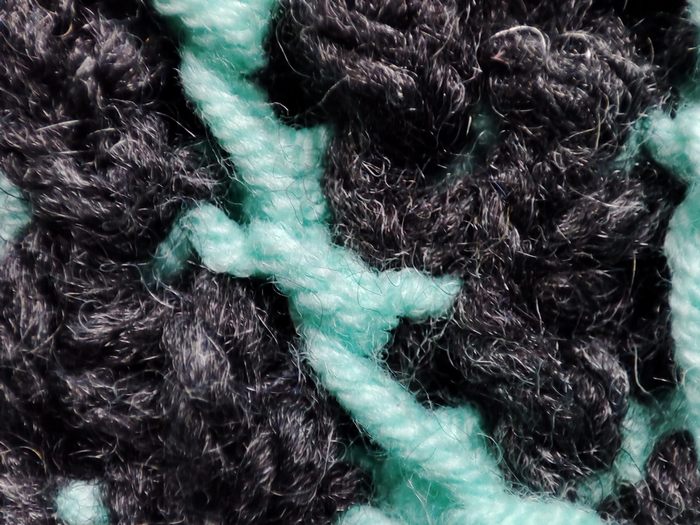
Insert the hook behind the 2 vertical bars of the St of the same color two rows below and one St to the right of the next St, YO and pull up a loop, Ch 1.
You can replace these with front post Tunisian double stitches worked in the same stitch, if you want a looser diagonal stitch.
FpTDs2R and FpTDs2L
Front post Tunisian double stitch 2 to the right or to the left.
These stitches are at a 45 degree angle from the vertical and are made 2 stitches away from where you would normally put a FpTEs.
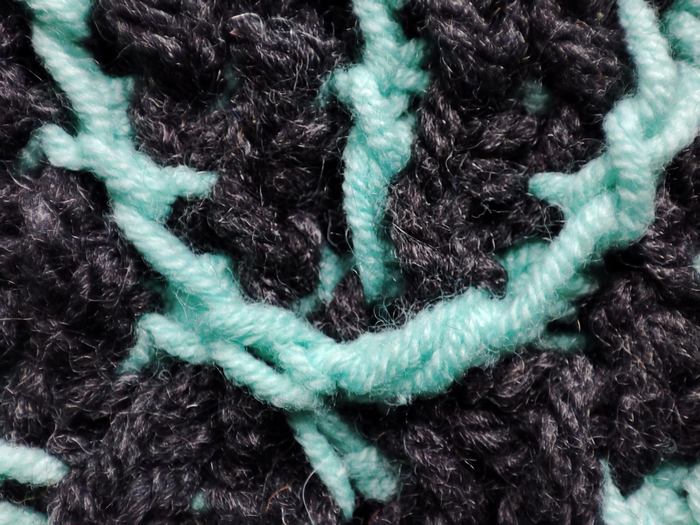
YO, insert the hook behind the 2 vertical bars of the St of the same color two rows below and 2 Sts to the right of the next St, YO and pull up a loop, YO and pull through 2 loops on hook.
You can replace these with front post Tunisian extended double stitches or front post Tunisian treble stitches worked in the same stitch, if you want a looser diagonal stitch.
Clusters
In this particular example, a cluster consists of FpTDs2R, FpTEs, FpTDs2L, which are brought together with a YO and pull through 3 loops on hook, so they work up as 1 stitch in the row.
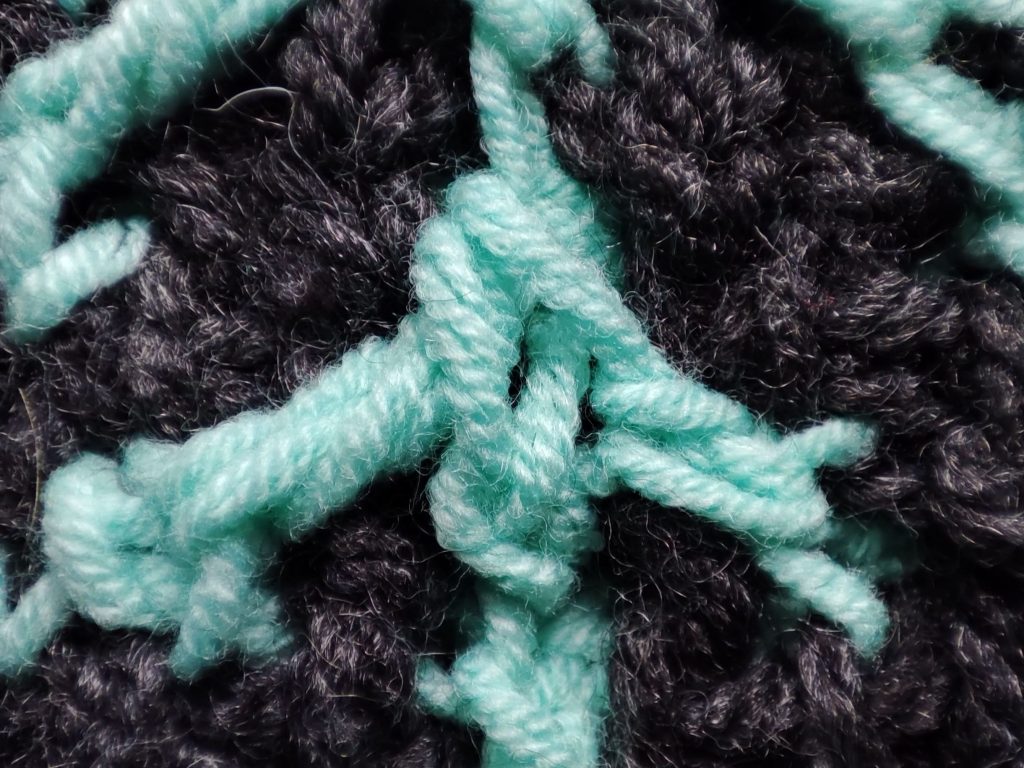
You can make many variations of clusters, involving either of the stitches detailed above.
For example, by including a Tss instead of a FpTEs, you will get a wide upside down V shape.
Or by making 5 tall stitches you can get a triangle shape in one color.
Video tutorial for advanced Tunisian crochet mosaic
Follow the detailed tutorial I made to show you how to make each of these stitches and how to read the chart below.
This is the right handed video tutorial. If you’d like a left handed version for which I need to do voice over to replace all the “left”s with “right”s and vice-versa, let me know and I will do it.
Example of advanced Tunisian crochet mosaic chart
The chart shows 1 horizontal pattern repeat and 1 vertical pattern repeat.
The stitch pattern is a repeat of 12 stitches and 24 rows. You can repeat this pattern as many times as you wish, horizontally and vertically.
Add 2 loops to the loop count to account for the first and last loop. That means you add 1 chain to the foundation row (or 2 if you skip the first chain).
Make the two rows at the bottom first, before starting the repeat.
Follow the stitches for each row individually.
Start working from the bottom and reading each row from right to left, even if you are left handed. The return pass rows are not shown on the chart.
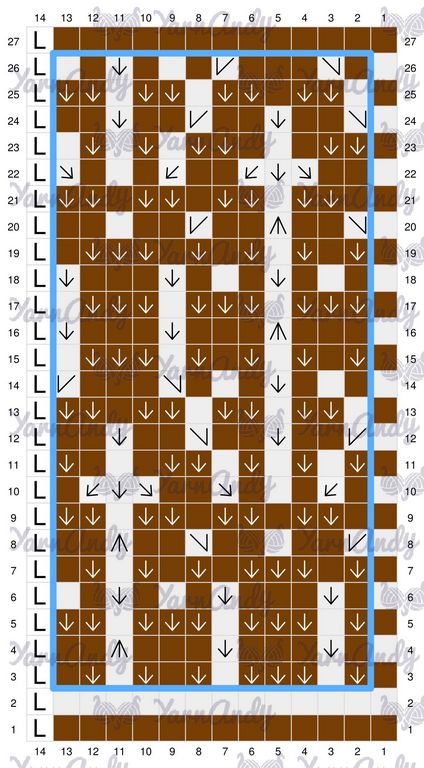
The legend below includes all stitches.
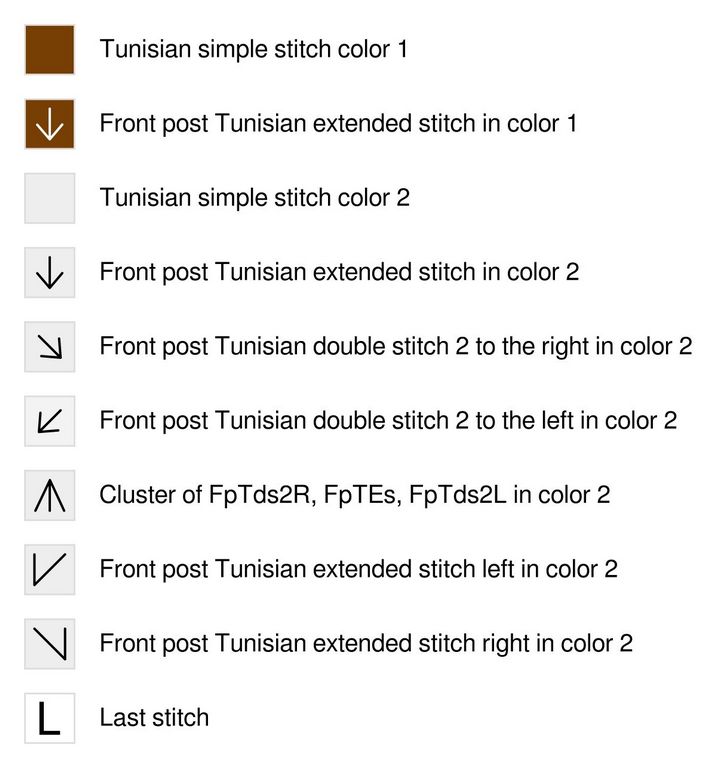
Written instructions for the above chart
Starting with color 1
Row 1: 13 Tss, Ls, R
Start switching colors, with Row 2 in C2, by doing the last repeat of the return pass with the new color.
Row 2: 13 Tss, Ls, R
Switch the yarn to C1. Continue switching the color every row at the end of the return pass.
Work Rows 3 – 26 as many times as needed to reach your desired row count:
Row 3: Tss, Rep [FpTEs, Tss, 3 FpTEs, Rep [Tss, FpTEs] 3 times, Tss] across, Ls, R
Row 4: Tss, Rep [Tss, Rep [FpTEs, 3 Tss] 2 times, Cluster, 2 Tss] across, Ls, R
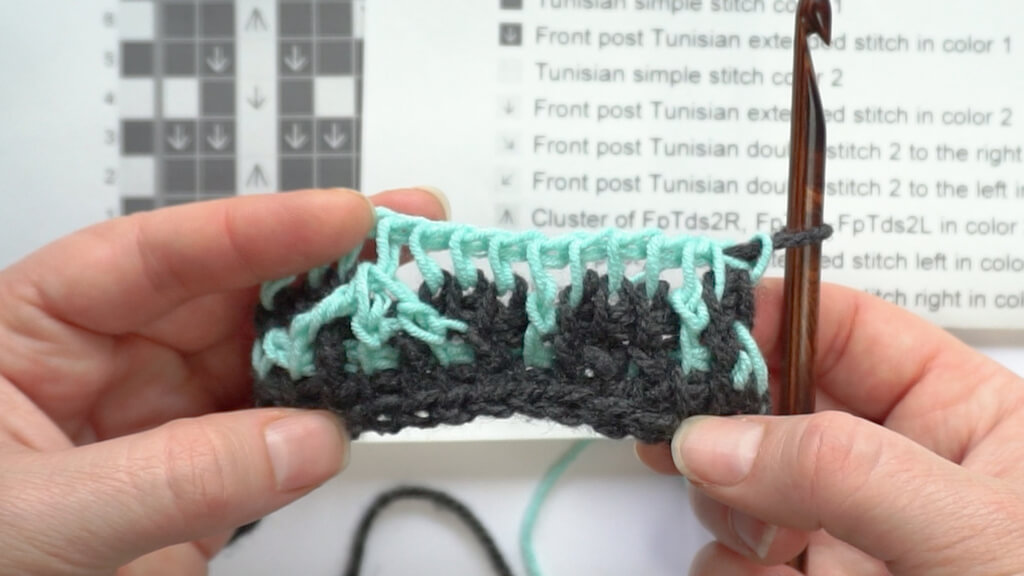
Row 5: Tss, Rep [FpTEs, Rep [Tss, 3 FpTEs] 2 times, Tss, 2 FpTEs] across, Ls, R
Row 6: Tss, Rep [Tss, Rep [FpTEs, 3 Tss] 2 times, FpTEs, 2 Tss] across, Ls, R
Row 7: Tss, Rep [FpTEs, Tss, 3 FpTEs, Rep [Tss, FpTEs] 3 times, Tss] across, Ls, R
Row 8: Tss, Rep [FpTEsL, 5 Tss, FpTEsR, 2 Tss, Cluster, 2 Tss] across, Ls, R
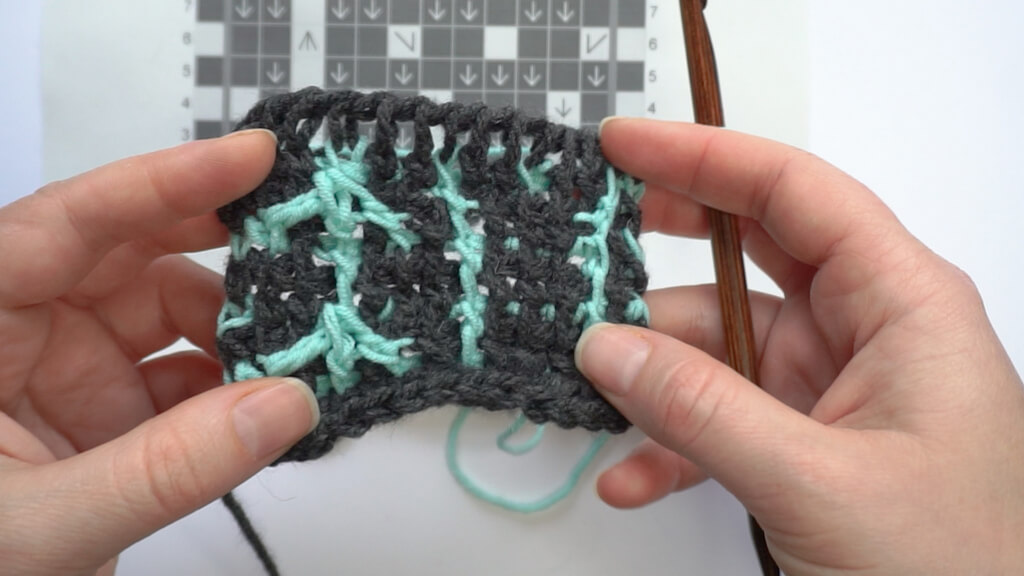
Row 9: Tss, Rep [Rep [Tss, 2 FpTEs] 4 times] across, Ls, R
Row 10: Tss, Rep [Tss, FpTDs2L, 3 Tss, FpTDs2R, 2 Tss, FpTDs2R, FpTEs, FpTDs2L, Tss] across, Ls, R
Row 11: Tss, Rep [Rep [FpTEs, Tss] 3 times, 2 FpTEs, 3 Tss, FpTEs] across, Ls, R
Row 12: Tss, Rep [FpTEsL, 2 Tss, FpTEs, 2 Tss, FpTEsR, 2 Tss, FpTEs, 2 Tss] across, Ls, R
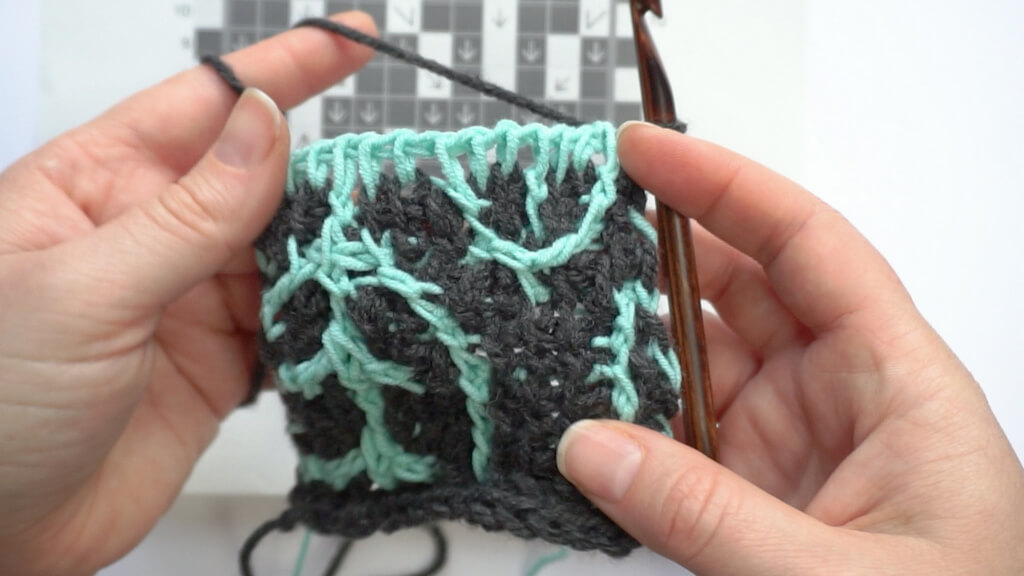
Row 13: Tss, Rep [Rep [Tss, 2 FpTEs] 4 times] across, Ls, R
Row 14: Tss, Rep [3 Tss, FpTEs, 3 Tss, FpTEsR, 3 Tss, FpTEsL] across, Ls, R
Row 15: Tss, Rep [Rep [FpTEs, Tss] 4 times, 3 FpTEs, Tss] across, Ls, R
Row 16: Tss, Rep [3 Tss, Cluster, Rep [3 Tss, FpTEs] 2 times] across, Ls, R
Row 17: Tss, Rep [Rep [3 FpTEs, Tss] 3 times] across, Ls, R
Row 18: Tss, Rep [Rep [3 Tss, FpTEs] 3 times] across, Ls, R
Row 19: Tss, Rep [Rep [FpTEs, Tss] 4 times, 3 FpTEs, Tss] across, Ls, R
Row 20: Tss, Rep [FpTEsR, 2 Tss, Cluster, 2 Tss, FpTEsL, 5 Tss] across, Ls, R
Row 21: Tss, Rep [Rep [Tss, 2 FpTEs] 4 times] across, Ls, R
Row 22: Tss, Rep [2 Tss, FpTDs2R, FpTEs, FpTDs2L, 2 Tss, FpTDs2L, 3 Tss, FpTDs2R] across, Ls, R
Row 23: Tss, Rep [2 FpTEs, 3 Tss, 2 FpTEs, Rep [Tss, FpTEs] 2 times, Tss] across, Ls, R
Row 24: Tss, Rep [FpTEsR, 2 Tss, FpTEs, 2 Tss, FpTEsL, 2 Tss, FpTEs, 2 Tss] across, Ls, R
Row 25: Tss, Rep [Rep [Tss, 2 FpTEs] 4 times] across, Ls, R
Row 26: Tss, Rep [Tss, FpTEsR, 3 Tss, FpTEsL, 3 Tss, FpTEs, 2 Tss] across, Ls, R
End of repeat
Final thoughts
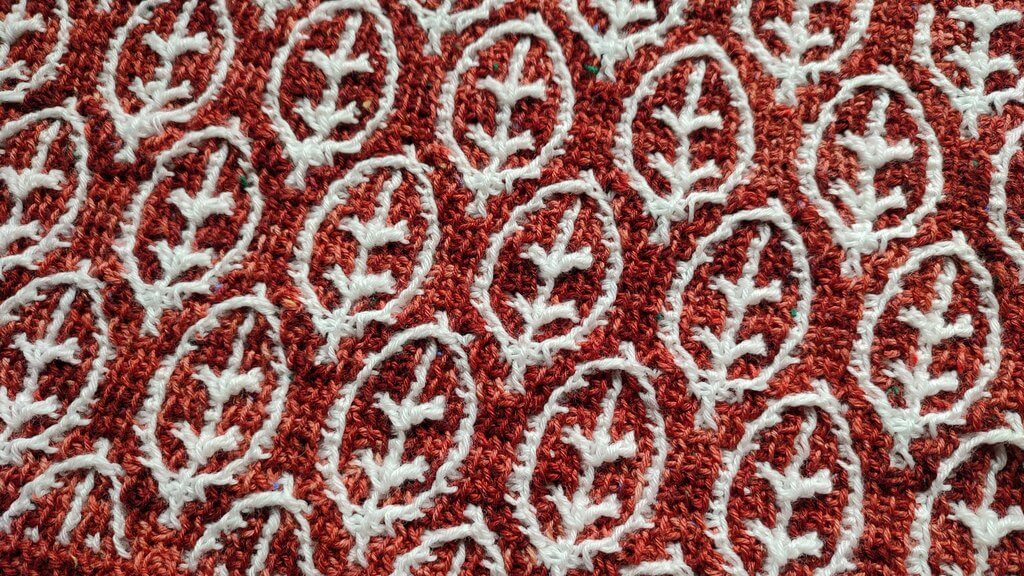
If you’d like the full pattern for a cowl with 6 sizes with this leaf motif, check it out here in my shop, on Payhip, Ravelry or Etsy.
The PDF version includes a watermark-free chart and print-friendly instructions, including the top and bottom honeycomb edges that keep the cowl from curling.
If you’d like to try the shawl pattern that includes the bee motifs, make sure you subscribe to my emails to find out when that one is ready.
Check out more Tunisian crochet resources and all the free patterns that are here on the blog in the dedicated page.

