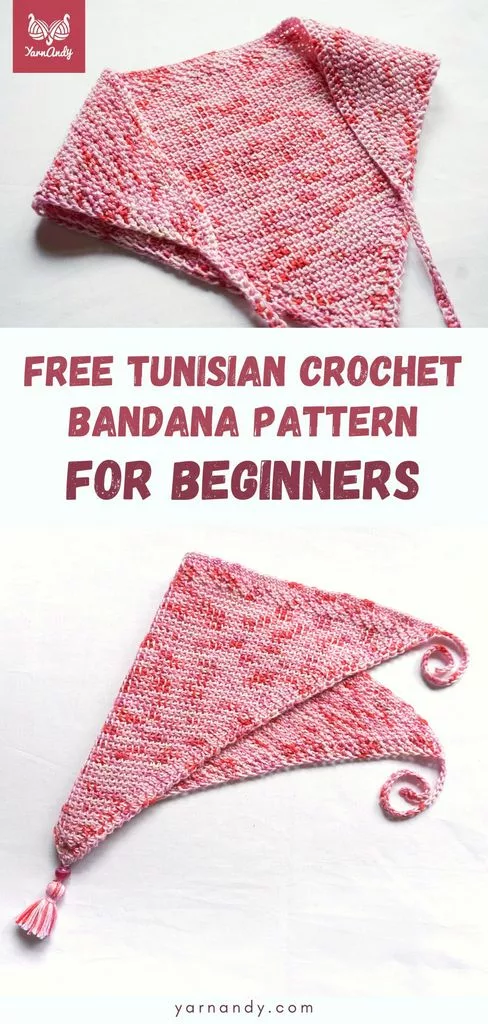
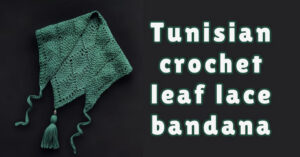
This beginner Tunisian crochet bandana pattern is perfect for a quick summer make in your favorite speckled or tonal cotton yarn.
If you’re a beginner in Tunisian crochet and want an easy project to keep your hair protected from the harsh summer sun, while looking cute, you can make a quick bandana using sport weight cotton yarn.
This will keep the bandana lightweight and flowy, while creating a smooth, compact fabric that protects your head from the heat.
Simple and easy to make with a Tunisian crochet hook, it includes a non-curling border on all sides, so you don’t have to worry about curling.
For this project you can use variegated or speckled yarn because the triangle shape and simple stitch pattern prevents pooling in such colored yarns.
Contents
About this beginner crochet bandana pattern
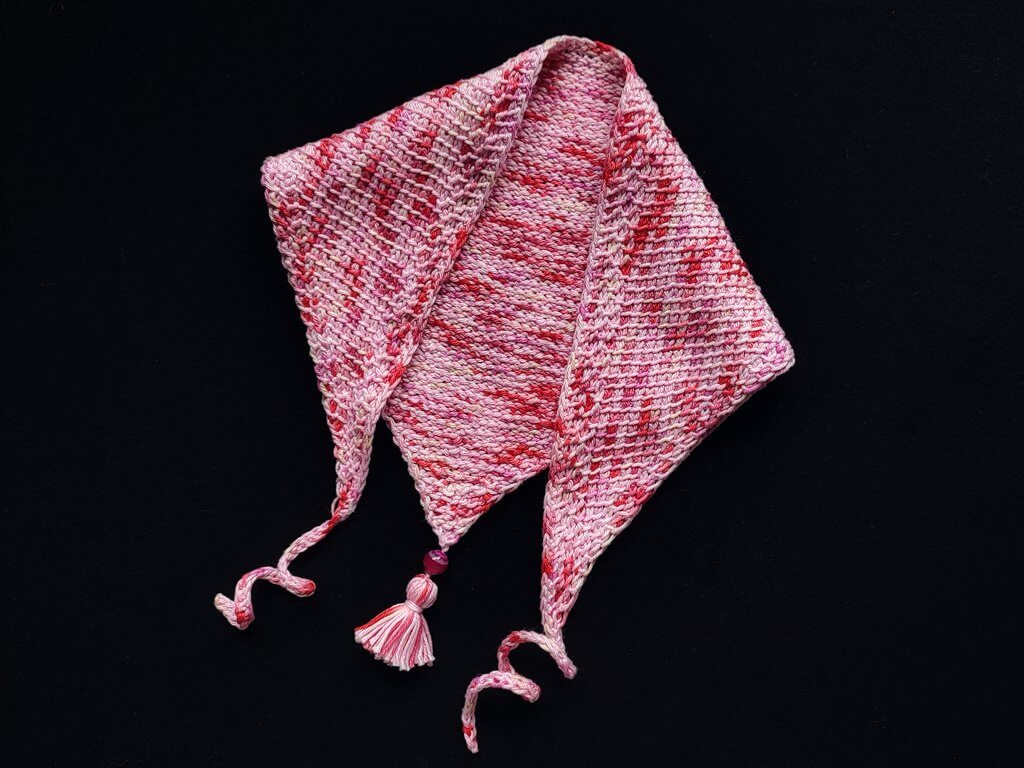
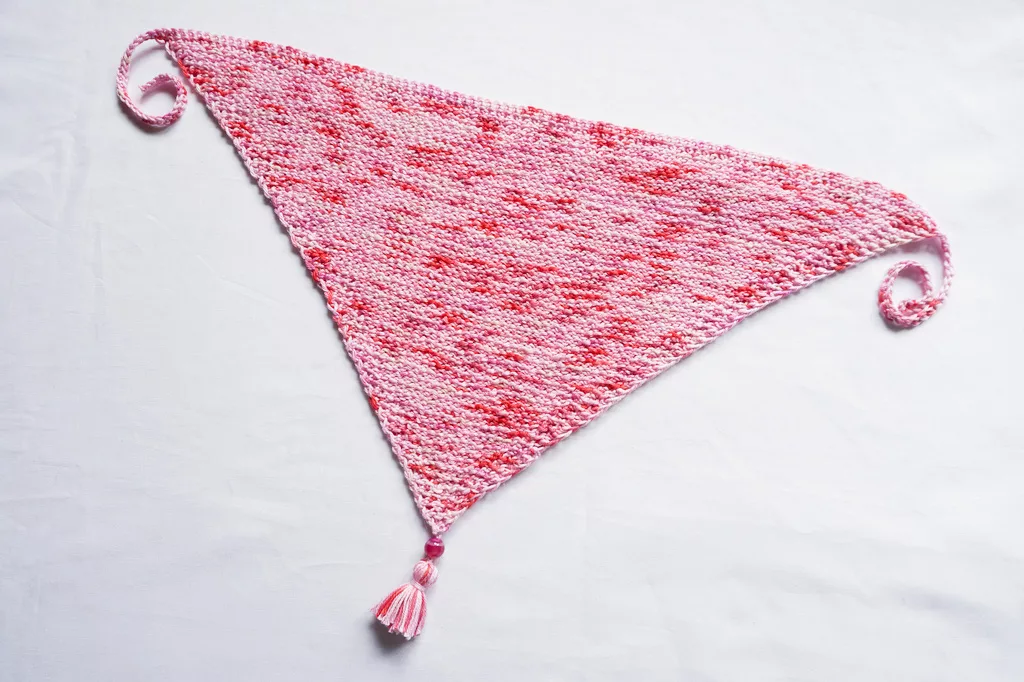
This is a beginner Tunisian crochet pattern for a triangle-shaped bandana with ties, perfect for beginners.
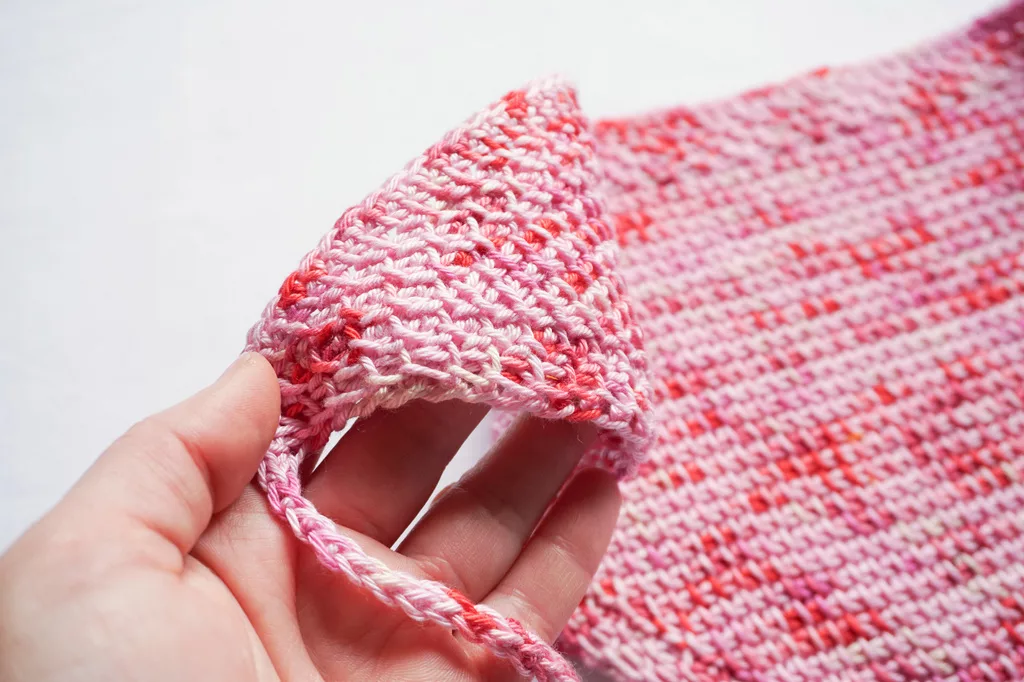
It is constructed from the tip at the bottom and grows with each row, with an inbuilt non-curling border on all edges.
The size is variable and you can make it cover a larger or smaller area by changing the number of rows you work. The ties are practical and light.
It is made of light cotton yarn, which makes it ideal for wearing on the beach, in place of a hat.
The name of the pattern is the German translation of the Straits of Florida.
Size and measurements
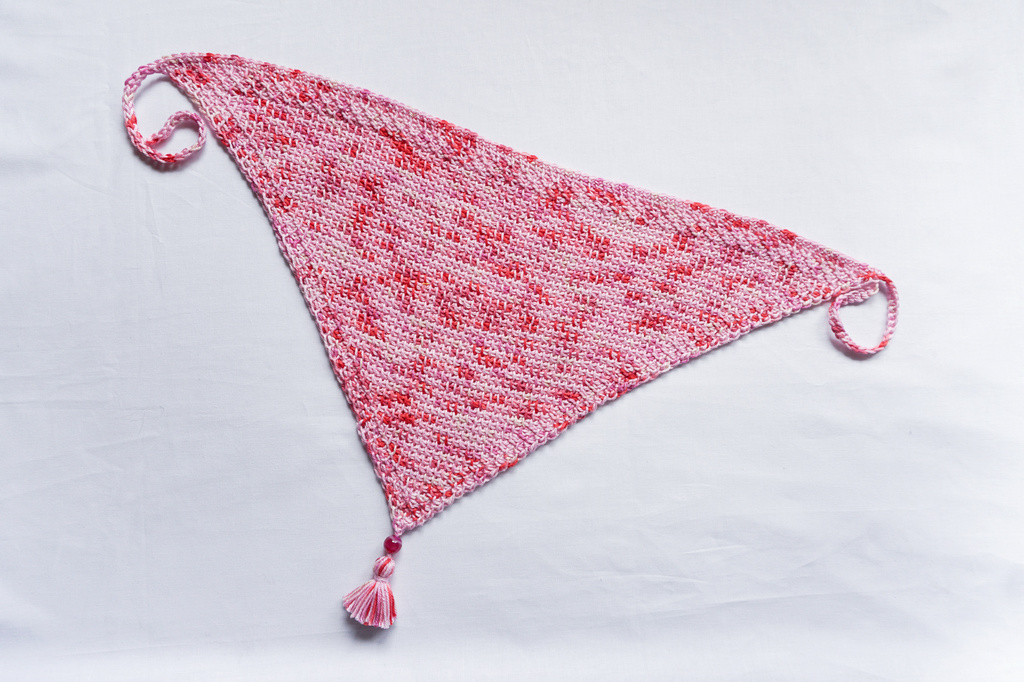
When meeting gauge and working all rows in the pattern, the triangle measures 60 cm across the top and 28 cm in depth, due to the slight elasticity of the lace pattern.
Gauge
Gauge is not essential in this pattern, as you work to your desired measurements.
If you do want to work to the provided size, make a gauge swatch by following these instructions
Row 1. Ch 25, pick up 25 loops in the back bumps of the chains, R (26 loops)
Row 2. 24 Tss, Ls, R (26 loops)
Repeat Row 2 24 more times for a total of 26 rows.
Block the swatch by washing it and laying it flat to dry.
Measure a 10 by 10 cm (4″ by 4″) square in the middle of the swatch and count the stitches and rows.
18 stitches and 18 rows should measure 10 by 10 cm (4″ by 4″).
If you get fewer stitches and rows, go down a hook size (0.5 mm), if available, and make another swatch.
If you get more stitches and rows, go up a hook size (0.5 mm), if available, and make another swatch.
Repeat the swatching process until you reach the recommended gauge. Make a note of the hook size used.
Skill level
Beginner. You need to know how to make Tunisian simple and purl stitches, Tunisian full stitches and a regular return pass.
Observations
This is a Tunisian crochet pattern worked flat, which means you always work on the right side of the fabric (the side that will be towards the outside).
Each row of symbols in the chart is independent of the previous row. You read each row of the chart as if reading a row of instructions.
The chart includes special symbols that are not usual for Tunisian crochet, but are explained in the legend and the instructions accompanying the chart.
When you encounter an eyelet and need to make a Tss, insert the hook through the eyelet and draw up a loop.
After a YO, you don’t skip a stitch unless specifically instructed.
You can stop whenever you like and continue with the ties and binding off row to finish the bandana.
Stitch makers are useful for keeping track of stitch counts.
Repeats are shown in [square brackets].
At the end of each row, loop counts are shown in (round brackets), including the first and last loop, before starting the return pass.
After finishing the bandana, wash it and lay it flat to dry. Then press it with an iron, on the wrong side, to open up the lace and give it the triangle shape.
You can make a tassel to attach at the bottom. Attach it after washing and pressing the bandana.
Notions
- Yarn: 50 g or 125-160 meters of size 2 cotton yarn at about 250-340 meters per 100 grams – for example 8/4 cotton yarn;
- Hook: Tunisian crochet hook with cable or straight, 5 mm or hook size that gets you gauge; 3.5 mm regular crochet hook for binding off and ties;
- Tools for blocking (iron with steam or other steamer), blocking mats and pins.
- Hook -Tunisian crochet hook with cable or straight, 5 mm or hook size that gets you gauge; 3.5 mm regular crochet hook for binding off and ties;
- Tapestry needle, scissors, tape measure;
- Optional. stitch markers;
- Tools for blocking (iron with steam or other steamer), blocking mats and pins.
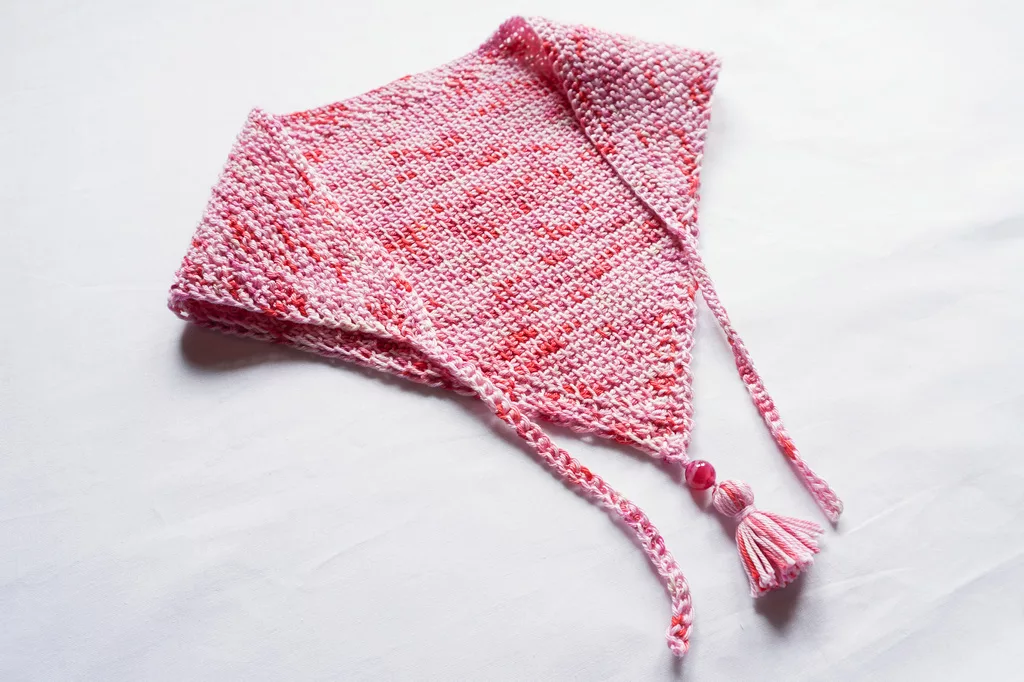
Sample made using Hobbii Simple Cotton 8/4 yarn.
Examples of yarn that works with this pattern: Paintbox Yarns Cotton 4 ply, Scheepjes Catona, Schachenmayr Catania, Rowan Summerlite 4 Ply, DMC Natura Just Cotton, Schachenmayr Organic Cotton.
Any of the colors in these yarns would work well with this pattern. Choose a light color to show off the lace.
Abbreviations
- BO – Bind off;
- Ch – Chain;
- Fs – First stitch;
- Ls – Last stitch: insert hook behind the two vertical bars at the end of the row, YO and pull up a loop;
- R – Regular return pass: Ch 1, Rep [YO and pull through 2 loops on hook] until 1 loop is left;
- Rep – Repeat;
- Sc – single crochet (US) or double crochet (UK);
- Sk – Skip;
- Sl St(s) – Slip stitch(es);
- St(s) – Stitch(es);
- Tfs – Tunisian full stitch: insert the hook in the space before the next St, YO and pull up a loop;
- Tps – Tunisian purl stitch: YU, insert the hook under the vertical bar of the next St, YO and pull up a loop;
- Tss – Tunisian simple stitch: insert the hook under the vertical bar of the next St, YO and pull up a loop;
- Tss2Tog – Tunisian simple stitch 2 together: insert the hook under the front vertical bars of the next 2 Sts, YO and pull up a loop;
- YO – Yarn over;
- YU – Yarn under: bring the yarn under and to the front of the hook.
Instructions
Start with a slip knot on the Tunisian crochet hook.
Row 1. Ch 2, pick up 2 loops in back bumps of the chains, R (3 loops)
Row 2. Tfs, Tps, Tfs, Ls, R (5 loops)
Row 3. Tfs, Tps, Tss, Tps, Tfs, Ls, R (7 loops)
Row 4. Tfs, Rep [Tps, Tss] 2 times, Tps, Tfs, Ls, R (9 loops)
Row 5. Tfs, Rep [Tps, Tss] 3 times, Tps, Tfs, Ls, R (11 loops)
Row 6. Tfs, Rep [Tps, Tss] 2 times, Tss, [Tss, Tps] 2 times, Tfs, Ls, R (13 loops)
Row 7. Tfs, Rep [Tps, Tss] 2 times, 4 Tss, Tps, Tss, Tps, Tfs, Ls, R (15 loops)
Row 8. Tfs, Rep [Tps, Tss] 2 times, 6 Tss, Tps, Tss, Tps, Tfs, Ls, R (17 loops)
Row 9. Tfs, Rep [Tps, Tss] 2 times, 8 Tss, Tps, Tss, Tps, Tfs, Ls, R (19 loops)
Continue in pattern until you reach the desired length and width, then add 3 rows of honeycomb stitch and bind off (see bind off section below).
Alternatively, follow the detailed written instructions below.
Row 10. Tfs, Rep [Tps, Tss] 2 times, 10 Tss, Tps, Tss, Tps, Tfs, Ls, R (21 loops)
Row 11. Tfs, Rep [Tps, Tss] 2 times, 12 Tss, Tps, Tss, Tps, Tfs, Ls, R (23 loops)
Row 12. Tfs, Rep [Tps, Tss] 2 times, 14 Tss, Tps, Tss, Tps, Tfs, Ls, R (25 loops)
Row 13. Tfs, Rep [Tps, Tss] 2 times, 16 Tss, Tps, Tss, Tps, Tfs, Ls, R (27 loops)
Row 14. Tfs, Rep [Tps, Tss] 2 times, 18 Tss, Tps, Tss, Tps, Tfs, Ls, R (29 loops)
Row 15. Tfs, Rep [Tps, Tss] 2 times, 20 Tss, Tps, Tss, Tps, Tfs, Ls, R (31 loops)
Row 16. Tfs, Rep [Tps, Tss] 2 times, 22 Tss, Tps, Tss, Tps, Tfs, Ls, R (33 loops)
Row 17. Tfs, Rep [Tps, Tss] 2 times, 24 Tss, Tps, Tss, Tps, Tfs, Ls, R (35 loops)
Row 18. Tfs, Rep [Tps, Tss] 2 times, 26 Tss, Tps, Tss, Tps, Tfs, Ls, R (37 loops)
Row 19. Tfs, Rep [Tps, Tss] 2 times, 28 Tss, Tps, Tss, Tps, Tfs, Ls, R (39 loops)
Row 20. Tfs, Rep [Tps, Tss] 2 times, 30 Tss, Tps, Tss, Tps, Tfs, Ls, R (41 loops)
Row 21. Tfs, Rep [Tps, Tss] 2 times, 32 Tss, Tps, Tss, Tps, Tfs, Ls, R (43 loops)
Row 22. Tfs, Rep [Tps, Tss] 2 times, 34 Tss, Tps, Tss, Tps, Tfs, Ls, R (45 loops)
Row 23. Tfs, Rep [Tps, Tss] 2 times, 36 Tss, Tps, Tss, Tps, Tfs, Ls, R (47 loops)
Row 24. Tfs, Rep [Tps, Tss] 2 times, 38 Tss, Tps, Tss, Tps, Tfs, Ls, R (49 loops)
Row 25. Tfs, Rep [Tps, Tss] 2 times, 40 Tss, Tps, 2 Tss, Tfs, Ls, R (51 loops)
Row 26. Tfs, Rep [Tps, Tss] 2 times, 42 Tss, Tps, Tss, Tps, Tfs, Ls, R (53 loops)
Row 27. Tfs, Rep [Tps, Tss] 2 times, 44 Tss, Tps, Tss, Tps, Tfs, Ls, R (55 loops)
Row 28. Tfs, Rep [Tps, Tss] 2 times, 46 Tss, Tps, Tss, Tps, Tfs, Ls, R (57 loops)
Row 29. Tfs, Rep [Tps, Tss] 2 times, 48 Tss, Tps, Tss, Tps, Tfs, Ls, R (59 loops)
Row 30. Tfs, Rep [Tps, Tss] 2 times, 50 Tss, Tps, Tss, Tps, Tfs, Ls, R (61 loops)
Row 31. Tfs, Rep [Tps, Tss] 2 times, 52 Tss, Tps, Tss, Tps, Tfs, Ls, R (63 loops)
Row 32. Tfs, Rep [Tps, Tss] 2 times, 54 Tss, Tps, Tss, Tps, Tfs, Ls, R (65 loops)
Row 33. Tfs, Rep [Tps, Tss] 2 times, 56 Tss, Tps, Tss, Tps, Tfs, Ls, R (67 loops)
Row 34. Tfs, Rep [Tps, Tss] 2 times, 58 Tss, Tps, Tss, Tps, Tfs, Ls, R (69 loops)
Row 35. Tfs, Rep [Tps, Tss] 2 times, 60 Tss, Tps, Tss, Tps, Tfs, Ls, R (71 loops)
Row 36. Tfs, Rep [Tps, Tss] 2 times, 62 Tss, Tps, Tss, Tps, Tfs, Ls, R (73 loops)
Row 37. Tfs, Rep [Tps, Tss] 2 times, 64 Tss, Tps, Tss, Tps, Tfs, Ls, R (75 loops)
Row 38. Tfs, Rep [Tps, Tss] 2 times, 66 Tss, Tps, Tss, Tps, Tfs, Ls, R (77 loops)
Row 39. Tfs, Rep [Tps, Tss] 2 times, 68 Tss, Tps, Tss, Tps, Tfs, Ls, R (79 loops)
Row 40. Tfs, Rep [Tps, Tss] 2 times, 70 Tss, Tps, Tss, Tps, Tfs, Ls, R (81 loops)
Row 41. Tfs, Rep [Tps, Tss] 2 times, 72 Tss, Tps, Tss, Tps, Tfs, Ls, R (83 loops)
Row 42. Tfs, Rep [Tps, Tss] 2 times, 74 Tss, Tps, Tss, Tps, Tfs, Ls, R (85 loops)
Row 43. Tfs, Rep [Tps, Tss] 2 times, 76 Tss, Tps, Tss, Tps, Tfs, Ls, R (87 loops)
Row 44. Tfs, Rep [Tps, Tss] 2 times, 78 Tss, Tps, Tss, Tps, Tfs, Ls, R (89 loops)
Row 45. Tfs, Rep [Tps, Tss] 43 times, Tps, Tfs, Ls, R (91 loops)
Row 46. Tfs, Rep [Tps, Tss] 44 times, Tps, Tfs, Ls, R (93 loops)Row 47. Tfs, [Tps, Tss] 45 times, Tps, Tfs, Ls, R (95 loops)
Binding off
Ch 31, Sk 1, make Sc in back bumps of chains.
Bind off with Sc as if to make Tss. Ch 31, turn, Sk 1, make Sc in back bumps of chains OR make 30 foundation Sc.
Weave in all tails or use the tail at the beginning to tie a tassel.
Here’s how to make a cute tassel. Make it smaller and with fewer strands than in the video.
Charts for this Tunisian crochet lace bandana
How to use the charts
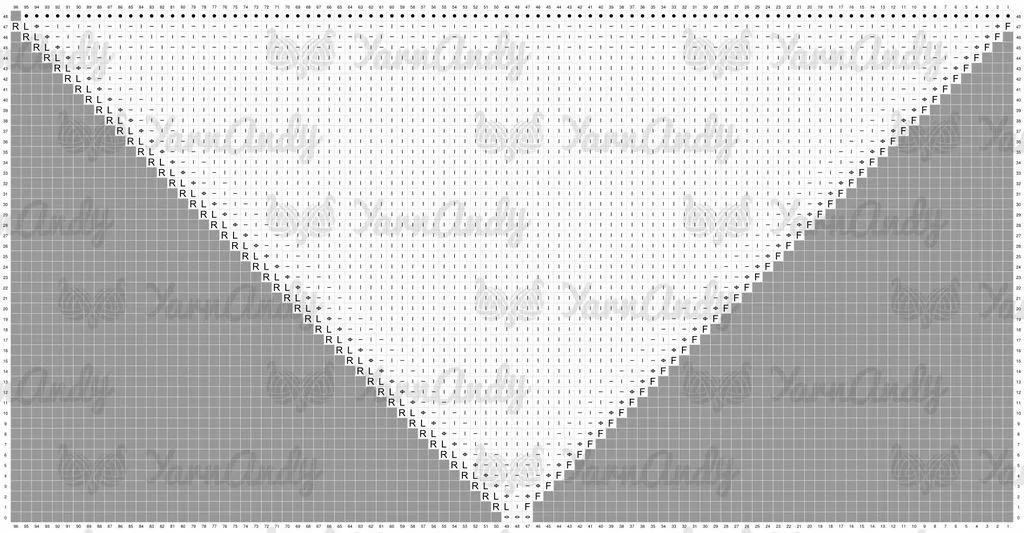
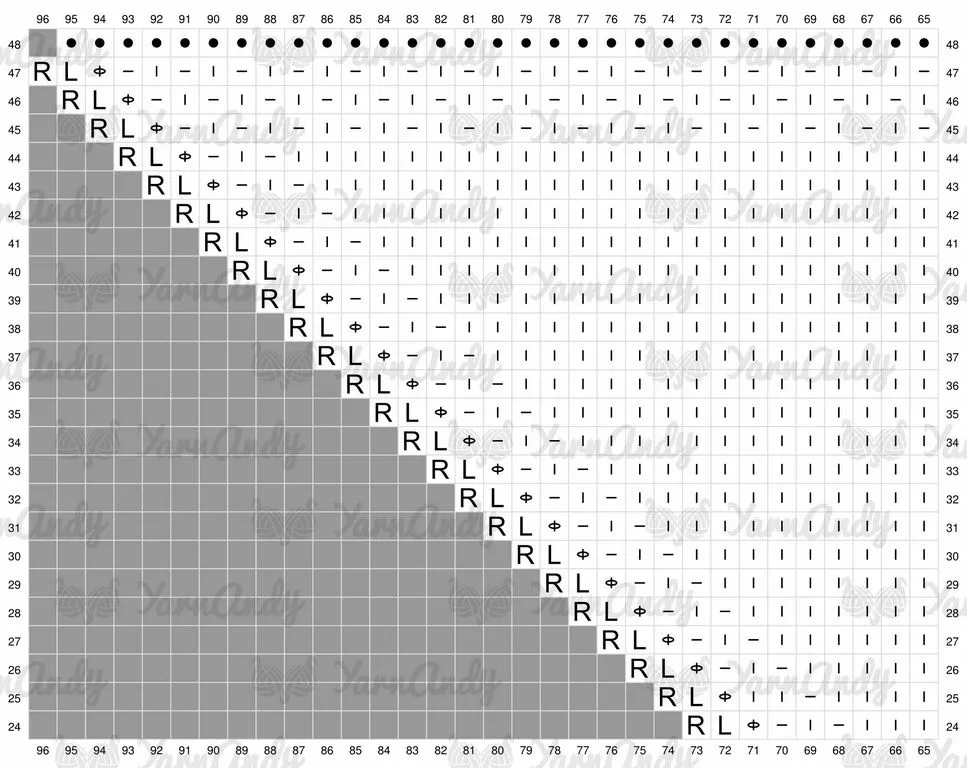
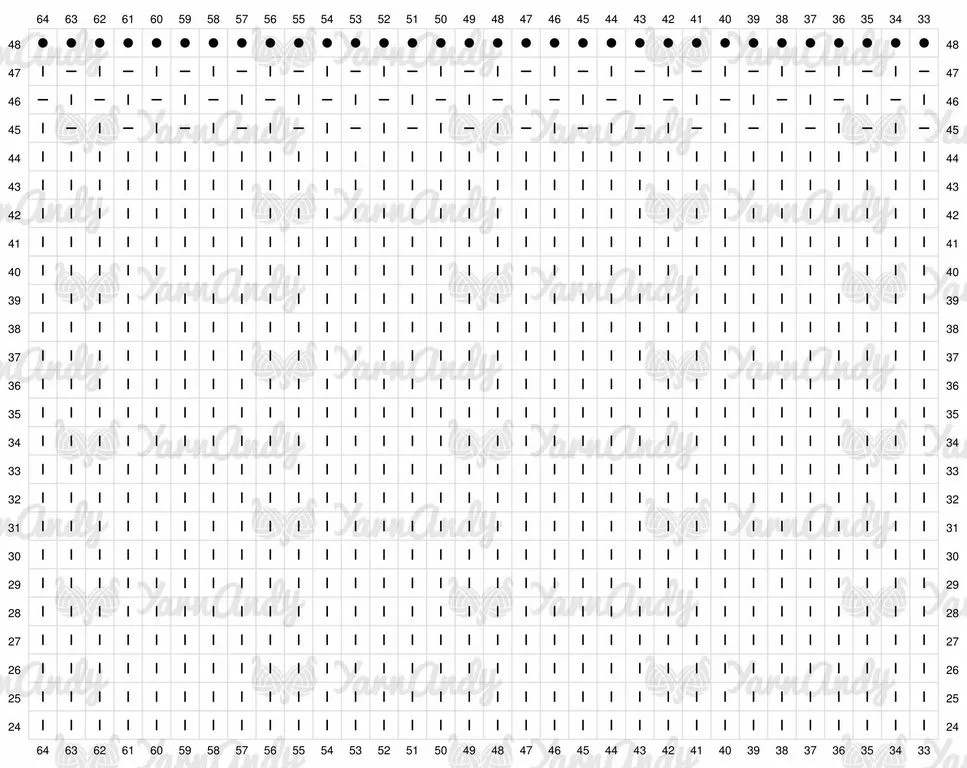
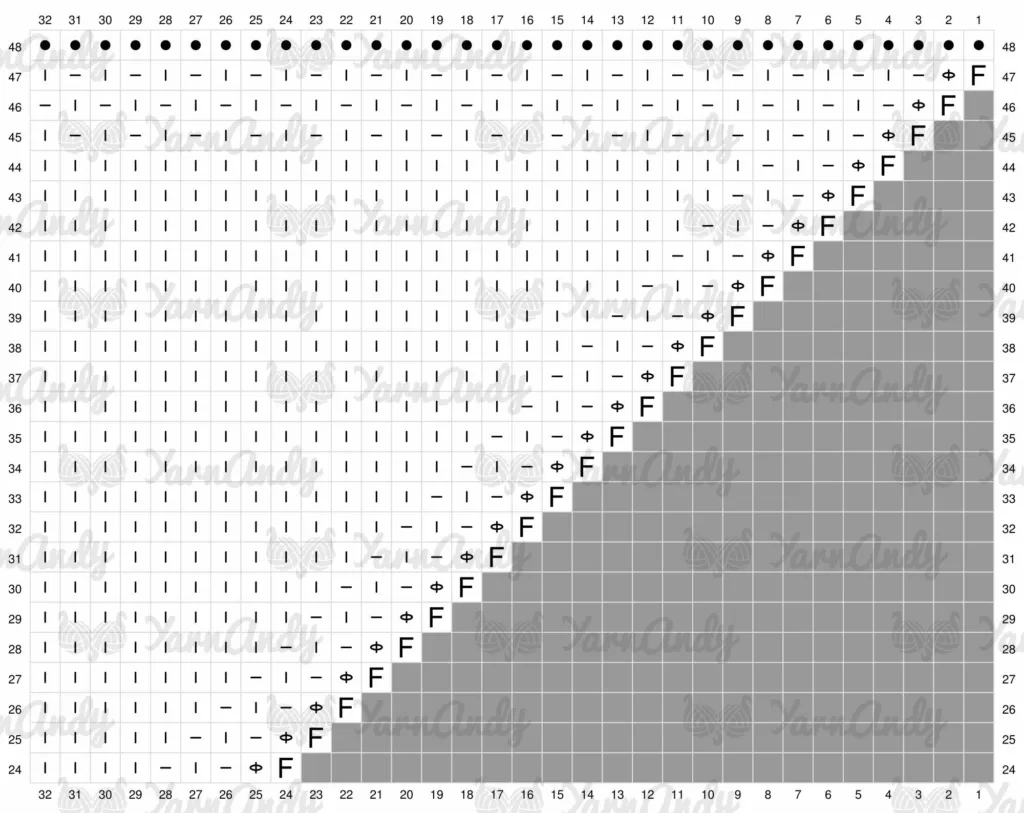
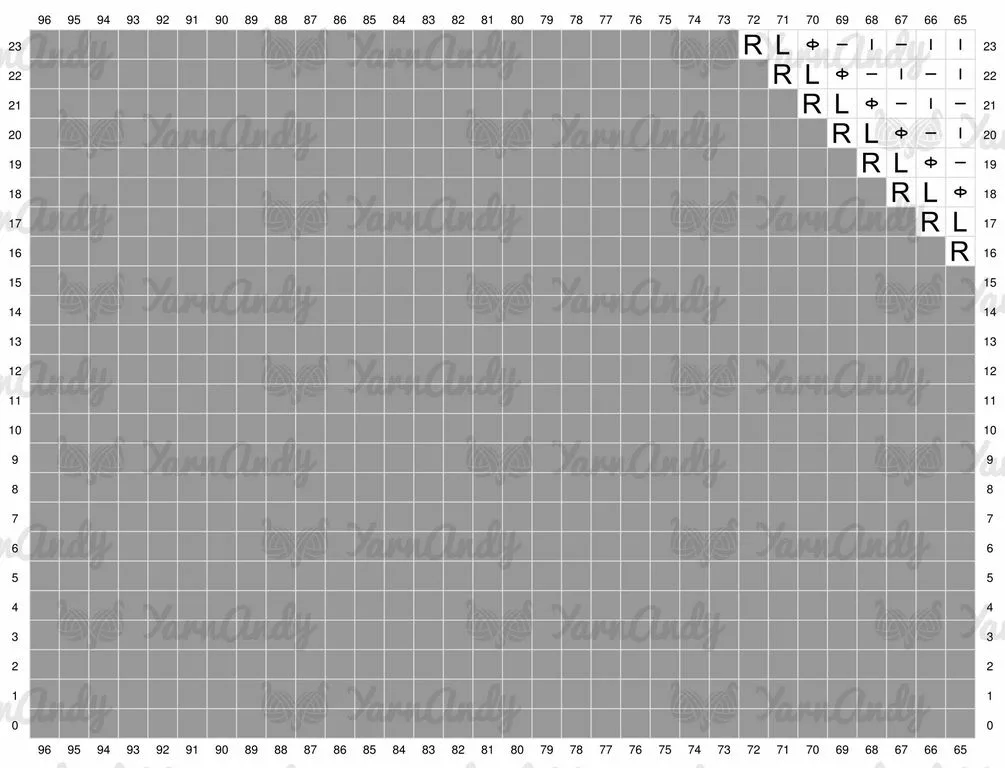
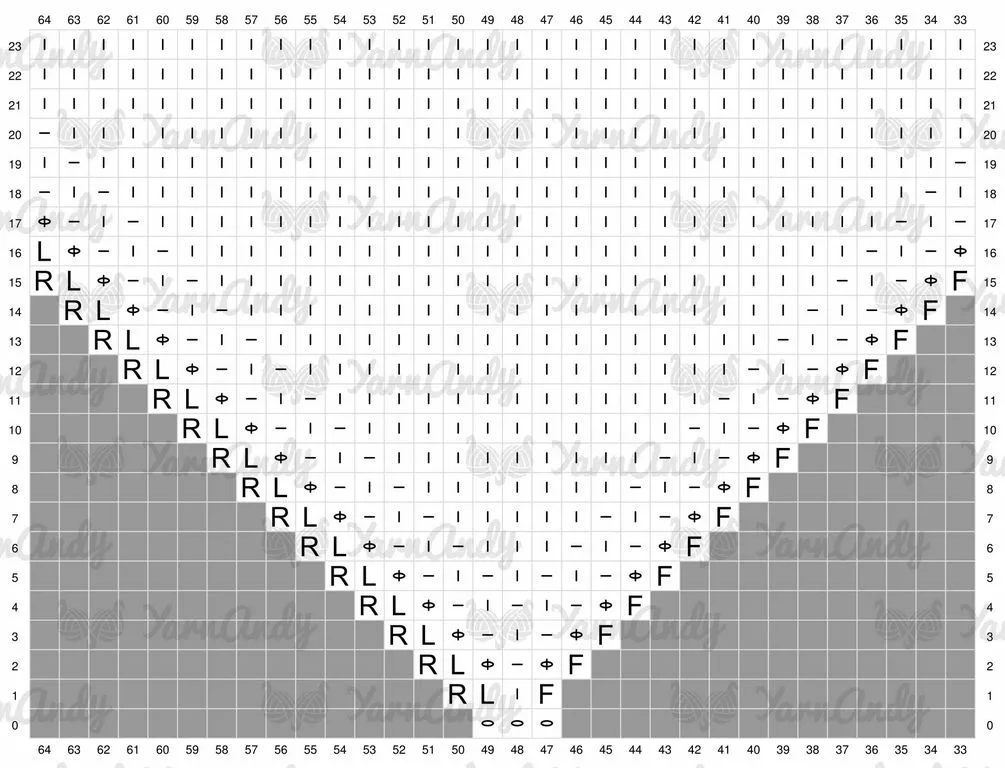
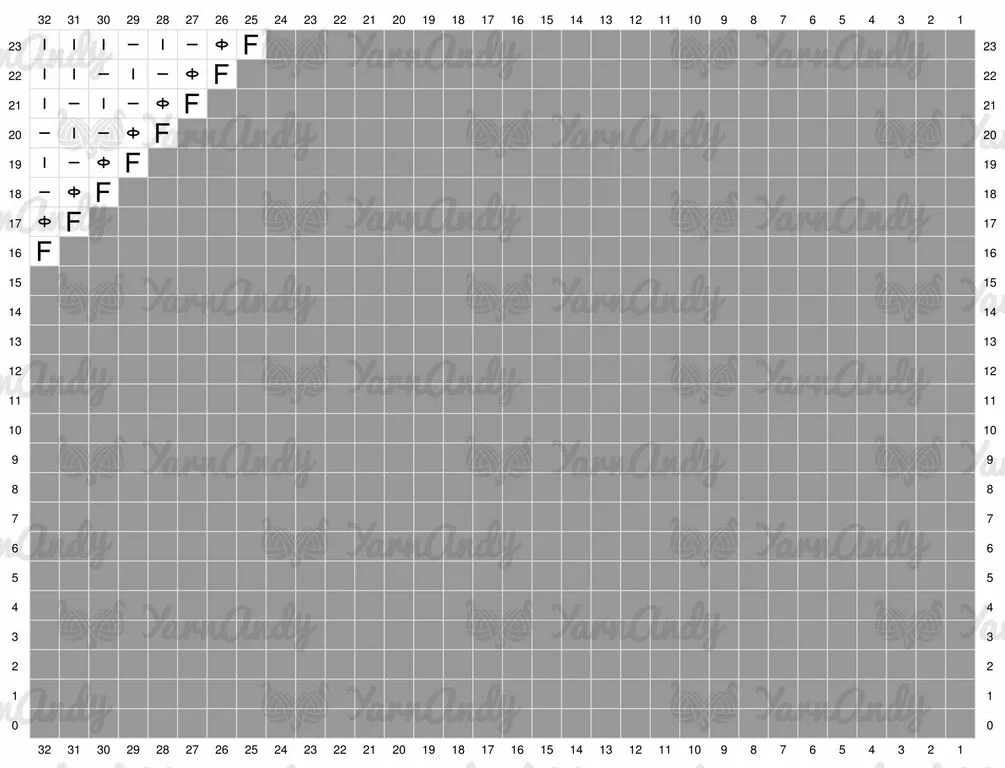
This pattern can be made by following along with the instructions, following the chart or both at the same time.
Follow the stitches for each row individually. The full chart shows the intended shape and layout of the final project, but when working from the chart you should only look at the stitches on the current row.
Start working from the bottom and reading each row from right to left, even if you are left handed.
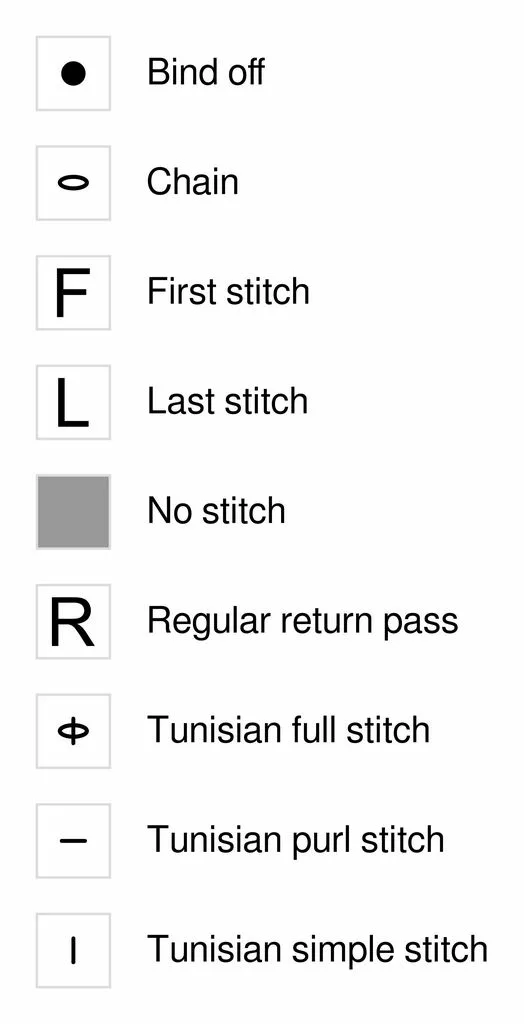
The return pass rows are represented on the chart with the symbol R. The first loop (which you don’t work with in this pattern) is represented with the symbol F.
Everything else is represented in the legend.
Overall chart
Legend
Small charts
Click on the charts to open them as larger photos. Follow along as they are or save and print them.
You can save and print these charts, to assemble them to form the large chart, or just follow the stitches on the same row over the 3 charts for each row.
Final remarks
If you have any trouble with the pattern, write me a comment down below or use the contact form here to write me an email.
I hope, however, that you’ll have fun with the pattern and try out other Tunisian crochet patterns that I’ve put out so far.
Nordic star Tunisian crochet baby blanket pattern
Tunisian crochet cat ear beanie free pattern
Free wavy mosaic Tunisian crochet pattern
Feather and fan Tunisian crochet pattern for a washcloth
Tunisian crochet asymmetrical rounded triangle shawl tutorial
How to start a Tunisian crochet project in a magic ring
How to make different shawl shapes in Tunisian crochet
How to sew Tunisian knit stitch row to row
How to make a Tunisian crochet mosaic bee potholder
Free pattern for leaf lace Tunisian crochet bandana
If you’re interested in more bandana patterns, check out the ones linked below. You can also sign up to my email updates here if you want to know when others are published.
Also if you want to see what this pattern looks like knit.
Hugs,
Andrea
