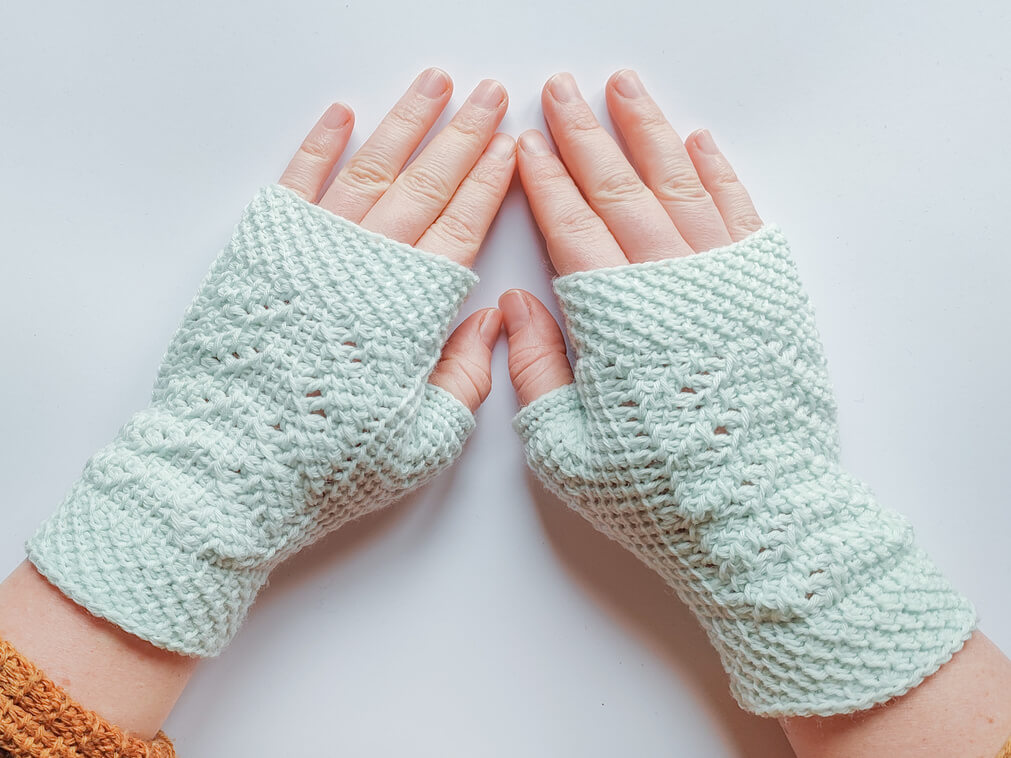
Keep your hands warm in the transitional seasons by wearing these beautiful and light lacy Tunisian crochet fingerless mittens.
Make them for yourself or your loved ones, using one of the 6 sizes available in the pattern here on the blog.
Use sock yarn or a high twist fingering weight merino for a snug fit. If you prefer to add ribbing to either the cuff or the top of the mitten, skip the bottom and/or top honeycomb and use this tutorial to add elastic ribbing sideways when you are finished with the main body of the mittens.
The mittens are constructed flat and seamed, but you can also make them in the round using a double ended hook. The lace panel is centered above the back of the palm, and testers have helped in doing this properly.
Contents
About the pattern
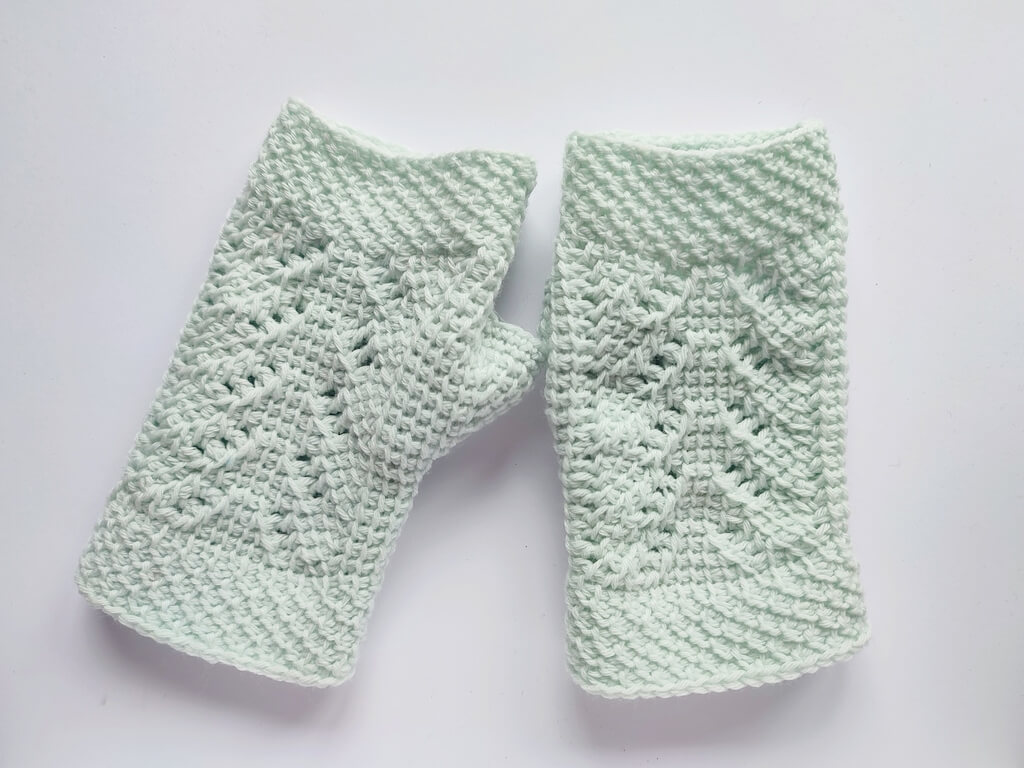
These Tunisian crochet fingerless mittens are made flat from the wrist up and seamed. The beautiful lace pattern on the back of the hand resembles rising vapors and the shaped thumb makes these mittens very comfortable to wear.
Any sock weight or size 2 yarn works for this pattern as long as you get gauge. Gauge is important to get well-fitting mittens, so make a gauge swatch before you start.
The pattern is offered in six adult sizes, so you can make fingerless mittens for your entire family.
Size and measurements
Check out the table for hand circumference and length, as well as thumb circumference.
For thicker thumbs, keep increasing. Remove the extra stitches and rows when binding off to make the section above the thumb.
The sizes range between hand sizes of 15.2 and 27.9 cm (between 6″ and 11″) with no ease.
The table provides approximate sizes for the length of the mitten. For longer hands, add more rows. For shorter hands, skip rows before or after the thumb.
| Size | A | B | C | D | E | F |
|---|---|---|---|---|---|---|
| Circumference (cm) | 15.2 | 17.8 | 20 | 23 | 25.4 | 27.9 |
| Length (cm) | 16 | 17.1 | 18 | 19 | 20.4 | 21.5 |
| Thumb circ. (cm) | 6 | 6.5 | 7 | 7.5 | 8 | 8.5 |
| Circumference (“) | 6 | 7 | 8 | 9 | 10 | 11 |
| Length (“) | 6 1/4 | 6 3/4 | 7 1/8 | 7 1/2 | 8 | 8 1/2 |
| Thumb circ. (“) | 2 1/3 | 2 5/9 | 2 3/4 | 3 | 3 1/7 | 3 1/3 |
The stitch and loop counts are shown in pattern as follows: A, B (C, D) [E, F].

Notions
Use a springy or elastic yarn with high twist, such as sock yarn or yarn with a similar composition and twist, as this property of the yarn will make the mittens slightly elastic and more comfortable to put on and wear.
Yarn: sock weight or size 2, with 400-420 meters per 100 grams; approximate usage per size: 33, 35 (43, 49) [57, 65] g per pair;
Hooks: 5 mm Tunisian crochet or straight hook; 3.5 mm regular crochet hook.
Tapestry needle, scissors.
Optional: 2 stitch markers for the lace, 1 m elastic thread for the cuff.
Abbreviations
- Ch – chain;
- Fs – first stitch: the 2 vertical bars at the beginning of the row;
- Ls – Tunisian last stitch – put hook behind the 2 vertical loops at the end of the row, YO and pull up a loop;
- R – regular Tunisian crochet return: Ch1, repeat [YO and pull through 2 stitches on hook] until you are left with only one stitch;
- Sl St – slip stitch;
- St (s) – stitch(es);
- Tks – Tunisian knit stitch: insert the hook between the two vertical bars of the next St, YO and pull up a loop;
- Tps – Tunisian purl stitch: YU, insert the hook under the vertical bar of the next St, YO and pull up a loop;
- Tss – Tunisian simple stitch: insert the hook under the vertical bar of the next St, YO and pull up a loop;
- Tss2Tog – Tunisian simple stitch 2 together: insert the hook under the front vertical bars of the next 2 Sts, YO and pull up a loop;
- YO – Yarn over;
- YU – Yarn under: bring the yarn under and to the front of the hook.
Observations
- This pattern is written in Tunisian crochet terms, which are identical in US and UK crochet terminology.
- Each row consists of a forward pass and a return pass.
- The mittens are worked flat and from the wrist up.
- After the mittens are complete, they are sewn together with a mattress stitch and the seam should be towards the inside of each mitten.
- If you are left-handed, the instructions for the left mitten are your instructions for the right mitten and vice-versa.
- You could also make the mittens in the round, using a double ended hook and two yarns at a time (one for the forward pass, one for the return pass). In this case, you can use the instructions for either mitten twice.
- The sizes are based on standard sizing, but for people with shorter or longer fingers you can add or remove some rows. There are two places in the pattern where you can do this and these places are marked as such.
- Instructions for all sizes are provided with the following structure: A , B (C, D) [E, F]. Highlight the row number and stitch for the size you will be working on.
- When making a Tss in an eyelet (YO space from the row below), insert the hook through the eyelet and pull up a loop.
- Use stitch markers to mark the beginning and end of the lace pattern. Move them after each completed row (forward and return pass).
- At the end of each row, you have the loop counts for the current row for each size after the forward pass after the — symbol.
Gauge
22 Tss and 20 rows for a 10 cm by 10 cm square (4″ by 4″).
Make a gauge swatch by following these instructions.
Row 1. Ch 25, pick up 25 loops in the back bumps of the chains, R (26 loops)
Row 2. 24 Tss, Ls, R (26 loops)
Repeat Row 2 24 more times for a total of 26 rows.
Block the swatch by washing it and laying it flat to dry.
Measure a 10 by 10 cm (4″ by 4″) square in the middle of the swatch and count the stitches and rows.
If you get fewer stitches and rows, go down a hook size (0.5 mm), if available, and make another swatch.
If you get more stitches and rows, go up a hook size (0.5 mm), if available, and make another swatch.
Repeat the swatching process until you reach the recommended gauge. Make a note of the hook size used.
Instructions
Left mitten
Right for left handed.
Start with a slip knot on your hook.
Foundation Row or Row 1 all sizes. Ch 37, 41 (45, 49) [57, 61] and pick up 37, 41 (45, 49) [57, 61] loops in back bumps, R — 38, 42 (46, 50) [58, 62] loops
OR
Cast on 38, 42 (46, 50) [58, 62] Sts in your preferred cast on method, R where applicable. See different cast on methods here.
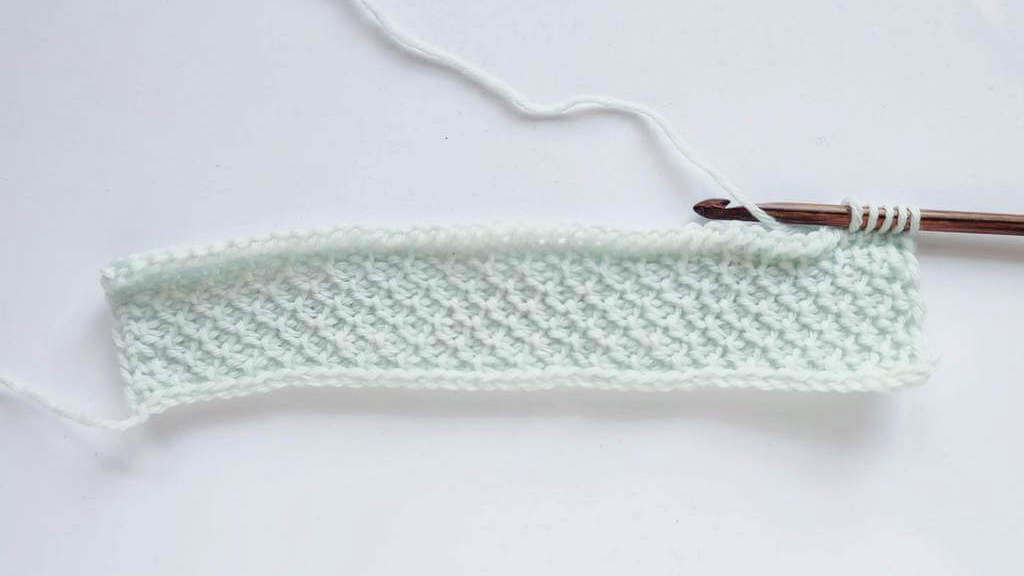
Row 2 all sizes. Rep [1 Tss, 1 TPs] until the end of the row, Ls, R — 38, 42 (46, 50) [58, 62] loops
Row 3 all sizes. Rep [1 TPs, 1 Tss] until the end of the row, Ls, R — 38, 42 (46, 50) [58, 62] loops
Row 4 all sizes. Rep [1 Tss, 1 TPs] until the end of the row, Ls, R — 38, 42 (46, 50) [58, 62] loops
Repeat Rows 3-4 another 1, 1 (2, 2) [2, 2] times. Repeat Row 3 another 1, 1 (-, -) [1, 1] time.
Row 8, 8 (9, 9) [10, 10]. 1 Tss in each St to end of row, Ls, R — 38, 42 (46, 50) [58, 62] loops
Row 9, 9 (10, 10) [11, 11]. 4, 5 (6, 7) [9, 10] Tss, YO, 1 Tss, Tss2Tog, 1 Tss, YO, Tss2Tog, 5 Tss, Tss2Tog, YO, 1 Tss, Tss2Tog, 1 Tss, YO, 15, 18 (21, 24) [30, 33] Tss, Ls, R — 38, 42 (46, 50) [58, 62] loops
Row 10, 10 (11, 11) [12, 12]. 4, 5 (6, 7) [9, 10] Tss, YO, 2 Tss, Tss2Tog, 1 Tss, YO, Tss2Tog, 3 Tss, Tss2Tog, YO, 1 Tss, Tss2Tog, 2 Tss, YO, 15, 18 (21, 24) [30, 33] Tss, Ls, R — 38, 42 (46, 50) [58, 62] loops
Row 11, 11 (12, 12) [13, 13]. 4, 5 (6, 7) [9, 10] Tss, YO, 3 Tss, Tss2Tog, 1 Tss, YO, Tss2Tog, 1 Tss, Tss2Tog, YO, 1 Tss, Tss2Tog, 3 Tss, YO, 15, 18 (21, 24) [30, 33] Tss, Ls, R — 38, 42 (46, 50) [58, 62] loops
Row 12, 12 (13, 13) [14, 14]. 4, 5 (6, 7) [9, 10] Tss, YO, 4 Tss, Tss2Tog, 5 Tss, Tss2Tog, 4 Tss, YO, 15, 18 (21, 24) [30, 33] Tss, Ls, R — 38, 42 (46, 50) [58, 62] loops
Row 13, 13 (14, 14) [15, 15]. 4, 5 (6, 7) [9, 10] Tss, YO, 1 Tss, Tss2Tog, 1 Tss, YO, Tss2Tog, 5 Tss, Tss2Tog, YO, 1 Tss, Tss2Tog, 1 Tss, YO, 15, 18 (21, 24) [30, 33] Tss, Ls, R — 38, 42 (46, 50) [58, 62] loops
Row 14, 14 (15, 15) [16, 16]. 4, 5 (6, 7) [9, 10] Tss, YO, 2 Tss, Tss2Tog, 1 Tss, YO, Tss2Tog, 3 Tss, Tss2Tog, YO, 1 Tss, Tss2Tog, 2 Tss, YO, 15, 18 (21, 24) [30, 33] Tss, Ls, R — 38, 42 (46, 50) [58, 62] loops
If you want to extend the palm section or to make it shorter, you can add or remove some rows here, continuing in lace pattern.
From this section, the 4 rows of the lace pattern will be repeated while the thumb section is built.
The 4 lace rows are as follows:
Lace row 1. YO, 1 Tss, Tss2Tog, 1 Tss, YO, Tss2Tog, 5 Tss, Tss2Tog, YO, 1 Tss, Tss2Tog, 1 Tss, YO
Lace row 2. YO, 2 Tss, Tss2Tog, 1 Tss, YO, Tss2Tog, 3 Tss, Tss2Tog, YO, 1 Tss, Tss2Tog, 2 Tss, YO
Lace row 3. YO, 3 Tss, Tss2Tog, 1 Tss, YO, Tss2Tog, Tss, Tss2Tog, YO, 1 Tss, Tss2Tog, 3 Tss, YO
Lace row 4. YO, 4 Tss, Tss2Tog, 5 Tss, Tss2Tog, 4 Tss, YO
Thumb increases
Row 15, 15 (16, 16) [17, 17]. {1 Tss, 1 Tks} in first St (not in Fs),3, 4 (5, 6) [8, 9] Tss, lace row 3, 15, 18 (21, 24) [30, 33] Tss, Ls, R — 39, 43 (47, 51) [59, 63] loops
Row 16, 16 (17, 17) [18, 18]. {1 Tss, 1 Tks, 1 Tss} in first St (not in Fs),4, 5 (6, 7) [9, 10] Tss, lace row 4, 15, 18 (21, 24) [30, 33] Tss, Ls, R — 41, 45 (49, 53) [61, 65] loops
Row 17, 17 (18, 18) [19, 19]. {1 Tss, 1 Tks} in first St (not in Fs), 1 Tss, {1 Tks, 1 Tss} in next St, 4, 5 (6, 7) [9, 10] Tss, lace row 1, 15, 18 (21, 24) [30, 33] Tss, Ls, R — 43, 47 (51, 55) [63, 67] loops
Row 18, 18 (19, 19) [20, 20]. {1 Tss, 1 Tks} in first St (not in Fs), 3 Tss, {1 Tks, 1 Tss} in next St, 4, 5 (6, 7) [9, 10] Tss, lace row 2, 15, 18 (21, 24) [30, 33] Tss, Ls, R — 45, 49 (53, 57) [65, 69] loops
Row 19, 19 (20, 20) [21, 21]. {1 Tss, 1 Tks} in first St (not in Fs), 5 Tss, {1 Tks, 1 Tss} in next St,4, 5 (6, 7) [9, 10] Tss, lace row 3, 15, 18 (21, 24) [30, 33] Tss, Ls, R — 47, 51 (55, 59) [67, 71] loops
Row 20, 20 (21, 21) [22, 22]. {1 Tss, 1 Tks} in first St (not in Fs), 7 Tss, {1 Tks, 1 Tss} in next St,4, 5 (6, 7) [9, 10] Tss, lace row 4, 15, 18 (21, 24) [30, 33] Tss, Ls, R — 49, 53 (57, 61) [69, 73] loops
Row 21, 21 (22, 22) [23, 23]. {1 Tss, 1 Tks} in first St (not in Fs), 9 Tss, {1 Tks, 1 Tss} in next St,4, 5 (6, 7) [9, 10] Tss, lace row 1, 15, 18 (21, 24) [30, 33] Tss, Ls, R — 51, 55 (59, 63) [71, 75] loops
Row 22, 22 (23, 23) [24, 24]. {1 Tss, 1 Tks} in first St (not in Fs), 11 Tss, {1 Tks, 1 Tss} in next St,4, 5 (6, 7) [9, 10] Tss, lace row 2, 15, 18 (21, 24) [30, 33] Tss, Ls, R — 53, 57 (61, 65) [73, 77] loops
Row 23, 23 (24, 24) [25, 25]. {1 Tss, 1 Tks} in first St (not in Fs), 13 Tss, {1 Tks, 1 Tss} in next St,4, 5 (6, 7) [9, 10] Tss, lace row 3, 15, 18 (21, 24) [30, 33] Tss, Ls, R — 55, 59 (63, 67) [75, 79] loops
Row -, – (25, 25) [26, 26]. {1 Tss, 1 Tks} in first St (not in Fs), 15 Tss, {1 Tks, 1 Tss} in next St,-, – (6, 7) [9, 10] Tss, lace row 4, -, – (21, 24) [30, 33] Tss, Ls, R — -, – (65, 69) [77, 81] loops
Row -, – (-, -) [27, 27]. {1 Tss, 1 Tks} in first St (not in Fs), 17 Tss, {1 Tks, 1 Tss} in next St,-, – (-, -) [9, 10] Tss, lace row 1, -, – (-, -) [30, 33] Tss, Ls, R — -, – (-, -) [79, 83] loops
Bind off 17, 17 (19, 19) [21, 21] stitches by doing 1 Sl St in each St.
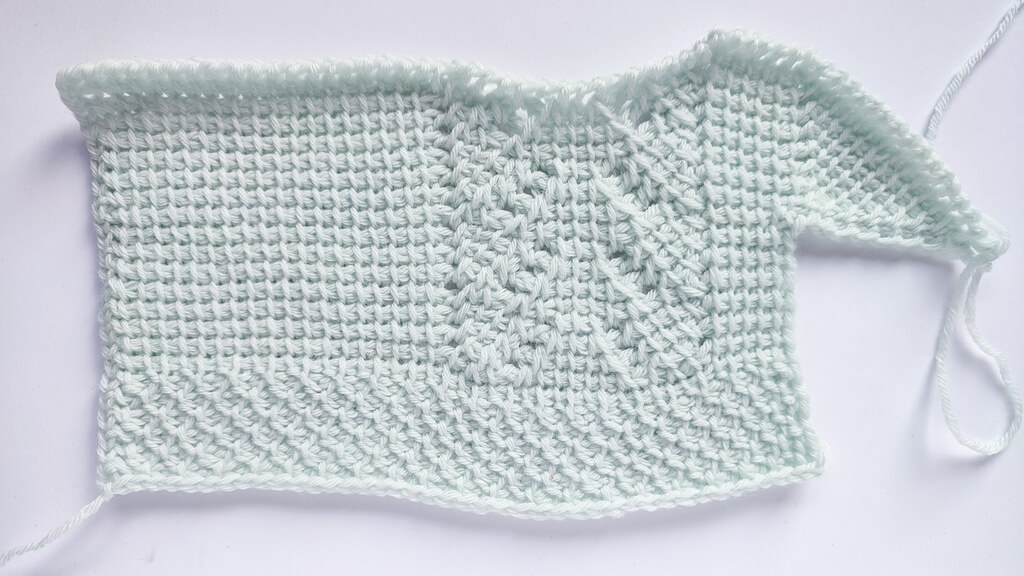
The length at the top of the thumb triangle (hypotenuse) should measure the thumb circumference. If not, continue increasing and working in the lace pattern.
Skip the corresponding rows in the palm section.
Palm
Row 24, 24 (26, 26) [28, 28]. 4, 5 (6, 7) [9, 10] Tss, lace row 4, 4 (1, 1) [2, 2], 15, 18 (21, 24) [30, 33] Tss, Ls, R — 38, 42 (46, 50) [58, 62] loops
Row 25, 25 (27, 27) [29, 29]. 4, 5 (6, 7) [9, 10] Tss, lace row 1, 1 (2, 2) [3, 3], 15, 18 (21, 24) [30, 33] Tss, Ls, R — 38, 42 (46, 50) [58, 62] loops
Row 26, 26 (28, 28) [30, 30]. 4, 5 (6, 7) [9, 10] Tss, lace row 2, 2 (3, 3) [4, 4], 15, 18 (21, 24) [30, 33] Tss, Ls, R — 38, 42 (46, 50) [58, 62] loops
Row 27, 27 (29, 29) [31, 31]. 4, 5 (6, 7) [9, 10] Tss, lace row 3, 3 (4, 4) [1, 1], 15, 18 (21, 24) [30, 33] Tss, Ls, R — 38, 42 (46, 50) [58, 62] loops
Row -, – (30, 30) [32, 32]. -, – (6, 7) [9, 10], lace row -, – (1, 1) [2, 2], -, – (21, 24) [30, 33] Tss, Ls, R — -, – (46, 50) [58, 62] loops
Row -, – (-, -) [33, 33]. -, – (-, -) [9, 10] Tss, lace row -, – (-, -) [3, 3], -, – (-, -) [30, 33] Tss, Ls, R — -, – (-, -) [58, 62] loops
Row 28, 28 (31, 31) [34, 34]. Tss in each St to end of row, Ls, R — 38, 42 (46, 50) [58, 62] loops
If you need more length in the palm area, add more rows with lace, following the pattern.
Top cuff
Row 1 all sizes. Repeat [Tss, TPs] until the end of the row, Ls, R — 36, 42 (46, 52) [58, 64] loops
Row 2 all sizes. Repeat [TPs, Tss] until the end of the row, Ls, R — 36, 42 (46, 52) [58, 64] loops
Repeat Rows 1-2 another 2 times and bind off in pattern.
Right mitten
Left for left handed.
Start with a slip knot on your hook.
Foundation Row or Row 1 all sizes. Ch 37, 41 (45, 49) [57, 61] and pick up 37, 41 (45, 49) [57, 61] loops in back bumps, R — 38, 42 (46, 50) [58, 62] loops
OR
Cast on 38, 42 (46, 50) [58, 62] Sts in your preferred cast on method, R where applicable. See different cast on methods here.
Row 2 all sizes. Repeat [Tss, TPs] until the end of the row, Ls, R — 38, 42 (46, 50) [58, 62] loops
Row 3 all sizes. Repeat [TPs, Tss] until the end of the row, Ls, R — 38, 42 (46, 50) [58, 62] loops
Row 4 all sizes. Repeat [Tss, TPs] until the end of the row, Ls, R — 38, 42 (46, 50) [58, 62] loops
Repeat Rows 3-4 another 1, 1 (2, 2) [2, 2] times. Repeat Row 3 another 1, 1 (-, -) [1, 1] time.
Row 8, 8 (9, 9) [10, 10]. Tss in each St to end of row, Ls, R — 38, 42 (46, 50) [58, 62] loops
Row 9, 9 (10, 10) [11, 11]. 15, 18 (21, 24) [30, 33] Tss, YO, 1 Tss, Tss2Tog, 1 Tss, YO, Tss2Tog, 5 Tss, Tss2Tog, YO, 1 Tss, Tss2Tog, 1 Tss, YO, 4, 5 (6, 7) [9, 10] Tss, Ls, R — 38, 42 (46, 50) [58, 62] loops
Row 10, 10 (11, 11) [12, 12]. 15, 18 (21, 24) [30, 33] Tss, YO, 2 Tss, Tss2Tog, 1 Tss, YO, Tss2Tog, 3 Tss, Tss2Tog, YO, 1 Tss, Tss2Tog, 2 Tss, YO, 4, 5 (6, 7) [9, 10] Tss, Ls, R — 38, 42 (46, 50) [58, 62] loops
Row 11, 11 (12, 12) [13, 13]. 15, 18 (21, 24) [30, 33] Tss, YO, 3 Tss, Tss2Tog, 1 Tss, YO, Tss2Tog, 1 Tss, Tss2Tog, YO, 1 Tss, Tss2Tog, 3 Tss, YO, 4, 5 (6, 7) [9, 10] Tss, Ls, R — 38, 42 (46, 50) [58, 62] loops
Row 12, 12 (13, 13) [14, 14]. 15, 18 (21, 24) [30, 33], YO, 4 Tss, Tss2Tog, 5 Tss, Tss2Tog, 4 Tss, YO, 4, 5 (6, 7) [9, 10] Tss, Ls, R — 38, 42 (46, 50) [58, 62] loops
Row 13, 13 (14, 14) [15, 15]. 15, 18 (21, 24) [30, 33], YO, 1 Tss, Tss2Tog, 1 Tss, YO, Tss2Tog, 5 Tss, Tss2Tog, YO, 1 Tss, Tss2Tog, 1 Tss, YO, 4, 5 (6, 7) [9, 10] Tss, Ls, R — 38, 42 (46, 50) [58, 62] loops
Row 14, 14 (15, 15) [16, 16]. 15, 18 (21, 24) [30, 33], YO, 2 Tss, Tss2Tog, 1 Tss, YO, Tss2Tog, 3 Tss, Tss2Tog, YO, 1 Tss, Tss2Tog, 2 Tss, YO, 4, 5 (6, 7) [9, 10] Tss, Ls, R — 38, 42 (46, 50) [58, 62] loops
If you want to extend the palm section or to make it shorter, you can add or remove some rows here, continuing in lace pattern.
From this section, the 4 rows of the lace pattern will be repeated while the thumb section is built.
The 4 lace rows are as follows:
Lace row 1. YO, 1 Tss, Tss2Tog, 1 Tss, YO, Tss2Tog, 5 Tss, Tss2Tog, YO, 1 Tss, Tss2Tog, 1 Tss, YO
Lace row 2. YO, 2 Tss, Tss2Tog, 1 Tss, YO, Tss2Tog, 3 Tss, Tss2Tog, YO, 1 Tss, Tss2Tog, 2 Tss, YO
Lace row 3. YO, 3 Tss, Tss2Tog, 1 Tss, YO, Tss2Tog, 1 Tss, Tss2Tog, YO, 1 Tss, Tss2Tog, 3 Tss, YO
Lace row 4. YO, 4 Tss, Tss2Tog, 5 Tss, Tss2Tog, 4 Tss, YO
Thumb increases
Row 15, 15 (16, 16) [17, 17]. 15, 18 (21, 24) [30, 33] Tss, lace row 3,3, 4 (5, 6) [8, 9] Tss, {1 Tss, 1 Tks} in last St (not in Ls), Ls, R — 39, 43 (47, 51) [59, 63] loops
Row 16, 16 (17, 17) [18, 18]. 15, 18 (21, 24) [30, 33] Tss, lace row 4, 4, 5 (6, 7) [9, 10] Tss, {1 Tss, 1 Tks, 1 Tss} in last St (not in Ls),Ls, R — 41, 45 (49, 53) [61, 65] loops
Row 17, 17 (18, 18) [19, 19]. 15, 18 (21, 24) [30, 33] Tss, lace row 1,4, 5 (6, 7) [9, 10] Tss, {1 Tss, 1 Tks} in next St, 1 Tss, {1 Tks, 1 Tss} in last St (not in Ls), Ls, R — 43, 47 (51, 55) [63, 67] loops
Row 18, 18 (19, 19) [20, 20]. 15, 18 (21, 24) [30, 33] Tss, lace row 2, 4, 5 (6, 7) [9, 10] Tss, {1 Tss, 1 Tks} in next St, 3 Tss, {1 Tks, 1 Tss} in last St (not in Ls), Ls, R — 45, 49 (53, 57) [65, 69] loops
Row 19, 19 (20, 20) [21, 21]. 15, 18 (21, 24) [30, 33] Tss, lace row 3,4, 5 (6, 7) [9, 10], {1 Tss, 1 Tks} in next St, 5 Tss, {1 Tks, 1 Tss} in last St (not in Ls), Ls, R — 47, 51 (55, 59) [67, 71] loops
Row 20, 20 (21, 21) [22, 22]. 15, 18 (21, 24) [30, 33] Tss, lace row 4,4, 5 (6, 7) [9, 10], {1 Tss, 1 Tks} in next St, 7 Tss, {1 Tks, 1 Tss} in last St (not in Ls), Ls, R — 49, 53 (57, 61) [69, 73] loops
Row 21, 21 (22, 22) [23, 23]. 15, 18 (21, 24) [30, 33] Tss, lace row 1,4, 5 (6, 7) [9, 10] Tss, {1 Tss, 1 Tks} in next St, 9 Tss, {1 Tks, 1 Tss} in last St (not in Ls), Ls, R — 51, 55 (59, 63) [71, 75] loops
Row 22, 22 (23, 23) [24, 24]. 15, 18 (21, 24) [30, 33] Tss, lace row 2,4, 5 (6, 7) [9, 10] Tss, {1 Tss, 1 Tks} in next St, 11 Tss, {1 Tks, 1 Tss} in last St (not in Ls), Ls, R — 53, 57 (61, 65) [73, 77] loops
Row 23, 23 (24, 24) [25, 25]. 15, 18 (21, 24) [30, 33] Tss, lace row 3,4, 5 (6, 7) [9, 10] Tss, {1 Tss, 1 Tks} in next St, 13 Tss, {1 Tks, 1 Tss} in last St (not in Ls), Ls, R — 55, 59 (63, 67) [75, 79] loops
Row -, – (25, 25) [26, 26]. -, – (21, 24) [30, 33] Tss, lace row 4,-, – (6, 7) [9, 10], {1 Tss, 1 Tks} in next St, 15 Tss, {1 Tks, 1 Tss} in last St (not in Ls), Ls, R — -, – (65, 69) [77, 81] loops
Row -, – (-, -) [27, 27]. -, – (-, -) [30, 33] Tss, lace row 1,-, – (-, -) [9, 10] Tss, {1 Tss, 1 Tks} in next St, 1 Tss, {1 Tks, 1 Tss} in last St (not in Ls), Ls, R — -, – (-, -) [79, 83] loops
Palm
Row 24, 24 (26, 26) [28, 28]. 15, 18 (21, 24) [30, 33] Tss, lace row 4, 4 (1, 1) [2, 2], 5, 6 (7, 8) [10, 11] Tss (last Tss counts as Ls only in this row) R — 38, 42 (46, 50) [58, 62] loops
Row 25, 25 (27, 27) [29, 29]. 15, 18 (21, 24) [30, 33] Tss, lace row 1, 1 (2, 2) [3, 3], 4, 5 (6, 7) [9, 10] Tss, Ls, R — 38, 42 (46, 50) [58, 62] loops
Row 26, 26 (28, 28) [30, 30]. 15, 18 (21, 24) [30, 33] Tss, lace row 2, 2 (3, 3) [4, 4], 4, 5 (6, 7) [9, 10] Tss, Ls, R — 38, 42 (46, 50) [58, 62] loops
Row 27, 27 (29, 29) [31, 31]. 15, 18 (21, 24) [30, 33], lace row 3, 3 (4, 4) [1, 1], 4, 5 (6, 7) [9, 10] Tss, Ls, R — 38, 42 (46, 50) [58, 62] loops
Row -, – (30, 30) [32, 32]. 15, 18 (21, 24) [30, 33] Tss, lace row -, – (1, 1) [2, 2], -, – (6, 7) [9, 10] Tss, Ls, R — -, – (46, 50) [58, 62] loops
Row -, – (-, -) [33, 33]. 15, 18 (21, 24) [30, 33], lace row -, – (-, -) [3, 3], -, – (-, -) [9, 10] Tss, Ls, R — -, – (-, -) [58, 62] loops
Row 28, 28 (31, 31) [34, 34]. Tss in each St to end of row, Ls, R — 38, 42 (46, 50) [58, 62] loops
If you need more length in the palm area, add more rows with lace, following the pattern.
Top cuff
Row 1 all sizes. Repeat [Tss, TPs] until the end of the row, Ls, R — 36, 42 (46, 52) [58, 64] loops
Row 2 all sizes. Repeat [TPs, Tss] until the end of the row, Ls, R — 36, 42 (46, 52) [58, 64] loops
Repeat Rows 1-2 another 2 times and bind off in pattern.
Finishing
Seam the mittens invisibly using the yarn ends, folding the thumb triangle so that the two lines of decreases are parallel with the side of the mitten. See the seaming instructions for extra details.
Weave in ends and optionally use an elastic thread to go around the inside of the cuff 4 or more times, to make the cuff elastic.
Attach yarn at the top of the thumb hole, next to the seam at the top part of the mitten, then use the smaller hook and Sc (Dc in UK terms) around, making one St in each Tss. Sl St in the first St when you return to the beginning.
Make 2 or 3 rows in Sc, depending on the desired height of the thumb. Finish with an invisible seam at the top. Weave in the ends.
Seaming instructions
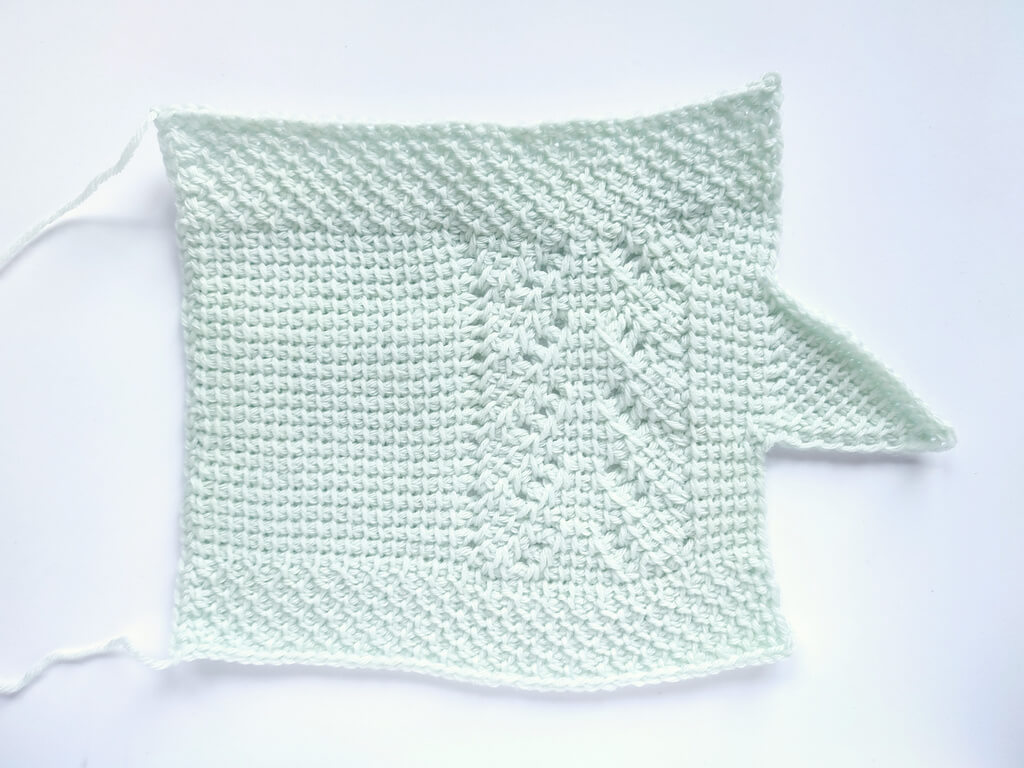
The mitten will look like a rectangle with a triangle on one side (see above).
Fold the mitten with the right side facing you, aligning the two sides to prepare them for sewing.
Fold the thumb flap in half, aligning the shorter edge to the opposite side of the mitten.
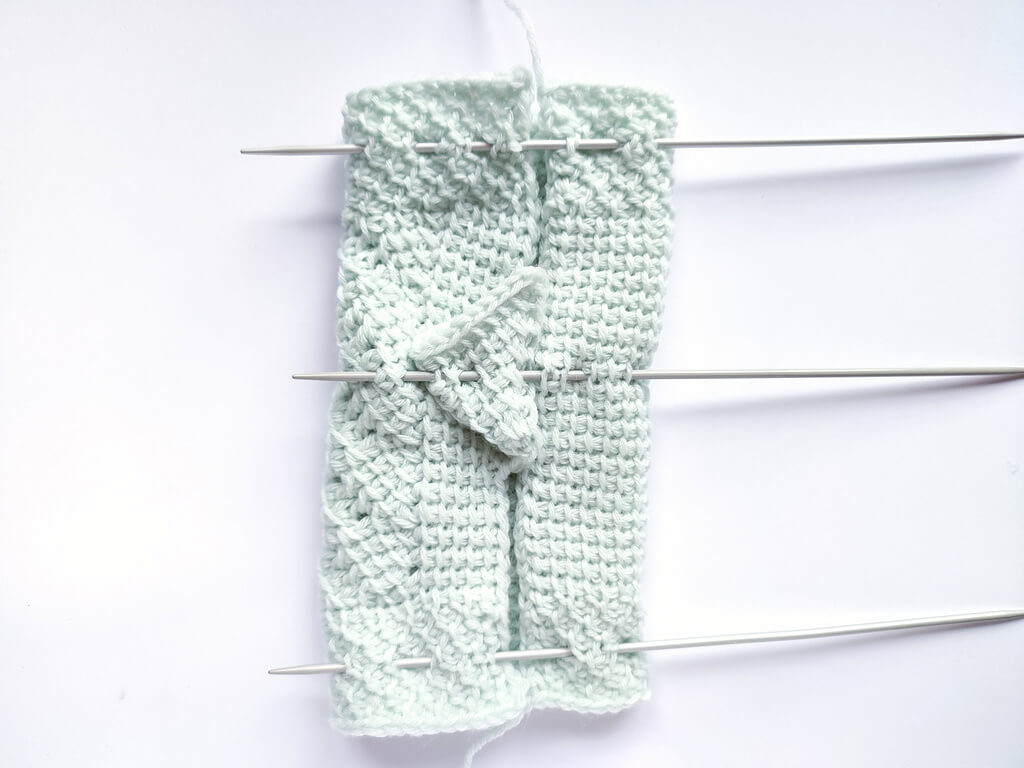
The open side of the thumb will be at a 45 degree angle to the side of the mitten.
Start at the bottom of the mitten, where you started the project.
Make an invisible join where the two sides meet, using the tail.
The first side is considered the one with the first stitch (Fs) and the second side is the one with the last stitch (Ls).
Step 1. Take the needle and go around the second St on the second side.
Step 2. Return to the first side and go back through the first stitch.
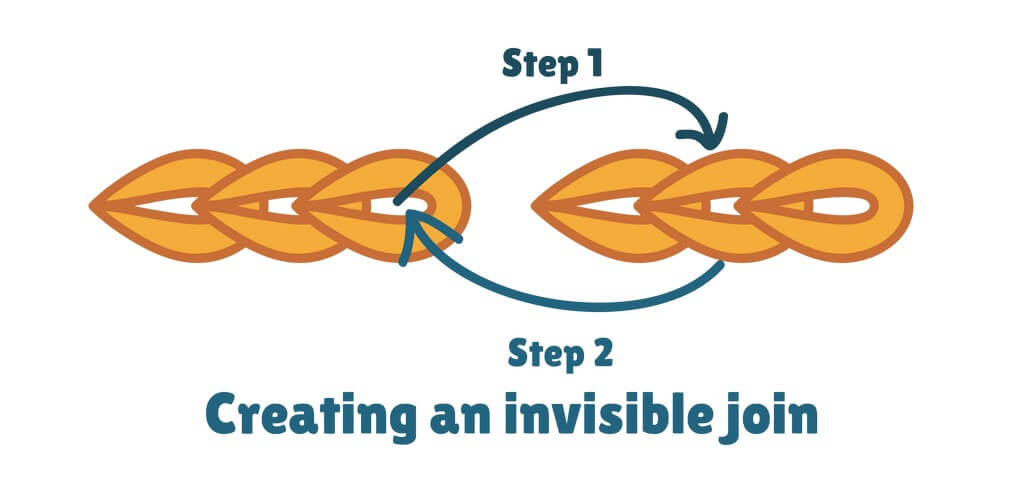
Now you will be working along the two sides of the mitten, ignoring the Fs and Ls and only working in return pass chains.
Step 3. After making the invisible stitch, go through the first return pass chain on the second side of the work.
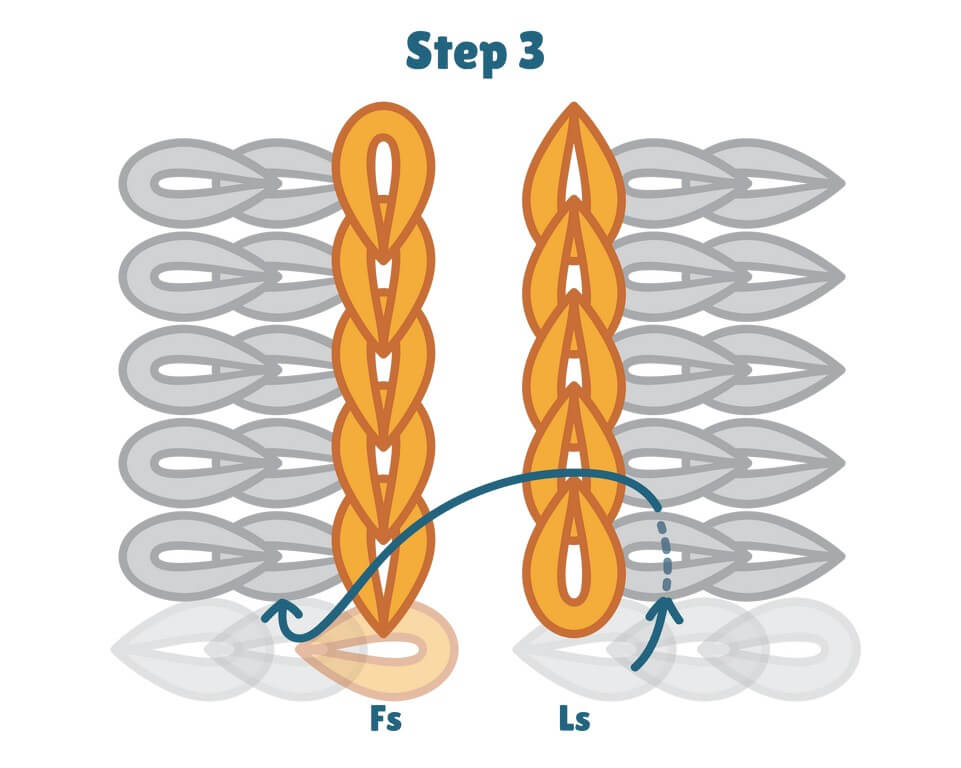
Return to the first side and insert the needle under the first return pass chain.
Step 4. Go with the needle through 2 return pass chains on the first side and come out at the surface of the work.
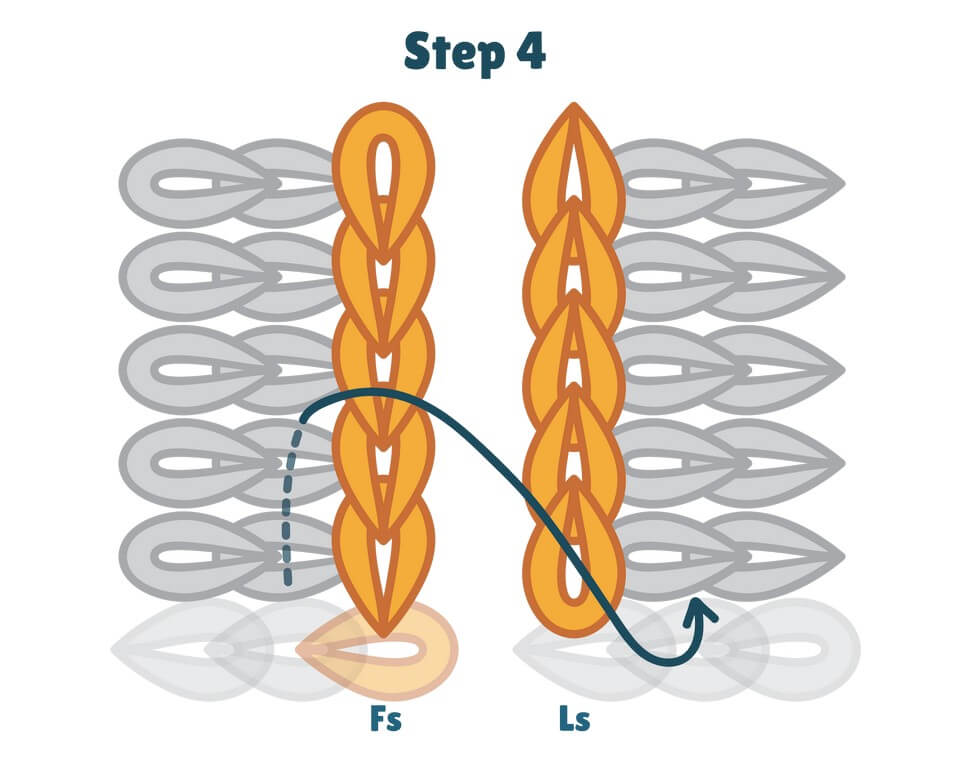
Return to the second side and insert the needle under the first return pass chain.
Step 5. Go with the needle through 2 return pass chains on the second side and come out at the surface of the work.
Return to the first side and insert the needle under the second return pass chain.
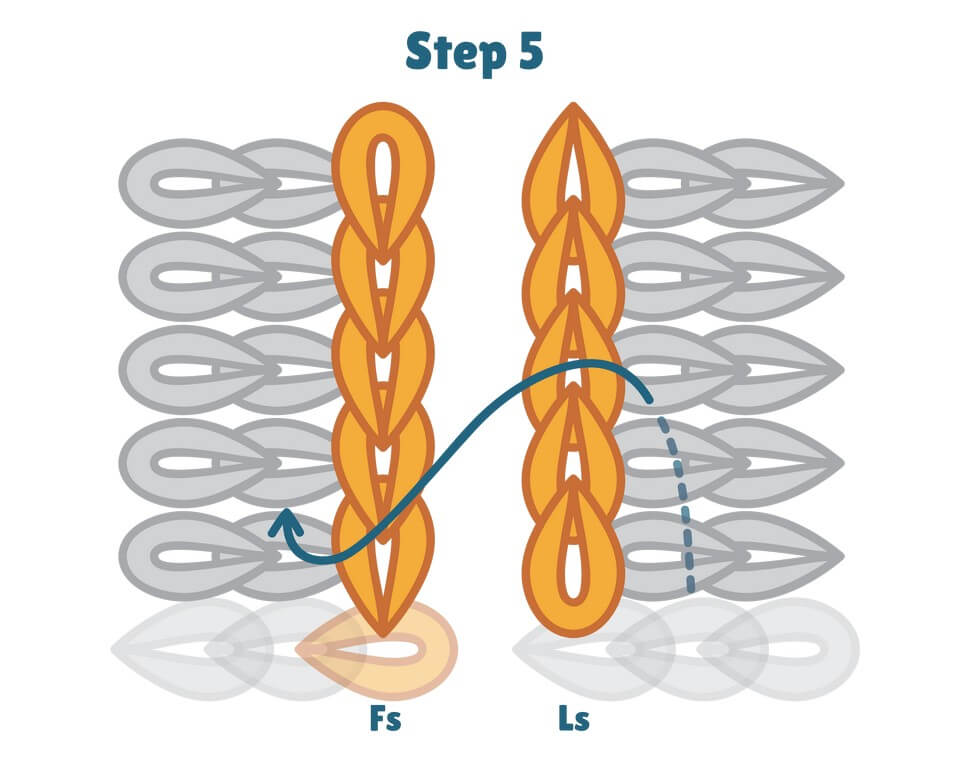
Step 6. Go with the needle through 2 return pass chains on the first side and come out at the surface of the work.
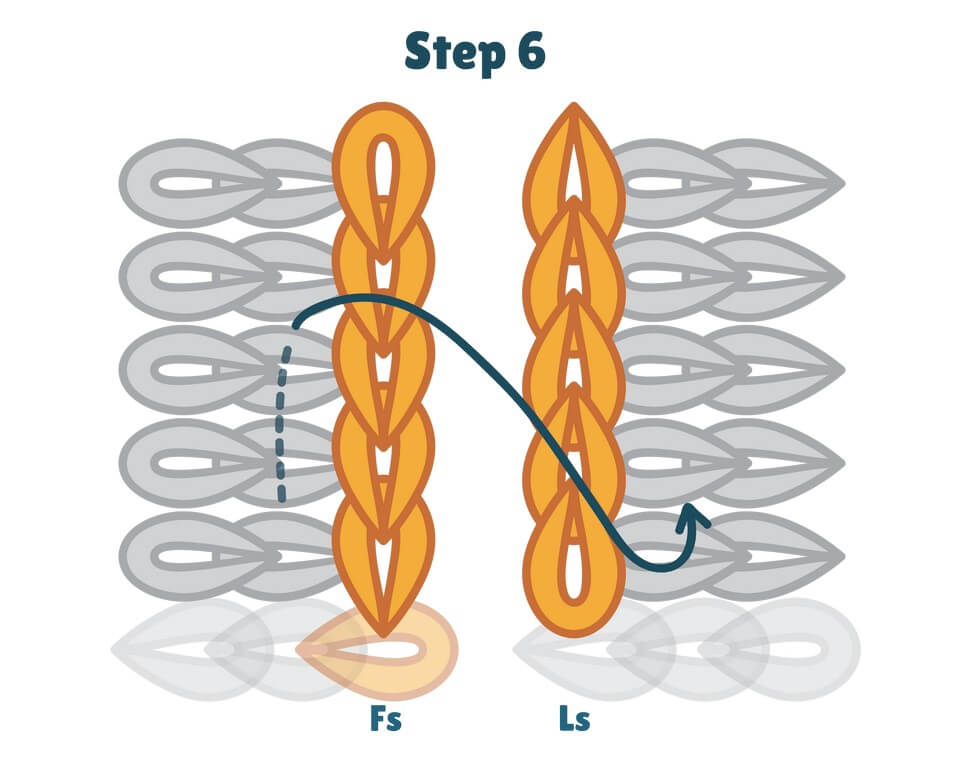
Return to the second side and insert the needle under the second return pass chain.
Continue working in this pattern, stopping regularly to pull on the tail.
When you reach the thumb flap, continue in this fashion, going through one row of the thumb and one row of the main fabric.
Create another invisible stitch at the end of the seam and weave in the ends.
This method creates a sturdy seam on the inside of the mitten. The seam will end up on the thumb side of the mitten and the thumb seam will be on the inside of the hand.
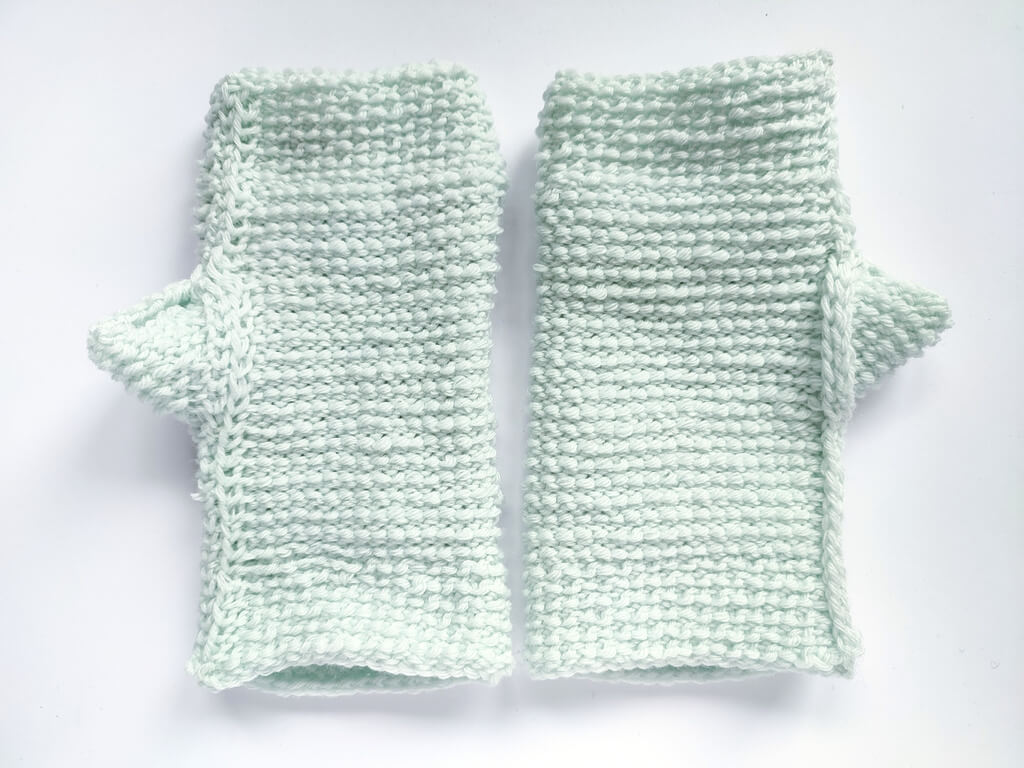
If you want to, while weaving in the ends, you can flatten out the seam by picking up 1 loop from the seam and catching the thread through a stitch further from the seam, as seen in the example above.
The mitten on the left had a flatter seam than the mitten on the right.
Turn the mittens the right side out, give them a wash and enjoy wearing these beauties out and about.
Charts
This free blog version doesn’t include charts, but the PDF version does. Find it below
Final remarks
If you enjoyed this pattern, you might like another free Tunisian crochet pattern from my blog:
Free wavy mosaic Tunisian crochet pattern
Advanced Tunisian crochet mosaic tutorial
Macaw wings shawl TCAL – Tunisian crochet along
Beryl lace square – Tunisian Blanket CAL 2022
Tunisian crochet lace pattern video tutorial – Wheat fields
Corner to corner Tunisian crochet scarf pattern
Free Tunisian crochet pattern – Cooling collar
Strawberry bandana – lacy Tunisian crochet free pattern
Diamond lace Tunisian crochet free bandana pattern
Free Tunisian crochet lace bandana pattern
Subscribe to my emails to get news about new free patterns on the blog, video tutorials, events and much more.


