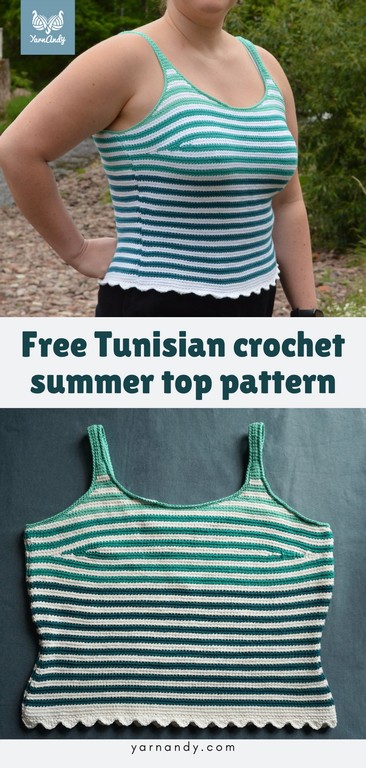
If you want to make yourself or a loved one a Tunisian crochet summer top, use this pattern to make the most comfortable tank top in cotton yarn.
The size inclusive pattern is easily adjusted with short row bust shaping or with waist shaping. The height of the armholes and neckline can be modified as well, to make the top more revealing or more modest.
Take your measurements or your loved one’s measurements, pick up some cotton yarn and a Tunisian crochet hook and get to it.
See some tester projects below if you want to see how they modified their tops.
Contents
About this Tunisian crochet summer top pattern
This is a beginner Tunisian crochet pattern for a summer top with thin straps. You can make it in many color combinations and many types of yarn
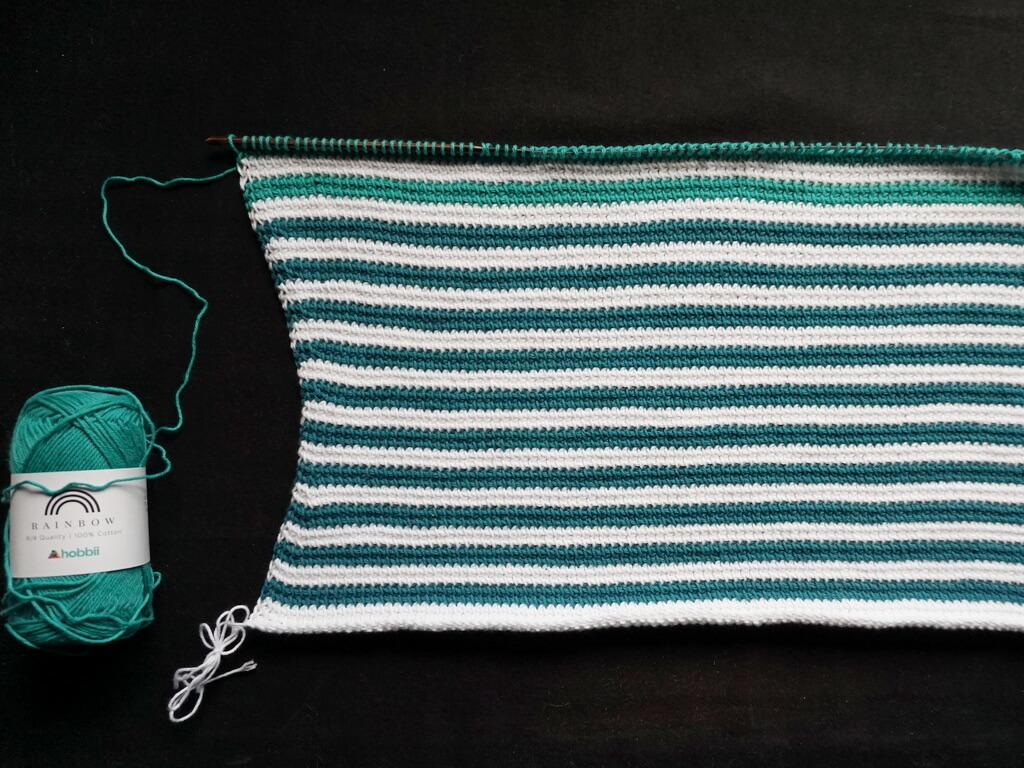
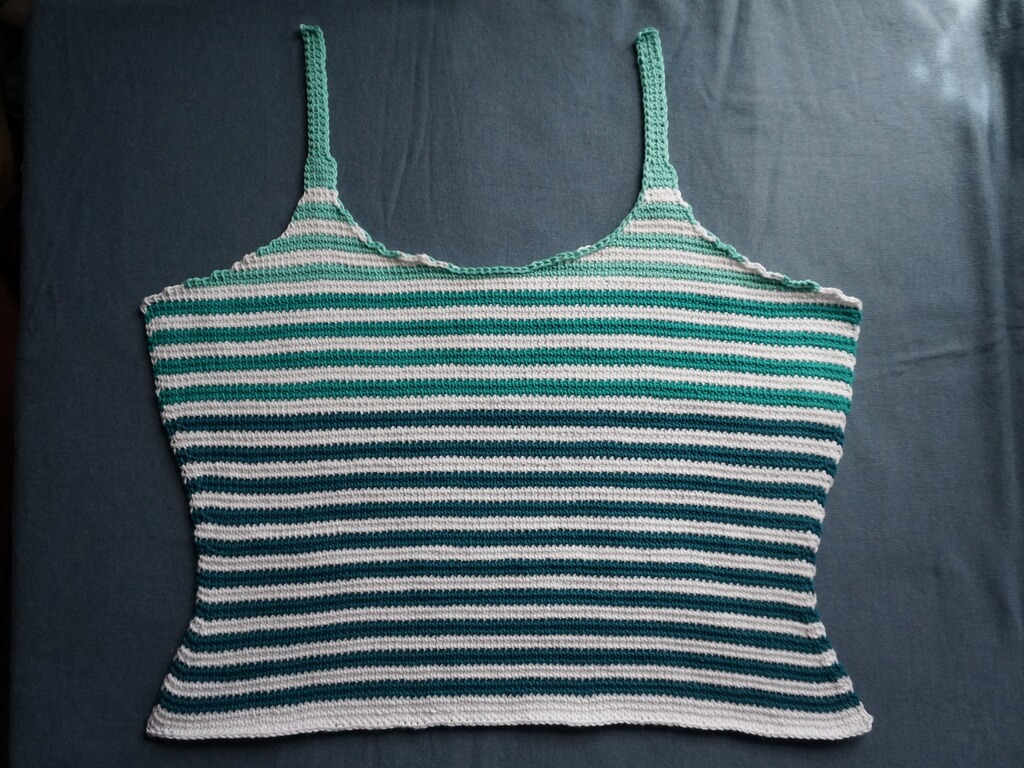
It is worked bottom-up for the body, in a front and back panel, in either a cropped or a full length. Waist shaping is optional.
The two pieces are seamed and the armholes and neckband are finished off after seaming. An optional ribbing or small lacy border is added on the bottom.
The pattern is written out for all 12 sizes and includes ease.
You will choose a size based on the finished garment measurements and follow only the instructions for that size.
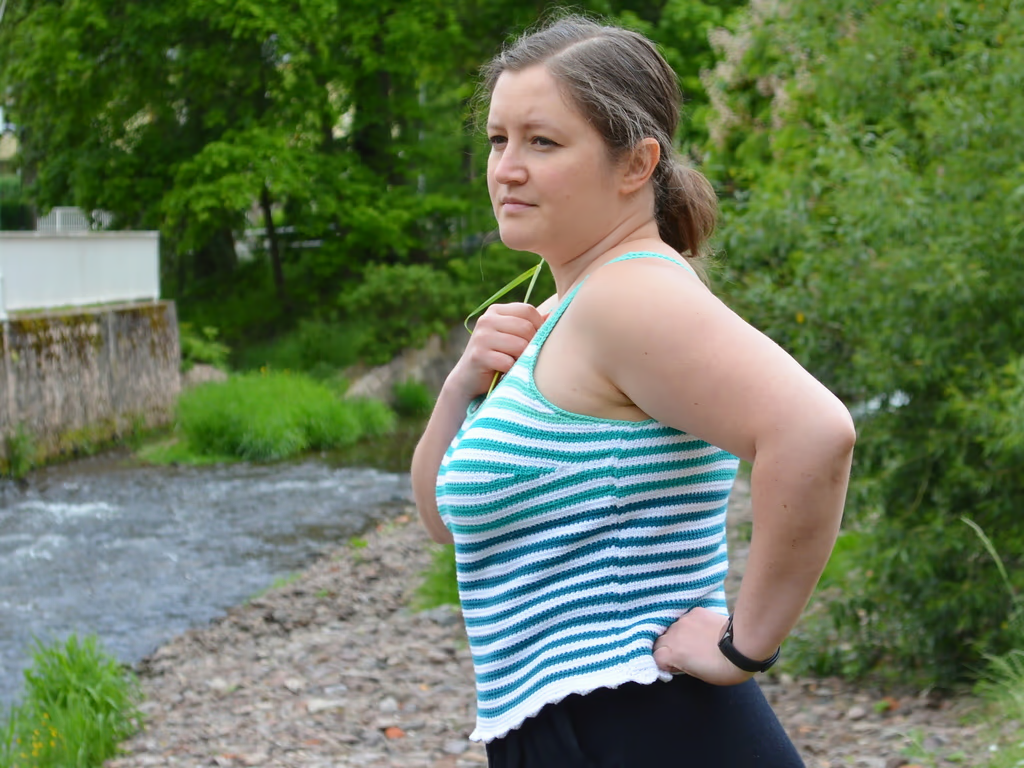
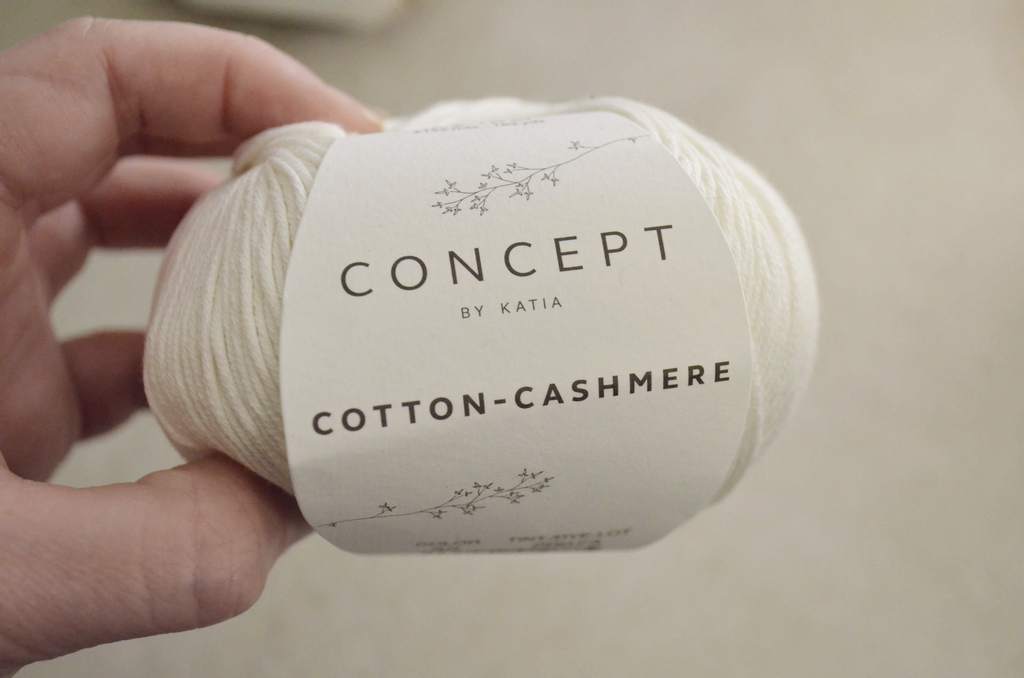
It took me two years to turn the original idea into a workable pattern. I got some cotton-cashmere mix yarn in Pisa, on a work trip to Italy, with the intention of making a summer top.
I only got 200 grams because I thought that would be enough for a lacy top. I’m not exactly a small person, though, so the results weren’t as fabulous as expected.
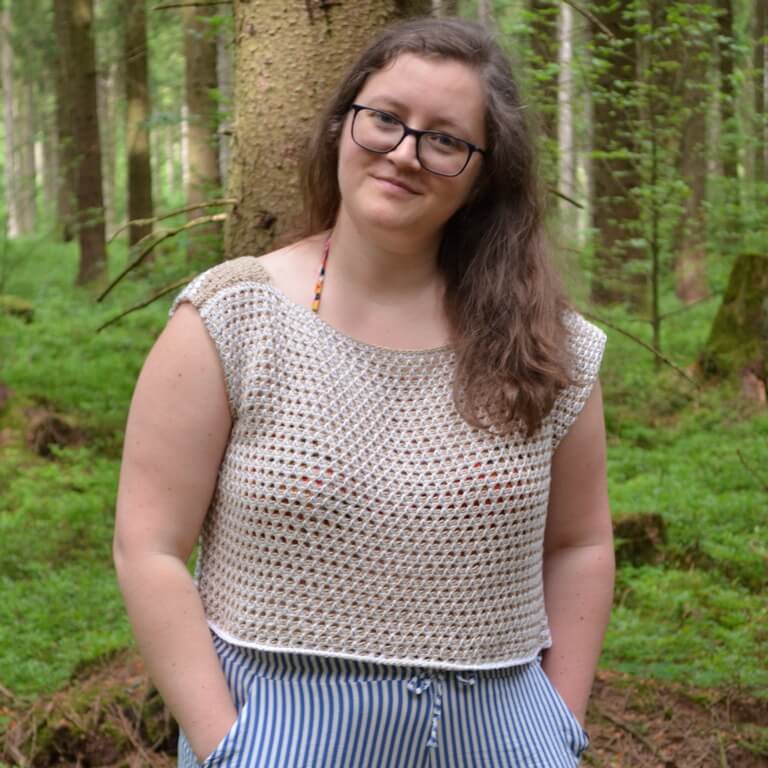
The top turned out short and I didn’t love the construction either. It also had a tendency to skew to one side on both the front and back (possibly due to the lace pattern), so I frogged it and remade it into something with thin straps.
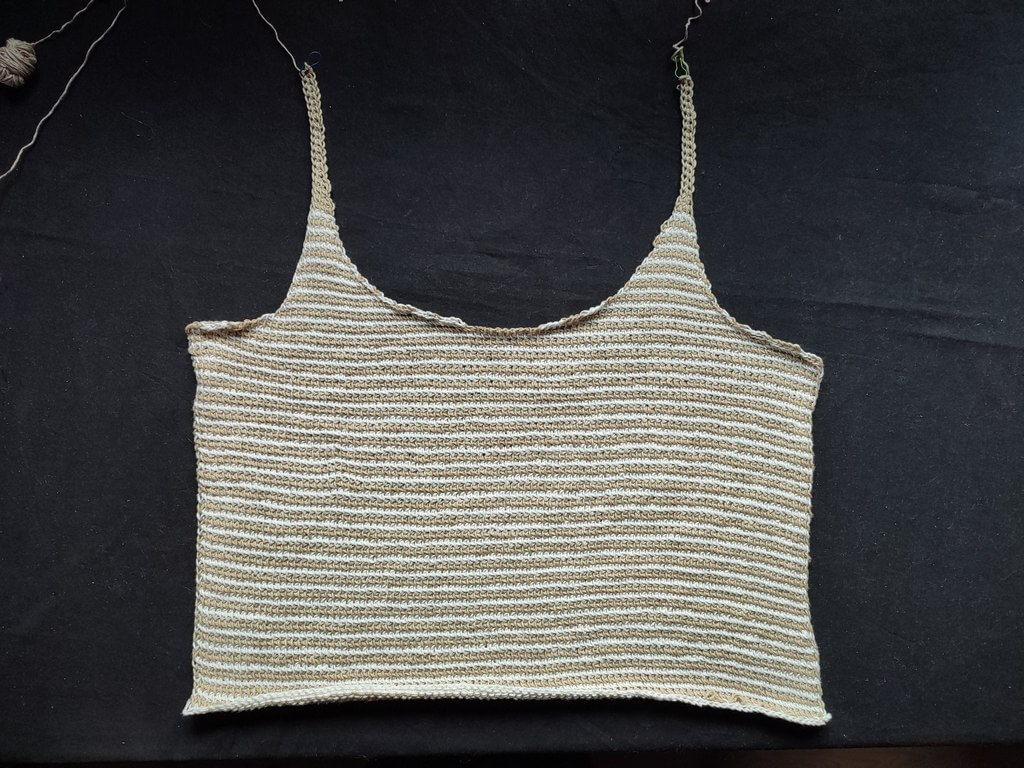
It still ended up being cropped, which is why I made a second sample and why the pattern includes cropped and full length options.
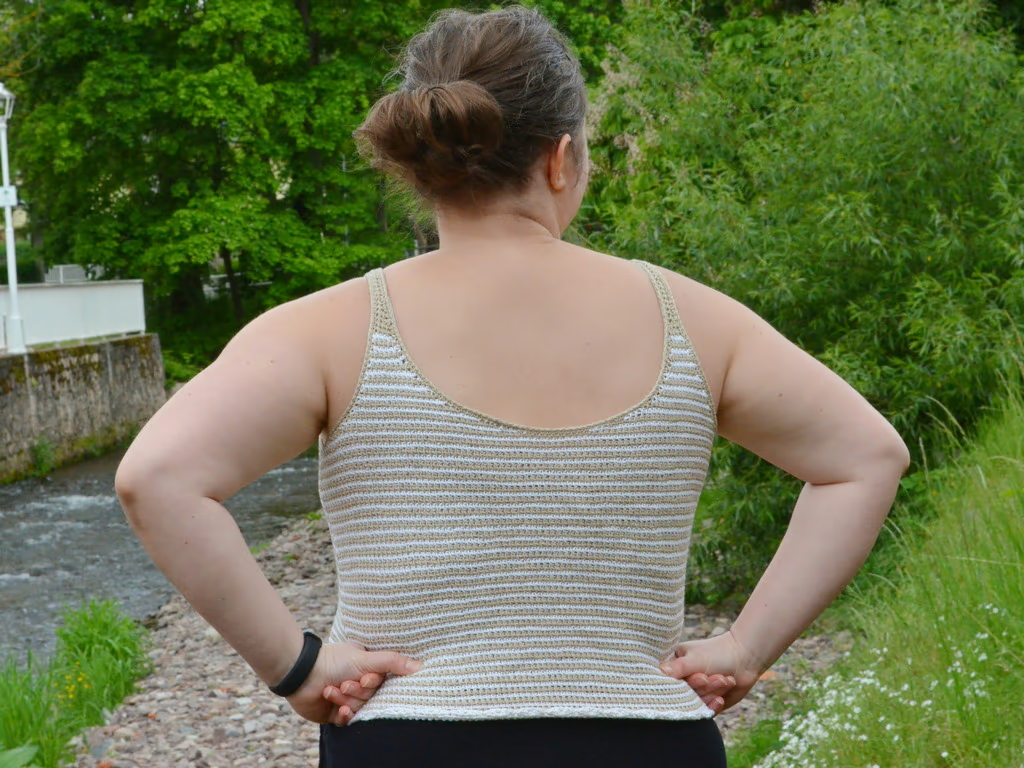
It’s a very comfortable top and I can’t wait to wear both of these this summer. I hope you enjoy yours as well!
Skill level
Beginner – you will work mainly with the Tunisian modified simple stitch, also known as Tunisian flat simple stitch.
Tunisian reverse purl stitches are used for the optional bottom ribbing. Shaping is achieved with working stitches together or increasing in existing stitches.
Tester projects
Some of the completed tester projects are below. You can see more as they are finished on the Ravelry projects page for this Tunisian crochet summer top pattern.
The makers are, in clockwork order from top left: Creaconhook, Michelle Foxworth, Rachel H, Jyoti @ashurumishthi.
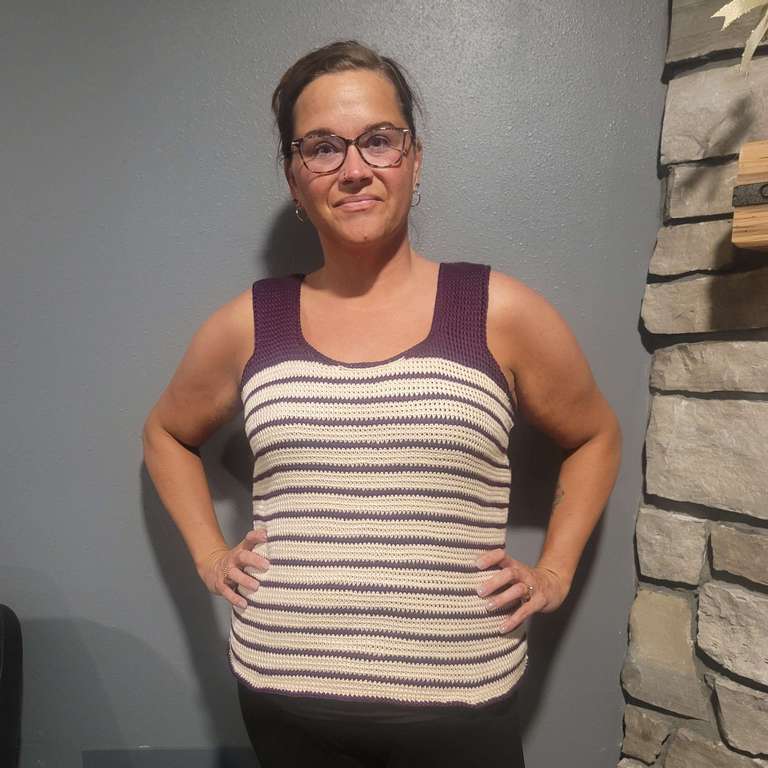
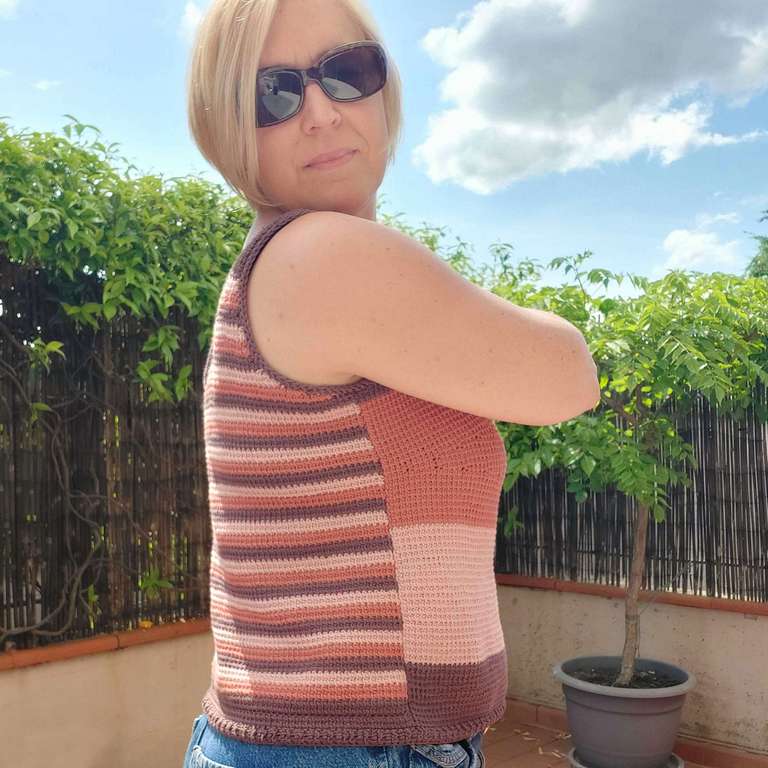
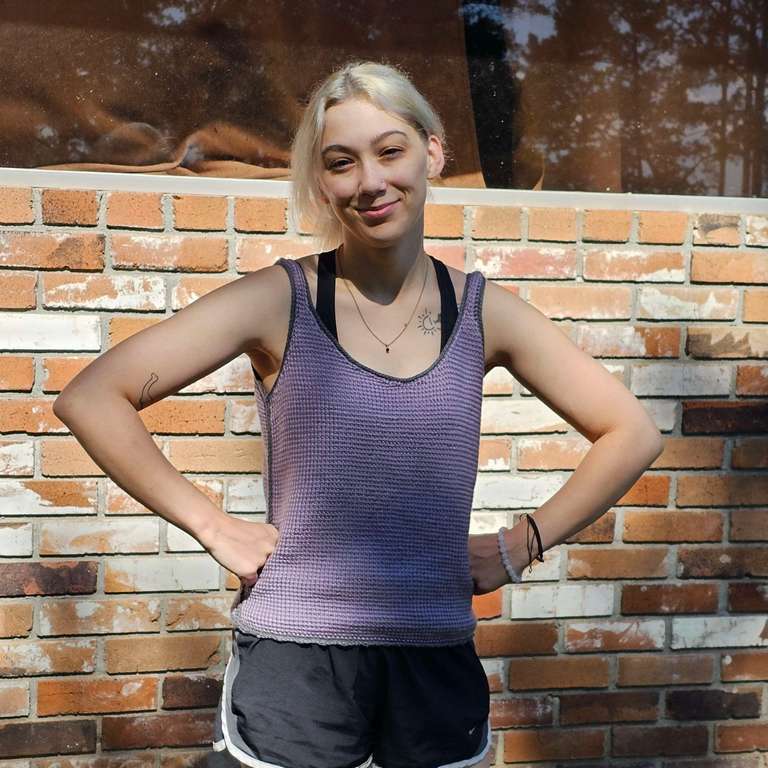
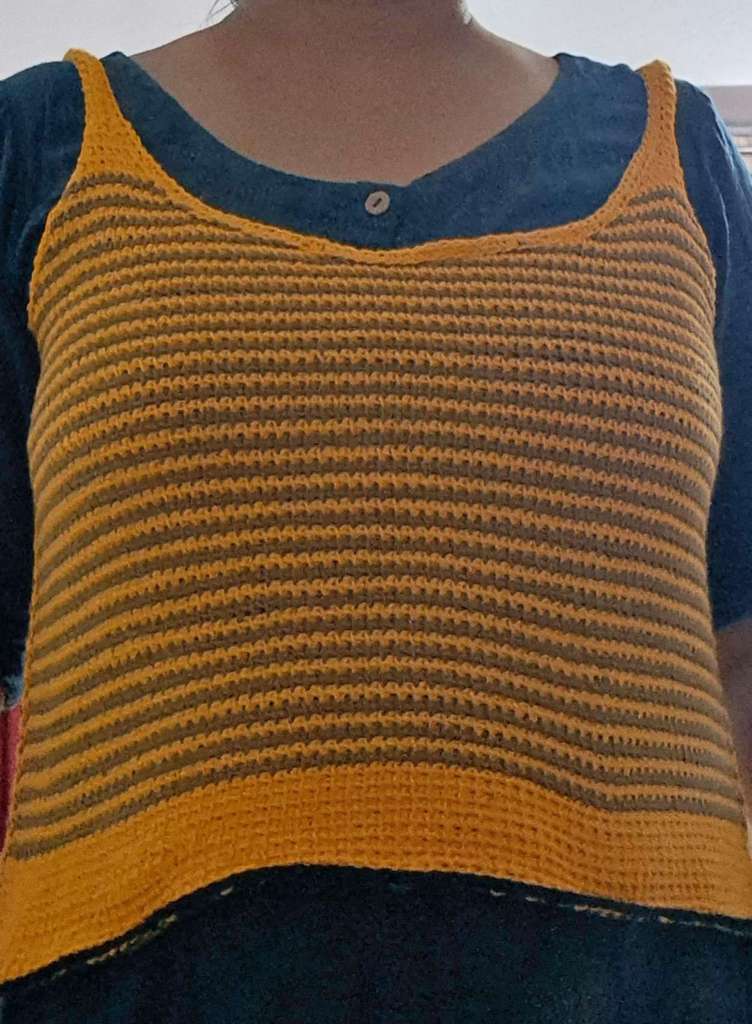
If you want to become a tester for future patterns, just sign up to my email updates. Here’s an article about what testing means and what to look out for when deciding to test patterns.
Size and measurements
The pattern comes with 12 fully written sizes. You can easily customize the length of the body and the straps by adding or skipping rows.
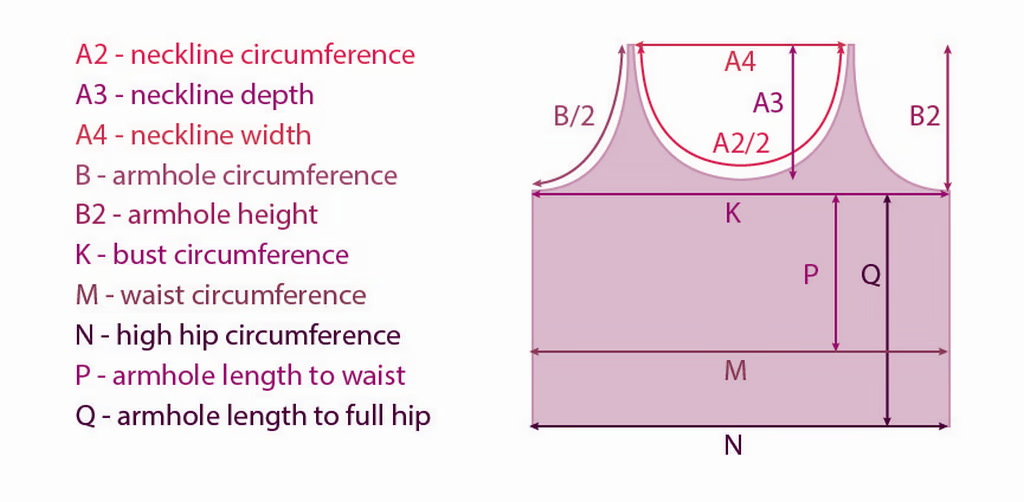
The measurements in the tables below are garment measurements and they should all be larger than or equal to your body measurements at the same points.
Take your measurements at the mentioned points or use this form as a guide and note measurements A, B, G, I, K, M, P for the cropped version or A, B, G, I, K, M, N, P, Q for the longer version and compare them to the ones in the tables below.
In the pattern, you will find the instructions for all sizes written in the following style:
Size 1, 2, 3 (4, 5, 6) [7, 8, 9] {10, 11, 12}.
Highlight the counts for your size or use the colored guides for your size.
| Garment measurements (cm) | ||||||||||||
| Size | 1 | 2 | 3 | 4 | 5 | 6 | 7 | 8 | 9 | 10 | 11 | 12 |
| A2. Neckline circumference | 92 | 93 | 95 | 96 | 97 | 98 | 100 | 101 | 102 | 103 | 104 | 106 |
| A3. Neckline depth | 18 | 19 | 19 | 19 | 19 | 20 | 20 | 23 | 24 | 25 | 26 | 27 |
| A4. Neckline width | 27 | 27 | 28 | 28 | 29 | 30 | 31 | 32 | 33 | 34 | 34 | 35 |
| B. Armhole circumference | 38 | 40 | 43 | 43 | 49 | 54 | 59 | 63 | 65 | 67 | 69 | 71 |
| B2. Armhole height | 19 | 20 | 20 | 20 | 20 | 21 | 21 | 24 | 25 | 26 | 27 | 28 |
| K. Bust circumference | 88 | 96 | 105 | 113 | 121 | 130 | 138 | 147 | 155 | 163 | 172 | 180 |
| M. Waist circumference | 88 | 96 | 105 | 113 | 121 | 130 | 138 | 147 | 155 | 163 | 172 | 180 |
| N. High hip circumference | 88 | 96 | 105 | 113 | 121 | 130 | 142 | 152 | 162 | 173 | 183 | 193 |
| P. Armhole length to waist | 24 | 23 | 23 | 24 | 25 | 24 | 25 | 23 | 23 | 24 | 26 | 27 |
| Q. Armhole length to high hip | 28 | 29 | 30 | 32 | 34 | 33 | 35 | 35 | 35 | 36 | 38 | 39 |
| Garment measurements (“) | ||||||||||||
| Size | 1 | 2 | 3 | 4 | 5 | 6 | 7 | 8 | 9 | 10 | 11 | 12 |
| A2. Neckline circumference | 36.8 | 37.3 | 38.0 | 38.5 | 38.8 | 39.3 | 40.0 | 40.5 | 40.8 | 41.3 | 41.5 | 42.5 |
| A3. Neckline depth | 7.3 | 7.5 | 7.5 | 7.5 | 7.5 | 8 | 8 | 9.3 | 9.5 | 10 | 10.5 | 10.8 |
| A4. Neckline width | 10.8 | 10.8 | 11.3 | 11.3 | 11.5 | 12 | 12.5 | 12.8 | 13.3 | 13.5 | 13.5 | 14 |
| B. Armhole circumference | 15.3 | 16 | 17.3 | 17.3 | 19.5 | 21.5 | 23.5 | 25.3 | 26 | 26.8 | 27.5 | 28.5 |
| B2. Armhole height | 7.5 | 8 | 8 | 8 | 8 | 8.5 | 8.5 | 9.5 | 10 | 10.5 | 10.8 | 11.3 |
| K. Bust circumference | 35.3 | 38.5 | 42 | 45.3 | 48.5 | 52 | 55.3 | 58.8 | 62 | 65.3 | 68.8 | 72 |
| M. Waist circumference | 35.3 | 38.5 | 42 | 45.3 | 48.5 | 52 | 55.3 | 58.8 | 62 | 65.3 | 68.8 | 72 |
| N. High hip circumference | 35.3 | 38.5 | 42 | 45.3 | 48.5 | 52 | 56.8 | 60.8 | 64.8 | 69.3 | 73.3 | 77.3 |
| P. Armhole length to waist | 9.5 | 9.3 | 9.3 | 9.5 | 10 | 9.5 | 10 | 9.3 | 9.3 | 9.5 | 10.5 | 10.8 |
| Q. Armhole length to high hip | 11.3 | 11.5 | 12 | 12.8 | 13.5 | 13.3 | 14 | 14 | 14 | 14.5 | 15.3 | 15.5 |
Abbreviations
- Ch – Chain;
- Ls – last stitch: insert hook behind the two vertical bars at the end of the row, YO and pull up a loop;
- R – regular return pass: Ch1, Rep [YO and pull through 2 loops on hook] until 1 loop remains;
- Rep – repeat;
- Sc – single crochet (US) or double crochet (UK);
- Sl St – slip stitch;
- SRR – short row return pass: Rep [YO and pull through 2 loops on hook] until 1 loop remains;
- St(s) – stitch(es);
- Tmss – Tunisian modified simple stitch: insert hook under both the vertical and front horizontal bars of the next St, YO and pull up a loop;
- Tmss2Tog – Tunisian modified simple stitch decrease: insert hook under the vertical bar of the next St, then under both the vertical and front horizontal bars of the next St, YO and pull up a loop;
- Trps – Tunisian reverse purl stitch: bring yarn to front of hook, insert hook between the two vertical bars of the next St from behind the work, YO and pull up a loop;
- YO – yarn over;
- YU – yarn under.
Notions
- Yarn: size 2 or sport weight cotton or cotton blend yarn at 155-170 meters per 50 grams (see below for length requirements per size);
- Hook -Tunisian crochet hook with cable or straight, 5 mm or hook size that gets you gauge; 3.5 mm regular crochet hook for seams;
- Tapestry needle, scissors, tape measure;
- Stitch markers;
- Tools for blocking (iron with steam or other steamer), blocking mats and pins.
Approximate total length of required yarn per size, cropped version:
In meters – 650, 680, 750 (820, 920, 960) [1060, 1090, 1190] {1330, 1500, 1600};
In balls of yarn, this translates to: – 4, 4, 5 (5, 6, 6) [7, 7, 7] {8, 9, 10} 50 g balls. For a longer torso or a full bust adjustment, add at least 1 ball.
Full length version (to high hip):
In meters – 720, 790, 890 (1020, 1160, 1190) [1360, 1500, 1600] {1740, 1940, 2110};
In skeins/balls of yarn, this translates to: – 5, 5, 6 (6, 7, 7) [8, 9, 10] {11, 12, 13} 50 g balls.
White and green sample made in Cotton Kings 8/4, color 23, and Hobbii Rainbow 8/4, colors 091, 024, 001, both yarns 100% cotton, 170 m per 50 g.
White and beige sample, cropped version, made in 200 g Katia Concept Cotton-Cashmere yarn – 90% cotton, 10% cashmere, colors 52 (white) and 55 (light brown), 155 m per 50 g.
Gauge
Gauge for this pattern is essential and you should check gauge in your panels as you work them, not just in the gauge swatch. Gauge is the most important aspect in getting a garment that fits, along with choosing the right size.
To find the correct hook size for your chosen yarn and for your natural tension, make a gauge swatch by following these instructions.
Row 1. Ch 30, pick up 30 loops in the back bumps of the chains, R
Row 2. 29 Tmss, Ls, R
Repeat Row 2 28 more times for a total of 30 rows.
Block the swatch by washing it and laying it flat to dry.
You can pin it if you want to, but the recommended yarn has bounce that will make the swatch return to its natural size after washing and removing the pins.
Measure a 10 by 10 cm (4″ by 4″) square in the middle of the swatch and count the stitches and rows.
18 stitches by 18 rows should measure 10 by 10 cm (4″ by 4″).
If you get fewer stitches and rows, go down a hook size (0.5 mm), if available, and make another swatch.
If you get more stitches and rows, go up a hook size (0.5 mm), if available, and make another swatch.
Repeat the swatching process until you reach the recommended gauge. Make a note of the hook size used.
Observations
- This is a Tunisian crochet pattern worked flat, which means you always work on the right side of the fabric (the side that will be towards the outside), except when seaming.
- The pattern is built in two panels that you create individually and then seam.
- This summer top pattern is written for all sizes at the same time. A separate file is available with individual instructions for each size.
- The front and back are identical, so you will make two pieces and seam them on the sides and at the top of the straps.
- You should choose the size based on the high hip measurement and bust measurement. You can adjust the height of the armscye when finishing the straps.
- The garment measurements are approximate and include ease. There are 10 cm or 4″ of ease at bust and hip, where the hip is wider than the bust. Choose a size that has an amount of ease from your body measurements that is comfortable for you (more ease for a loose fit, less ease for a closer fit).
- You can make a color blocked version, add stripes, include mosaic or even a lace pattern in the plain fabric.
- Change the yarn only at the beginning or end of a row (before the return pass) to prevent issues with stitches gaping where you add new yarn.
- Weave in the ends by going back and forth through the fabric across or along the back bumps of the return pass, on the wrong side of the fabric.
- You can choose between seaming using the smaller hook or the tapestry needle. In either case, always pick up loops from the return pass when seaming.
- Repeats are shown in [square brackets]. Some repeats are nested.
- At the end of specific rows, you will have loop counts for the row after the — symbol. These include the first and last loop on your hook before the return pass.
- If no loop count is mentioned after a row, use the last loop count given.
- After finishing the top, wash it and lay it flat to dry before wearing.
Video tutorials
The pattern includes the following video tutorials that demonstrate these Tunisian crochet techniques:
- Foundations in Tunisian crochet with left handed version.
- Tunisian modified simple stitch with left handed version;
- Tunisian reverse purl stitch with left handed version;
- Short row bust shaping;
- Working with short rows;
- Weaving in ends.
Instructions
Lower body
Cropped length
Row 1 all sizes. Chain 80, 86, 94 (102, 110, 120) [126, 134, 140] {148, 156, 162} and pick up 80, 86, 94 (102, 110, 120) [126, 134, 140] {148, 156, 162} loops in back bumps of chains, R — 81, 87, 95 (103, 111, 121) [127, 135, 141] {149, 157, 163} loops
Row 2 all sizes. Tmss across, Ls, R — 81, 87, 95 (103, 111, 121) [127, 135, 141] {149, 157, 163} loops
Rows 3 – 43, 41, 41 (43, 45, 43) [45, 41, 41] {43, 47, 49}. Repeat Row 2 another 41, 39, 39 (41, 42, 41) [43, 39, 39] {41, 45, 47} times OR until the piece measures 24, 23, 23 (24, 25, 24) [25, 23, 23] {24, 26, 27} cm in height — 81, 87, 95 (103, 111, 121) [127, 135, 141] {149, 157, 163} loops
Full length
Row 1 all sizes. Chain 80, 86, 94 (102, 110, 120) [130, 138, 148] {158, 166, 176} and pick up 80, 86, 94 (102, 110, 120) [130, 138, 148] {158, 166, 176} loops in back bumps of chains, R — 81, 87, 95 (103, 111, 121) [131, 139, 149] {159, 167, 177} loops
Row 2 all sizes. Tmss across, Ls, R — 81, 87, 95 (103, 111, 121) [131, 139, 149] {159, 167, 177} loops
Only sizes 1-6
Rows 3 – 50, 52, 54 (58, 61, 59). Repeat Row 2 another 48, 50, 52 (56, 59, 57) times OR until the piece measures 28, 29, 30 (32, 34, 33) cm– 81, 87, 95 (103, 111, 121) loops
Note
You can add waist shaping to the body by decreasing and increasing (up to 9 stitches less than the number indicated for your size) on both sides of the work.
Spread out the rows with decreases and increases evenly.
Optionally, add short row bust shaping for a bust-underbust difference of over 10 cm or 4″.
Only sizes 7-12
Plain row. Tmss across, Ls, R
Decrease row. 1 Tmss, Tmss2Tog, Tmss until 3 Sts are left, Tmss2Tog, 1 Tmss, Ls, R — 2 fewer loops than on the previous row
Rows 3 – [61, 62, 60] {64, 68, 66}. Repeat [[60, 61, 19] {15, 16, 10} Plain rows, 1 Decrease row] for a total of [1, 1, 3] {4, 4, 6} times
Rows [62, 63, 61] {65, -, 67} – [63, -, 63] {-, -, 70}. Make [2, 1, 3] {1, 0, 4} Plain rows — [127, 135, 141] {149, 157, 163} loops
OR decrease evenly until the piece measures [35, 35, 35] {36, 38, 39} cm in height and [69, 73.5, 77.5] {81.5, 86, 90} cm in width — [127, 135, 141] {149, 157, 163} loops
Note
You can add waist shaping to the body by decreasing and increasing (up to 18 stitches less than the number indicated for the final loop counts for your size) on both sides of the work.
Spread out the rows with decreases and increases evenly.
Optionally, add short row bust shaping for a bust-underbust difference of over 10 cm or 4″.
Waist shaping example
Size 6 starts with 139 loops at the hip and needs to reach 135 loops at the bust, with 5 cm of ease, or 9 loops per panel (rounded to 10 for one panel and 8 for the second panel for practical purposes).
The waist can be as small as 125 loops on one panel, 127 loops on the second panel (135-10 and 135-8 loops, respectively).
Depending on the height difference between high hip and waist, and waist and underarm, the decreases and increases can be distributed differently.
Assuming a 10 cm waist to high hip difference, the 10 decreases can be made over 18 rows.
At 2 decreases per row, a total of 5 rows is needed for decreases and 13 rows are plain.
These can be distributed as follows: Rep [2 plain rows, 1 decrease row] 5 times, 3 plain rows left over.
The next section requires increases to reach the bust loop count.
At 35 cm in total body length, there are 25 cm left over to work between waist and armhole shaping. That means 45 rows over which 10 stitches need to be increased.
One distribution of increases could be Rep [8 plain rows, 1 increase row] 5 times. This would work well for a back panel.
Another distribution could be Rep [3 plain rows, 1 increase row] 5 times, 25 plain rows left over. This would work well for a front panel, where more space for the bust is desired.
Front – neck and armhole shaping
Starting from this section, you will create the armhole shaping and neckline shaping at the same time.
The first few rows are short rows relating only to the armhole shaping.
The row count resets here on all sizes, for easier counting.
Note
The following rows will always end with no last stitch and a short row return (SRR).
In most cases, the last Tmss counts as Ls, and in some instances you will pick up a Tmss in the last stitch of the previous row.
In this second case, insert the hook behind the 2 crossed diagonal loops of the stitch and pick up a loop.
Use slip stitches to bind off.
Row 1. Bind off 2, 3, 3 (3, 5, 5) [5, 5, 6] {5, 5, 6} Sts, 76, 81, 89 (96, 100, 110) [116, 124, 128] {139, 147, 151} Tmss, SRR — 77, 82, 90 (97, 101, 111) [117, 125, 129] {140, 148, 152} loops
Row 2. Bind off 2, 4, 4 (3, 4, 4) [5, 5, 6] {5, 5, 5} Sts, 72, 73, 81 (90, 94, 102) [106, 114, 116] {129, 137, 141} Tmss, SRR — 73, 74, 82 (91, 95, 103) [107, 115, 117] {130, 138, 142} loops
First strap (right for right handed, left for left handed)
Row 3. Bind off 2, 2, 3 (4, 4, 4) [4, 5, 5] {4, 5, 5} Sts, 32, 32, 32 (36, 38, 42) [44, 46, 46] {55, 57, 59} Tmss, SRR — 33, 33, 33 (37, 39, 43) [45, 47, 47] {56, 58, 60} loops
Row 4. Bind off 2, 2, 2 (3, 3, 4) [4, 5, 5] {3, 4, 5} Sts, 27, 27, 27 (30, 31, 35) [37, 38, 38] {49, 50, 51} Tmss, SRR — 28, 28, 28 (31, 32, 36) [38, 39, 39] {50, 51, 52} loops
Row 5. Bind off 1, 1, 1 (2, 2, 4) [4, 4, 4] {3, 3, 3} Sts, 23, 23, 23 (25, 26, 28) [30, 31, 31] {43, 44, 45} Tmss, SRR — 24, 24, 24 (26, 27, 29) [31, 32, 32] {44, 45, 46} loops
Row 6. Bind off 1, 1, 1 (2, 2, 2) [4, 3, 3] {3, 3, 3} Sts, 19, 19, 19 (20, 21, 23) [23, 25, 25] {37, 38, 39} Tmss, SRR — 20, 20, 20 (21, 22, 24) [24, 26, 26] {38, 39, 40} loops
Row 7. Bind off -, -, – (2, 1, 1) [1, 2, 2] {2, 2, 2} Sts, 17, 17, 17 (16, 18, 20) [20, 21, 21] {32, 33, 36} Tmss, SRR — 18, 18, 18 (17, 19, 21) [21, 22, 22] {33, 34, 37} loops
Row 8. Bind off 1, 1, 1 (2, 2, 1) [1, 1, 1] {2, 2, 2} Sts, 15, 15, 15 (13, 15, 18) [18, 19, 19] {28, 30, 33} Tmss, SRR — 16, 16, 16 (14, 16, 19) [19, 20, 20] {29, 31, 34} loops
Row 9. Bind off -, -, – (1, 1, 1) [1, 1, 2] {1, 1, 1} Sts, 14, 14, 14 (11, 13, 16) [16, 17, 16] {26, 28, 30} Tmss, SRR — 15, 15, 15 (12, 14, 17) [17, 18, 17] {27, 29, 31} loops
Row 10. Bind off 1, 1, 1 (1, 1, 1) [1, 1, 1] {2, 2, 2} Sts, 12, 12, 12 (9, 11, 14) [14, 15, 14] {23, 25, 27} Tmss, SRR — 13, 13, 13 (10, 12, 15) [15, 16, 15] {24, 26, 28} loops
Row 11. Bind off -, -, – (-, -, 1) [1, 1, 1] {2, 2, 2} Sts, 11, 11, 11 (8, 10, 12) [12, 13, 12] {20, 22, 24} Tmss, SRR — 12, 12, 12 (9, 11, 13) [13, 14, 13] {21, 23, 25} loops
Row 12. Bind off 1 St, 9, 9, 9 (6, 8, 10) [10, 11, 10] {18, 20, 22} Tmss, SRR — 10, 10, 10 (7, 9, 11) [11, 12, 11] {19, 21, 23} loops
Row 13. Bind off -, -, – (-, 1, 1) [1, 1, 1] {1, 2, 2} Sts, 8, 8, 8 (6, 7, 8) [8, 9, 9] {16, 18, 19} Tmss, SRR — 9, 9, 9 (7, 8, 9) [9, 10, 10] {17, 19, 20} loops
Row 14. Bind off 1, -, – (1, -, 1) [1, -, 1] {1, 1, 1} St, 6, 8, 8 (5, 7, 7) [7, 9, 8] {14, 16, 17} Tmss, SRR — 7, 9, 9 (6, 8, 8) [8, 10, 9] {15, 17, 18} loops
Row 15. Bind off -, 1, 1 (-, 1, 1) [-, 1, -] {1, 1, 1} St, 6, 6, 6 (5, 6, 5) [6, 8, 8] {13, 15, 16} Tmss, SRR — 7, 7, 7 (6, 7, 6) [7, 9, 9] {14, 16, 17} loops
Row 16. Bind off 1, -, – (-, -, -) [-, 1, -] {1, 1, 1} St, 4, 6, 6 (5, 5, 5) [6, 7, 7] {12, 14, 15} Tmss, SRR — 5, 7, 7 (6, 6, 6) [7, 8, 8] {13, 15, 16} loops
Row 17. Bind off -, -, – (-, 1, -) [1, -, 1] {1, 1, 1} St, 3, 5, 5 (5, 4, 5) [5, 6, 6] {11, 12, 14} Tmss, SRR — 4, 6, 6 (6, 5, 6) [6, 7, 7] {12, 13, 15} loops
Row 18. Bind off -, 1, 1 (1, -, 1) [-, 1, -] {1, 1, 1} St, 3, 4, 4 (3, 4, 4) [5, 5, 6] {10, 11, 12} Tmss, SRR — 4, 5, 5 (4, 5, 5) [6, 6, 7] {11, 12, 13} loops
Row 19. Bind off -, -, – (-, -, -) [1, -, -] {1, 1, 1} St, 3, 3, 3 (3, 4, 4) [4, 5, 6] {9, 10, 11} Tmss, SRR — 4, 4, 4 (4, 5, 5) [5, 6, 7] {10, 11, 12} loops
Note
From here on, for sizes that stop showing up in the row count, skip to the end of this section to finish the first strap.
Only sizes 7-12
Row 20. Bind off -, -, – (-, -, -) [-, -, 1] {1, 1, 1} St, -, -, – (-, -, -) [4, 5, 5] {8, 9, 10} Tmss, SRR — -, -, – (-, -, -) [5, 6, 6] {9, 10, 11} loops
Only sizes 9-12
Row 21. Bind off -, -, – (-, -, -) [-, -, -] {1, 1, 1} St, -, -, – (-, -, -) [-, -, 5] {7, 8, 9} Tmss, SRR — -, -, – (-, -, -) [-, -, 6] {8, 9, 10} loops
Only sizes 10-12
Row 22. -, -, – (-, -, -) [-, -, -] {7, 8, 9} Tmss, SRR — -, -, – (-, -, -) [-, -, -] {8, 9, 10} loops
Row 23. Bind off -, -, – (-, -, -) [-, -, -] {1, 1, 1} St, -, -, – (-, -, -) [-, -, -] {6, 7, 8} Tmss, SRR — -, -, – (-, -, -) [-, -, -] {7, 8, 9} loops
Row 24. -, -, – (-, -, -) [-, -, -] {6, 7, 8} Tmss, SRR — -, -, – (-, -, -) [-, -, -] {7, 8, 9} loops
Row 25. Bind off -, -, – (-, -, -) [-, -, -] {1, 1, 1} St, -, -, – (-, -, -) [-, -, -] {5, 6, 6} Tmss, SRR — -, -, – (-, -, -) [-, -, -] {6, 7, 7} loops
Row 26. -, -, – (-, -, -) [-, -, -] {5, 6, 6} Tmss, SRR — -, -, – (-, -, -) [-, -, -] {6, 7, 7} loops
Finishing the strap
Rows 20, 20, 20 (20, 20, 20) [21, 21, 22] {27, 27, 27} – 30, 32, 32 (32, 32, 33) [33, 35, 35] {37, 38, 39}. Tmss across, SRR — 4, 4, 4 (4, 5, 5) [5, 6, 6] {6, 7, 7} loops
For a deeper armhole and neckline, add more rows here. Note how many rows you added, so you can mirror this on the second strap and the second piece.
Do not cut the yarn.
Second strap
In the last row of the body, count 39, 41, 43 (47, 51, 56) [59, 62, 64] {70, 73, 76} loops from the end and place a SM in the corresponding loop two rows higher (in Row 2 of the neckline and armhole shaping).
Bind off the remaining stitches on the first strap. Ch 1 at the end of the row and continue with Sl Sts along the side of the strap and the bottom of the neckline.
Make the last Sl St in the marked St.
Continue with the instructions for the second strap.
The row count resets here to reflect the first strap. All other notes from before regarding the short rows are still valid.
Row 3. 32, 32, 32 (36, 37, 42) [44, 46, 46] {57, 58, 61} Tmss, SRR — 33, 33, 33 (37, 38, 43) [45, 47, 47] {58, 59, 62} loops
Row 4. Bind off 3 Sts, 27, 27, 27 (30, 31, 35) [37, 38, 38] {49, 50, 51} Tmss, SRR — 28, 28, 28 (31, 32, 36) [38, 39, 39] {50, 51, 52} loops
Row 5. Bind off 3 Sts, 23, 23, 23 (25, 26, 28) [30, 31, 31] {43, 44, 45} Tmss, SRR — 24, 24, 24 (26, 27, 29) [31, 32, 32] {44, 45, 46} loops
Row 6. Bind off 3 Sts, 19, 19, 19 (20, 21, 23) [23, 25, 25] {37, 38, 39} Tmss, SRR — 20, 20, 20 (21, 22, 24) [24, 26, 26] {38, 39, 40} loops
Row 7. Bind off 2, 2, 2 (2, 2, 2) [2, 2, 2] {3, 3, 1} Sts, 17, 17, 17 (16, 18, 20) [20, 21, 21] {32, 33, 36} Tmss, SRR — 18, 18, 18 (17, 19, 21) [21, 22, 22] {33, 34, 37} loops
Row 8. Bind off 1, 1, 1 (1, 1, 1) [1, 1, 1] {2, 1, 1} Sts, 15, 15, 15 (13, 15, 18) [18, 19, 19] {28, 30, 33} Tmss, SRR — 16, 16, 16 (14, 16, 19) [19, 20, 20] {29, 31, 34} loops
Row 9. Bind off 1, 1, 1 (1, 1, 1) [1, 1, 1] {1, 1, 2} Sts, 14, 14, 14 (11, 13, 16) [16, 17, 16] {26, 28, 30} Tmss, SRR — 15, 15, 15 (12, 14, 17) [17, 18, 17] {27, 29, 31} loops
Row 10. Bind off 1 St, 12, 12, 12 (9, 11, 14) [14, 15, 14] {23, 25, 27} Tmss, SRR — 13, 13, 13 (10, 12, 15) [15, 16, 15] {24, 26, 28} loops
Row 11. Bind off 1 St, 11, 11, 11 (8, 10, 12) [12, 13, 12] {20, 22, 24} Tmss, SRR — 12, 12, 12 (9, 11, 13) [13, 14, 13] {21, 23, 25} loops
Row 12. Bind off 1 St, 9, 9, 9 (6, 8, 10) [10, 11, 10] {18, 20, 22} Tmss, SRR — 10, 10, 10 (7, 9, 11) [11, 12, 11] {19, 21, 23} loops
Row 13. 1, 1, 1 (-, 1, 1) [1, 1, -] {-, -, 1} St, 8, 8, 8 (6, 8, 8) [8, 9, 9] {16, 18, 19} Tmss, SRR — 9, 9, 9 (6, 9, 9) [9, 10, 10] {17, 19, 20} loops
Row 14. Bind off 1, -, – (-, -, -) [-, -, -] {1, 1, 1} St, 6, 8, 8 (5, 7, 7) [8, 9, 8] {14, 16, 17} Tmss, SRR — 7, 9, 9 (6, 8, 8) [9, 10, 9] {15, 17, 18} loops
Row 15. Bind off -, 1, 1 (-, -, 1) [1, -, -] {-, -, -} St, 6, 6, 6 (5, 7, 6) [6, 8, 8] {13, 15, 16} Tmss, SRR — 7, 7, 7 (6, 8, 7) [7, 9, 9] {14, 16, 17} loops
Row 16. Bind off 1, -, – (-, -, -) [-, -, -] {-, -, -} St, 4, 6, 6 (5, 6, 5) [5, 7, 8] {12, 14, 15} Tmss, SRR — 5, 7, 7 (6, 7, 6) [6, 8, 9] {13, 14, 15} loops
Row 17. Bind off 1, 1, 1 (-, 1, -) [-, 1, 1] {-, 1, -} St, 3, 5, 5 (5, 5, 5) [5, 6, 6] {11, 12, 14} Tmss, SRR — 4, 6, 6 (6, 6, 6) [6, 7, 7] {12, 13, 15} loops
Row 18. Bind off -, -, – (1, -, -) [-, -, -] {-, -, 1} St, 3, 4, 4 (3, 4, 4) [4, 5, 6] {10, 11, 12} Tmss, SRR — 4, 5, 5 (4, 5, 5) [5, 6, 7] {11, 12, 13} loops
Row 19. Bind off -, 1, 1 (-, 1, -) [-, -, -] {-, -, -} St, 3, 3, 3 (3, 4, 4) [4, 5, 5] {9, 10, 11} Tmss, SRR — 4, 4, 4 (4, 5, 5) [5, 6, 6] {10, 11, 12} loops
Row 20. 3, 3, 3 (3, 4, 4) [4, 5, 5] {8, 9, 10} Tmss, SRR — 4, 4, 4 (4, 5, 5) [5, 6, 6] {9, 10, 11} loops
Note
From here on, for sizes that stop showing up in the row count, skip to the end of this section to finish the second strap.
Only sizes 10-12
Row 21. -, -, – (-, -, -) [-, -, -] {7, 8, 9} Tmss, SRR — -, -, – (-, -, -) [-, -, -] {8, 9, 10} loops
Row 22. -, -, – (-, -, -) [-, -, -] {6, 7, 8} Tmss, SRR — -, -, – (-, -, -) [-, -, -] {7, 8, 9} loops
Row 23. -, -, – (-, -, -) [-, -, -] {6, 6, 8} Tmss, SRR — -, -, – (-, -, -) [-, -, -] {4, 4, 6} loops
Row 24. Bind off -, -, – (-, -, -) [-, -, -] {-, -, 1} St, -, -, – (-, -, -) [-, -, -] {5, 6, 6} Tmss, SRR — -, -, – (-, -, -) [-, -, -] {6, 7, 7} loops
Only size 12
Row 25. -, -, – (-, -, -) [-, -, -] {-, -, 6} Tmss, SRR — -, -, – (-, -, -) [-, -, -] {-, -, 7} loops
Finishing the strap
Rows 21, 21, 21 (21, 21, 21) [21, 21, 21] {25, 25, 26} – 30, 32, 32 (32, 32, 33) [33, 35, 35] {37, 38, 39}. Tmss across, SRR — 4, 4, 4 (4, 5, 5) [5, 6, 6] {6, 7, 7} loops
For a deeper armhole and neckline, add as many more rows here as you added to the first strap.
Bind off the stitches on the last row.
Do not cut the yarn.
Place a SM in the live loop and set the piece aside. Make the second side and continue with seaming and edgings.
Seaming
Shoulders
Lay the two panels (front and back), right sides together, with shoulder seams aligned.
Use a tail or the working yarn that you set aside using the stitch marker, or attach new yarn, and seam the shoulder seams by making slip stitches along them, taking up the two loops on the side of each strap for each slip stitch, plus a loop from the return pass of each strap, or going through the return pass chains on both sides.
After the second shoulder seam, don’t cut the yarn, but continue with the yarn to make the neckline edging.
Alternatively, use a needle and the tails to sew the seam in a spiral of whip stitches, going through and around the two layers. Go through the return pass chains.
In this case, attach new yarn at the neckline end of the seam to continue with the neckline edging.
Neckline edging
Turn the work right side out, so the shoulder seams are inside. You will work on the edge of the neckline.
Switch to the smaller hook.
Row 1. Sl St loosely along the entire neckline, ensuring you only make 1 Sl St for each St
You will encounter stitches that you already made Sl Sts into. Sl St into these Sl St previously made.
Row 2. 1 Sc in each Sl St.
Make an invisible join to finish off the neckline edging.
Side seams
Using the same technique as for the shoulder seams, keeping the top inside-out, seam along the two sides of the body, starting at the bottom and going up.
When you reach the underarm area, do not cut the yarn, but continue with the armhole edging.
Armhole edging
Repeat the same process used to make the neckline edging, by turning the work right side out first.
Attach yarn where needed.
Optional bottom edging
There are multiple options of a bottom edging. You can add a Tunisian crochet ribbing or a cute decorative crochet lace border.
Tunisian crochet ribbing
After seaming the sides and using the Tunisian crochet hook, pick up a loop on the bottom edge of the project.
Row 1. Ch 10, pick up loops in the back bumps of the chains, pick up 1 loop in the side of the project, SRR
Row 2. Trps across, pick up 1 loop in the side of the project, SRR
Row 3. Tss across, pick up 1 loop in the side of the project, SRR
Repeat Rows 2-3 across the side of your project, then seam the last Row to the first Row.
Assembly – photo tutorial
Shoulders
Prepare the shoulders by placing the front and back of the garment one on top of the other, with right sides facing.
Use sewing clips or pins to keep the two sides from sliding and seam using either:
- a needle and the tail that’s 3 times the length of the seam, making whip stitches around and through the two layers;
- a smaller crochet hook (3 mm) and matching yarn, making slip stitches through both layers, going through the return pass on both sides.
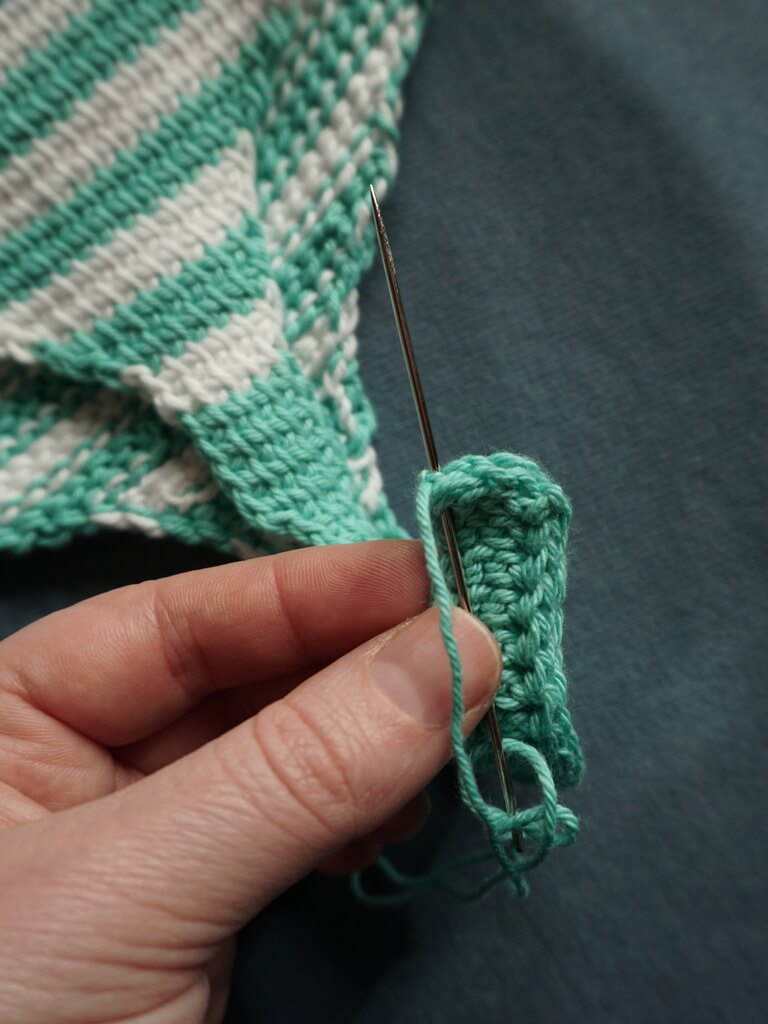
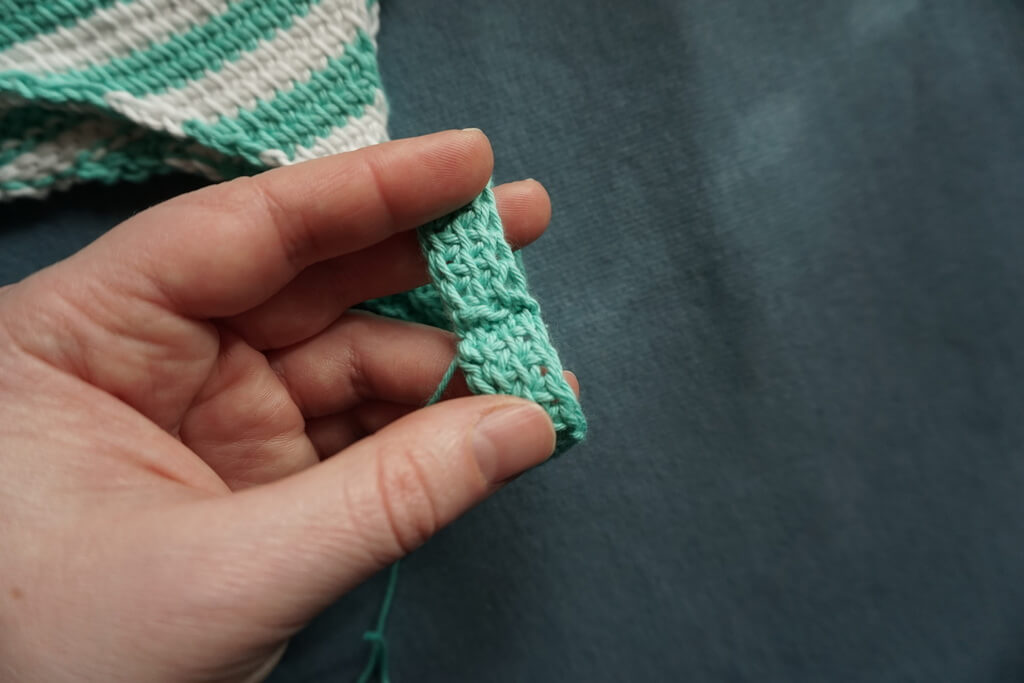
Start from the shoulder and work towards the neck, leaving the yarn attached at the side of the neck on the second seam, if making slip stitches.
Side seams
The side seams go through the same process as the shoulder seams.
Keeping the right sides together, insert pins or use sewing clips to secure the two sides together and ensure that an equal amount of rows is seamed on either side.
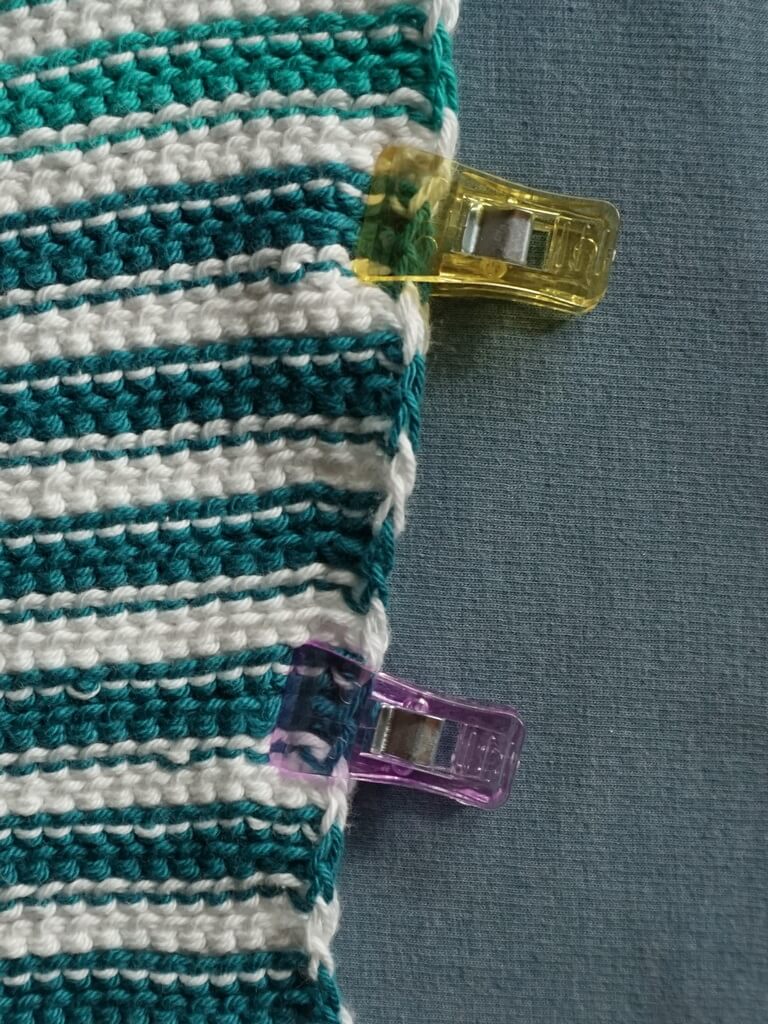
Either sew with whip stitches or slip stitch with the small crochet hook the two sides together, always going through the first or last chain of the return pass on both sides at the same time.
Use the same technique for seaming the sleeves.
Alternative seaming method
If you prefer seaming the front and back pieces from the right side of the fabric, place the two sides to be seamed, with the right side of both pieces facing you and the cuff at the bottom.
Use a needle and the tails left over from making the two sides. Weave in the ends as you go, when they become too short (10 cm or 4″). Attach new yarn as needed.
Follow along with these instructions to make the seam. Forward pass stitches are not represented in these drawings.
Make an invisible join where the two sides meet.
The first side is considered the one with the first stitch (Fs) and the second side is the one with the last stitch (Ls).
Step 1. Take the needle and go around the second St on the second side.
Step 2. Return to the first side and go back through the first stitch.
Now you will be working along the sides of the pieces, ignoring the Fs and Ls and only working in return pass chains.
Step 3. After making the invisible stitch, go through the first return pass chain on the second side of the work.
Return to the first side and insert the needle under the first return pass chain.
Step 4. Go with the needle through 2 return pass chains on the first side and come out at the surface of the work.
Return to the second side and insert the needle under the first return pass chain.
Step 5. Go with the needle through 2 return pass chains on the second side and come out at the surface of the work.
Return to the first side and insert the needle under the second return pass chain.
Step 6. Go with the needle through 2 return pass chains on the first side and come out at the surface of the work.
Return to the second side and insert the needle under the second return pass chain.
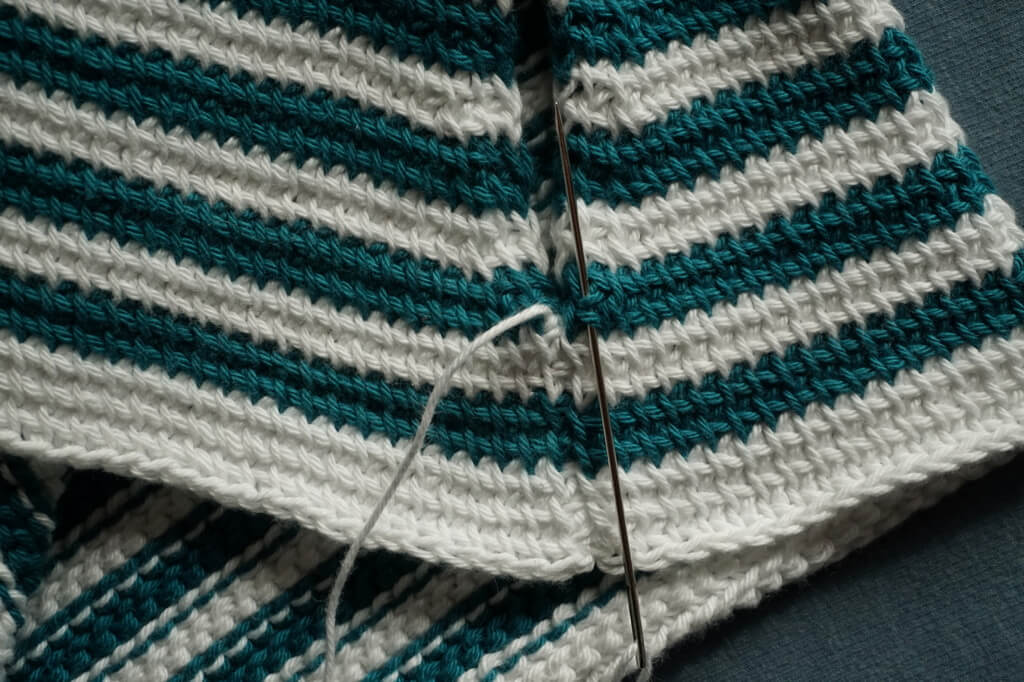
Continue working in this pattern, stopping regularly to pull on the tail.
Final thoughts
Let me know how your Tunisian crochet summer top works up. You can send me an email or tag me on socials @Yarnandy. I’d love to see and share your project.
If you want to try out more Tunisian crochet patterns, you can find them in this list of free Tunisian crochet patterns or click on one of the recommended articles below.
Feather and fan Tunisian crochet pattern for a washcloth
Tunisian crochet asymmetrical rounded triangle shawl tutorial
How to make a Tunisian crochet mosaic bee potholder
Free pattern for leaf lace Tunisian crochet bandana
Tunisian crochet houndstooth pattern for fingerless mittens
Tunisian crochet in the round tutorial with free pattern
Free Tunisian crochet fingerless mittens pattern
Free pattern for sideways Tunisian crochet beanie with elastic brim
Advanced Tunisian crochet mosaic tutorial
Deep forest baby blanket free Tunisian crochet pattern
I’ll see you soon with more patterns and tips.
Hugs,
Andrea
