Learn how to make stunning Tunisian crochet mosaic projects and how to read a mosaic Tunisian crochet chart.
Whether you want to make a big blanket with allover mosaic crochet or just a small item with a Tunisian crochet mosaic detail, you will learn from this tutorial how to make the required stitches and how to read a chart.
You can make your entire project in mosaic or you can use mosaic as an accent, like it is used in the Sporeprint sweater pattern, or you can even use mosaic to transition between two colors in a project.
Then you can test your skills using this free Tunisian crochet mosaic blanket square pattern or you can challenge yourself and learn advanced Tunisian crochet mosaic by making rounded shapes.
If you’d like to then frame your work with a simple honeycomb border, you can learn how to do that here on the blog as well.
Contents
A little about mosaic crochet in general
There are so many methods for working mosaic patterns in crochet, that you may be wondering why I’d even mention mosaic in Tunisian crochet. Well, the more methods we have for reaching similar results, the better, in my opinion.
Besides, with Tunisian crochet you don’t have to worry about turning or cutting yarn at the end of every row. You don’t have to overthink things and you also end up with a beautiful and soft fabric.
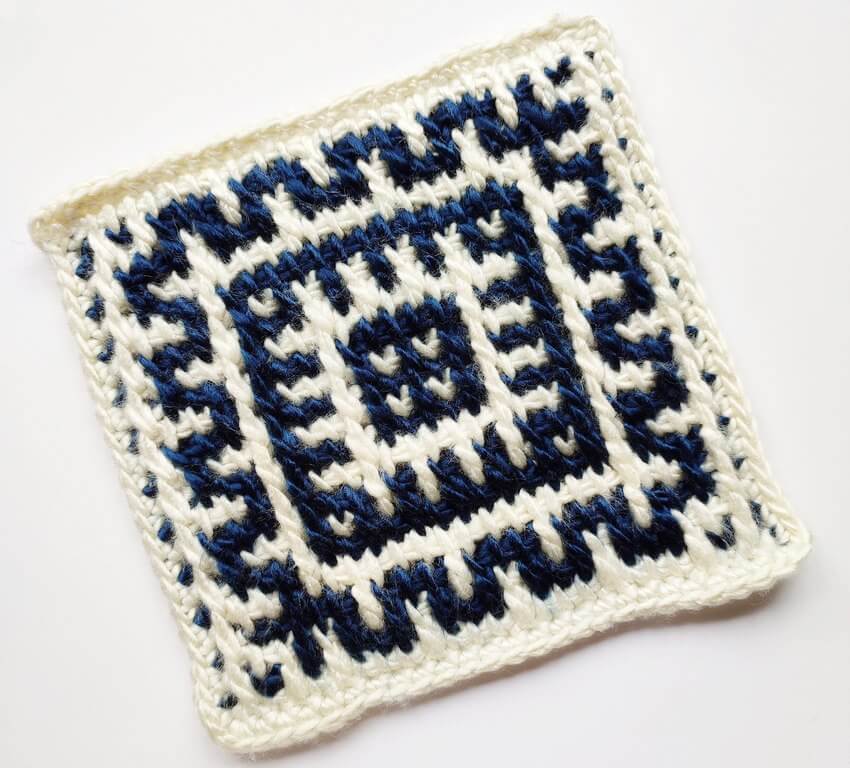
Mosaic crochet is known for being somewhat chunky and some methods require you to cut the yarn at the end of every row.
I really don’t like that, as I feel it’s a waste of time and yarn, plus you have to hide all of those ends somehow, which means you either have a bulky border on your projects, or you have to weave in an innumerable amount of ends.
Not for me, thank you. I did actually develop a method for working mosaic regular crochet without cutting the yarn, I’ll have to refresh my memory and write another article all about that.
But this article is about mosaic patterns in Tunisian crochet.
A bit more about mosaic Tunisian crochet
You can use multiple colors for mosaic patterns, but you usually have two. The main color and the background. They are worked in alternating rows.
You could mix the up the colors in these two to add a bit of extra funkiness, but I recommend starting small, with two colors, or one color and a gradient.
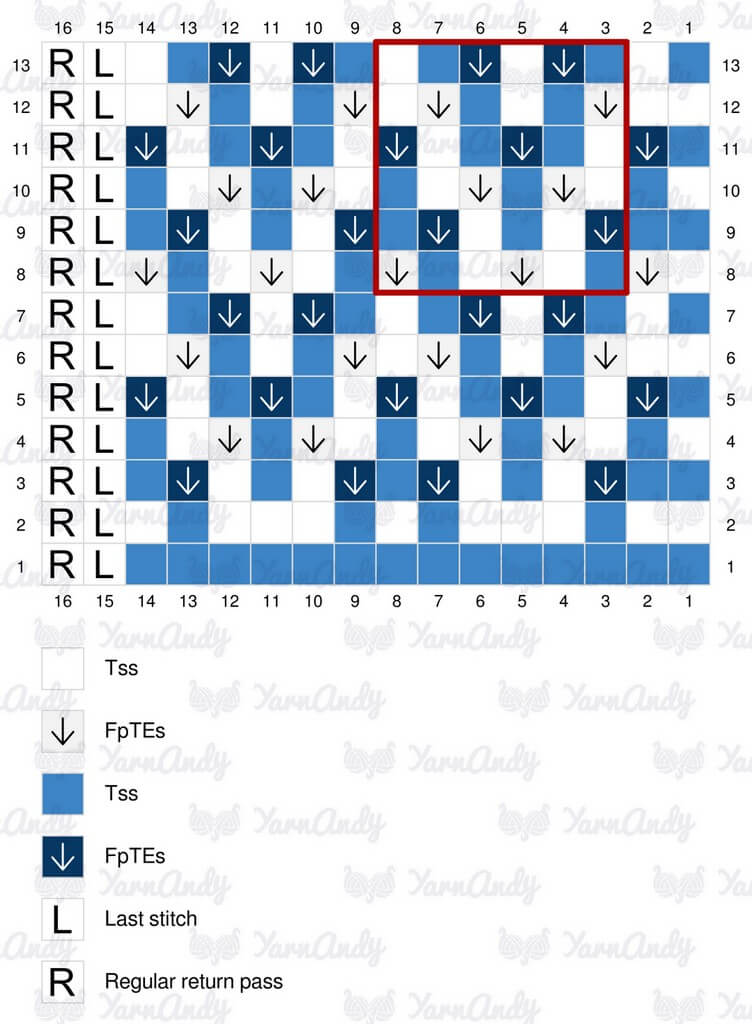
The pattern can be either fully detailed or a chart. The chart can be made up of pixels, like in the case of most graph patterns, or they can be made up of symbols, which is what I prefer to use after I make the chart.
It is much easier to read a chart with symbols than a graph, as you can know instantly whether you should make a regular stitch or a tall stitch.
To read one of these charts, you start from the lower right corner. You have a plain row of MC (main color) and a plain row of CC (contrast color).
Then you continue with a second row of MC, where you may have tall stitches.
These tall stitches are worked two rows below. In Tunisian crochet, you may choose to use double stitches or front post extended stitches, which are worked around both vertical bars of the row of the same color, below.
The front post extended stitch was first proposed by Richard Gartland (Ravelry link) in our Advanced Tunisian Crochet group on Facebook and I really recommend it.
Here’s a practical example, complete with a simple chart.
Work along with me on this little sample and you will get the hang of the technique.
Abbreviations
- CC – contrast color;
- Ch – chain;
- FpTEs – front post Tunisian extended stitch;
- Ls – last stitch;
- MC – main color;
- R – regular Tunisian crochet return; Ch1, YO and pull through 2 loops on the hook until 1 loop remains;
- St – stitch;
- Tss – Tunisian simple stitch;
How to read a mosaic Tunisian crochet chart
Refer to this chart throughout this tutorial.
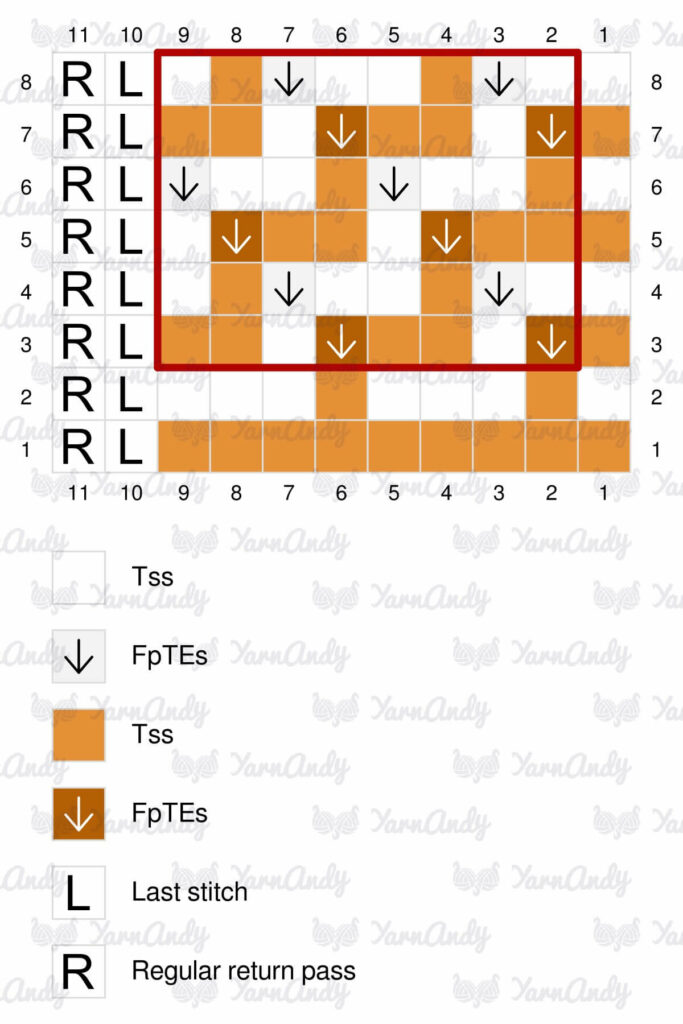
Row 1. Start with your favorite foundation, making 10 stitches (9 Tss and a Ls) in MC. Alternatively, Ch10, pick up 10 loops on the hook, going through the back bumps of the chains, R. Before making the last return stitch, switch to CC and finish the return pass with CC.
Row 2. Working with CC, make 9 Tss and Ls, R. Finish the return pass with MC.
In the photos below, MC is orange, CC is gray.
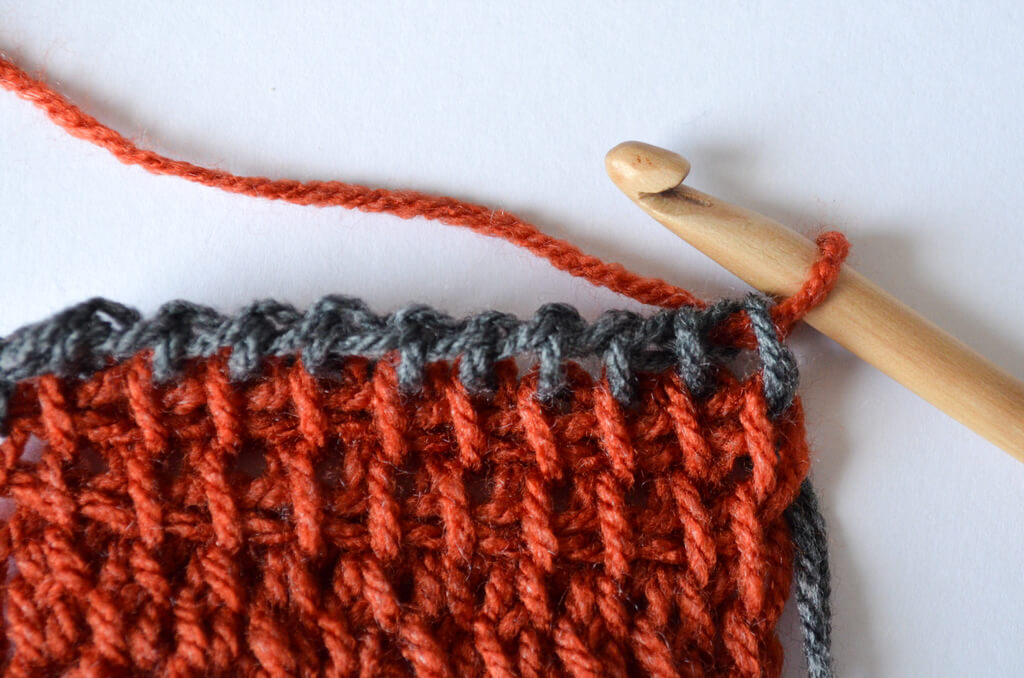
Row 3. Pick up a loop in the first stitch, to make 1 Tss.
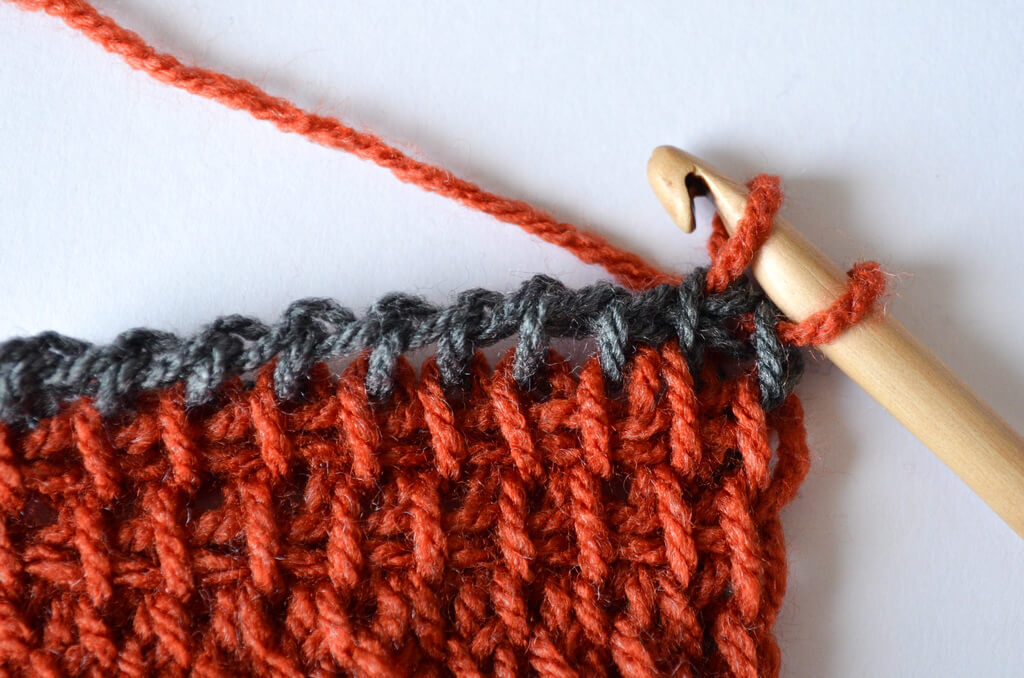
To make the tall stitch (FpTEs), insert the hook behind the two vertical bars of the next stitch, two rows below, not in the row directly under your hook.
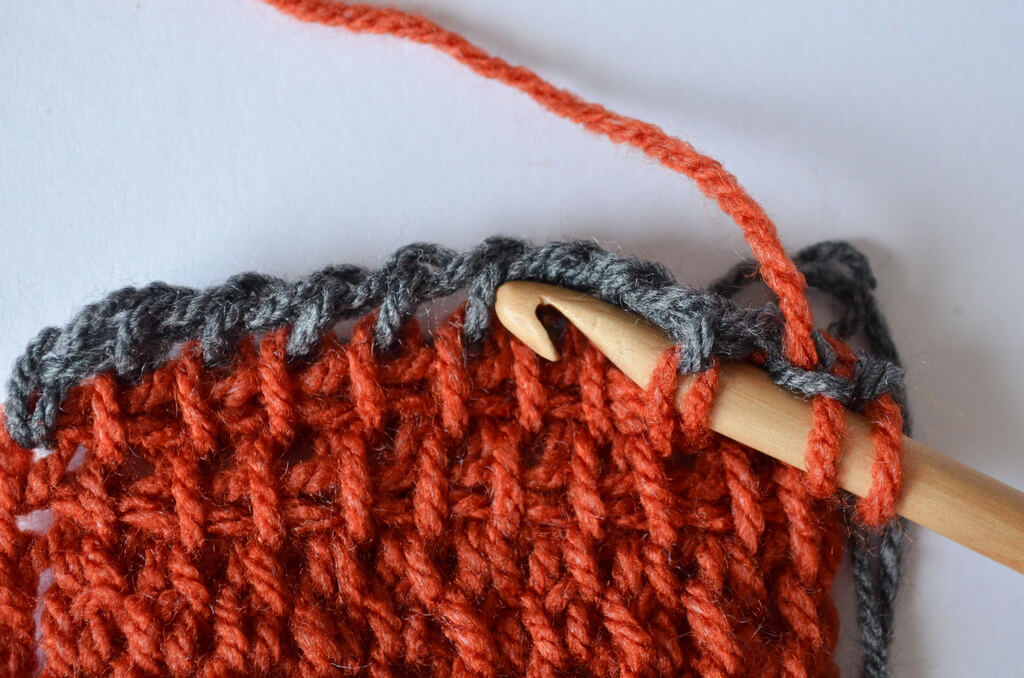
Pick up a loop, Ch1. Keep this loop on the hook. Tall stitch (front post extended simple stitch) made.
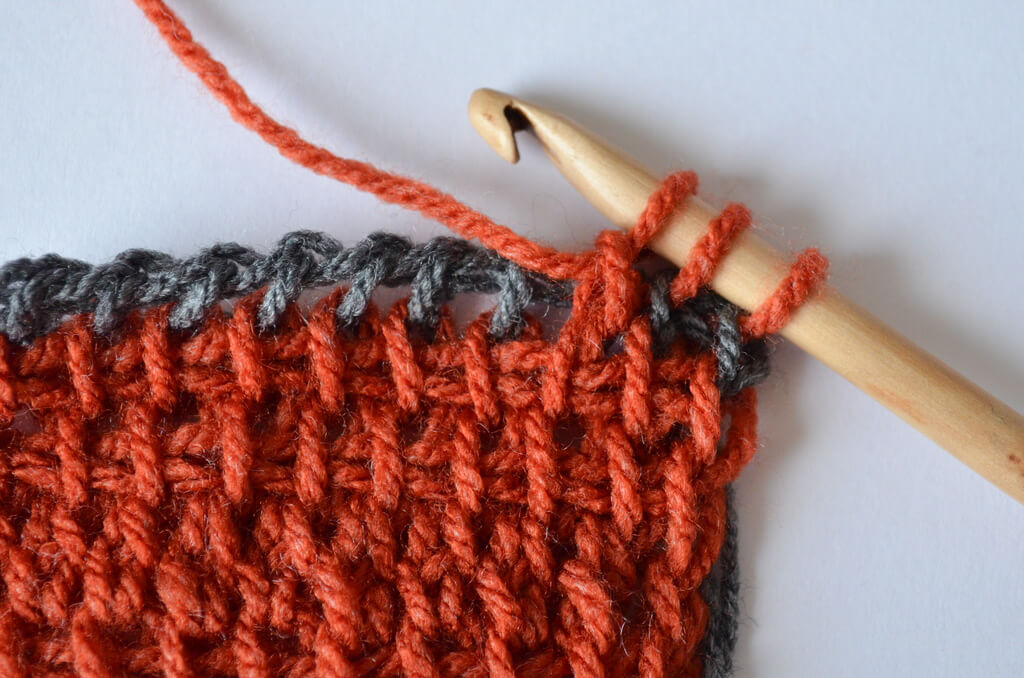
Pick up 3 more loops in the row directly under, to make 3 Tss, then one more tall stitch two rows below, then the last stitch as usual. R, with the last loop made in CC.
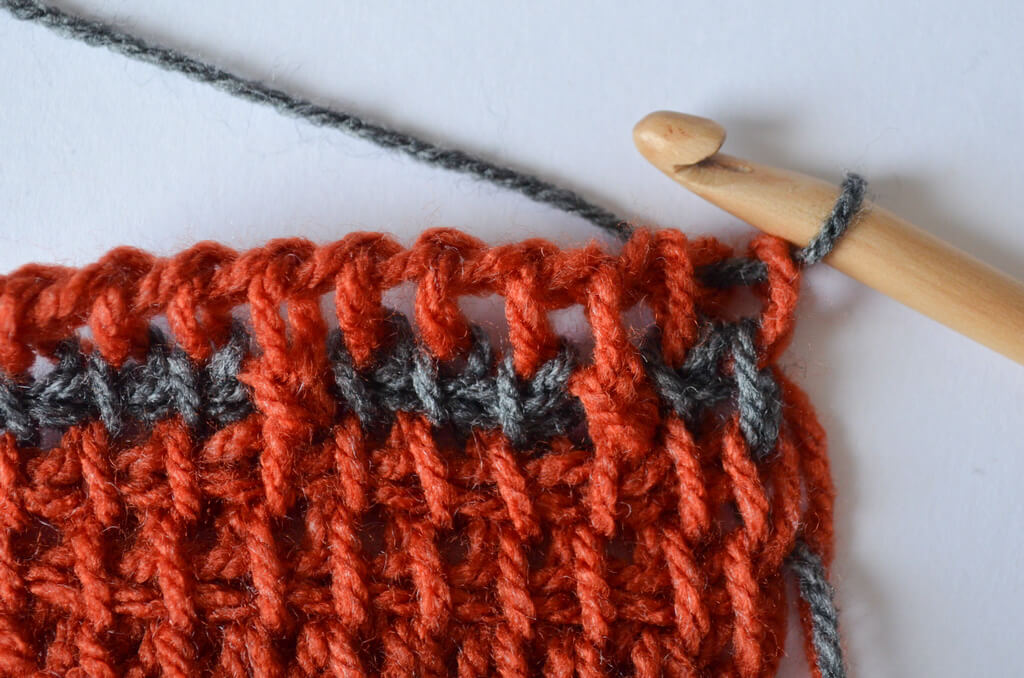
Row 4. Working with CC, pick up two loops.
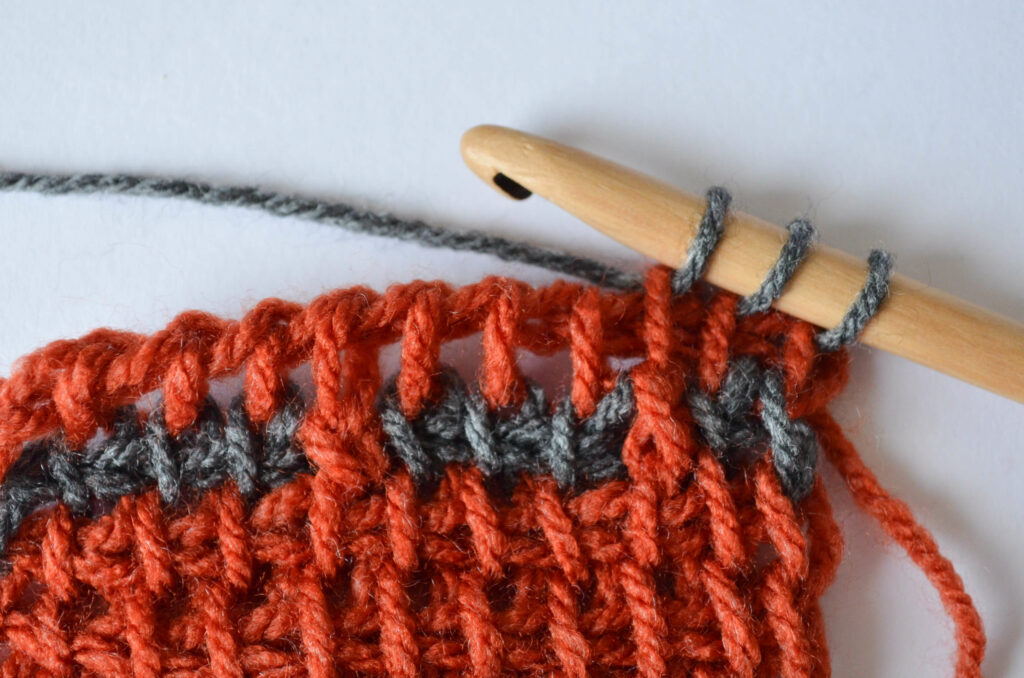
Insert the hook behind the two vertical bars of the next stitch two rows below, Ch1.
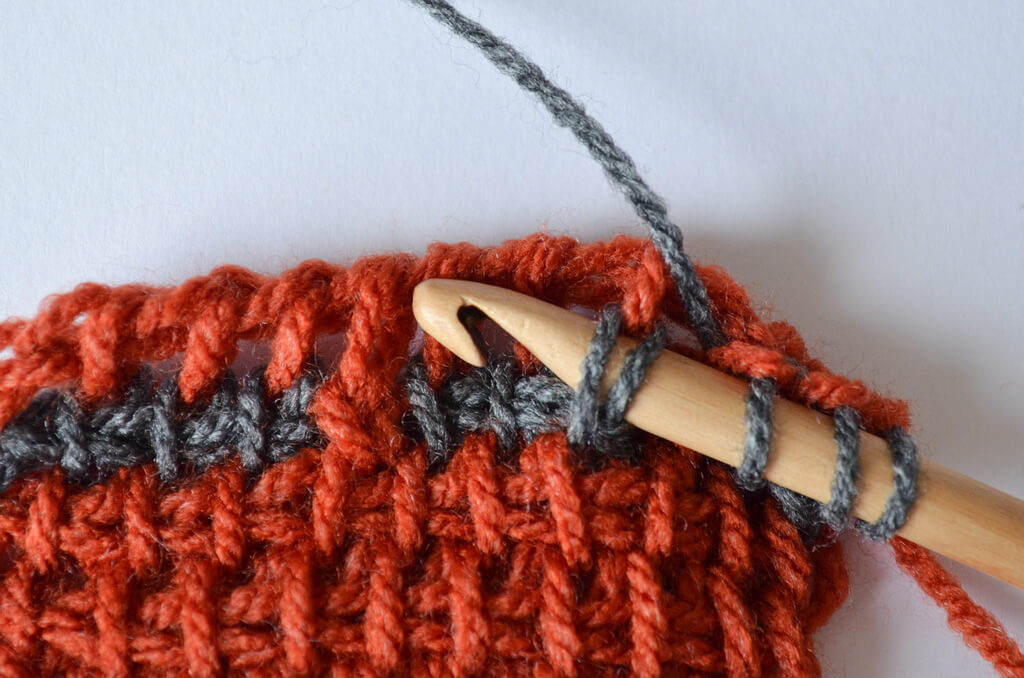
Front post extended simple stitch made.
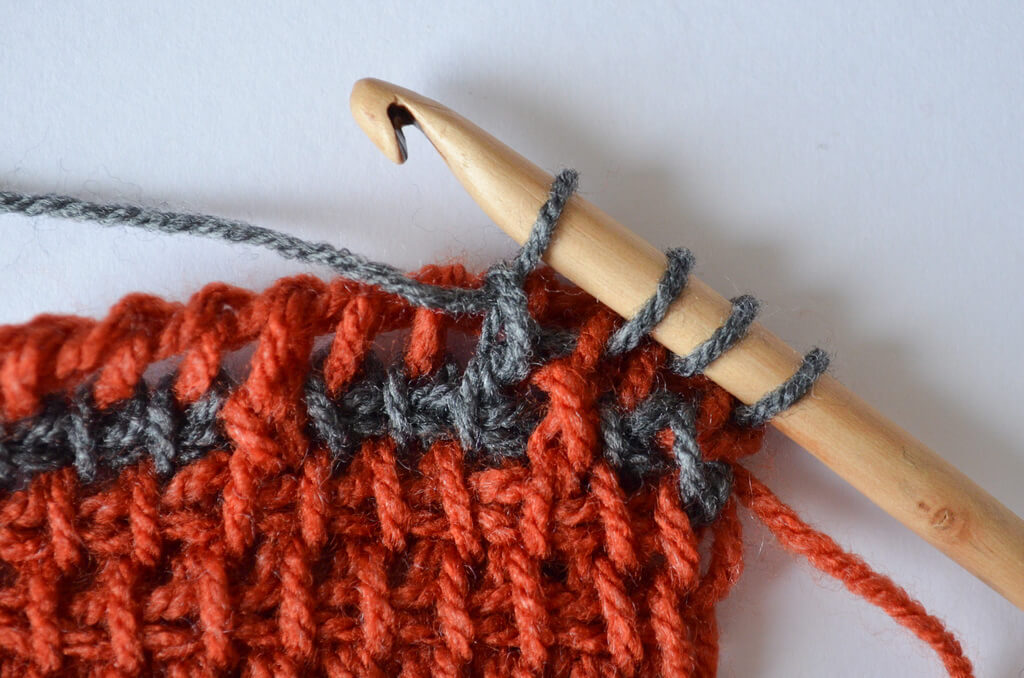
Continue in pattern: 3 Tss, 1 FpTEs, 2 Tss, Ls. R, finishing with MC.
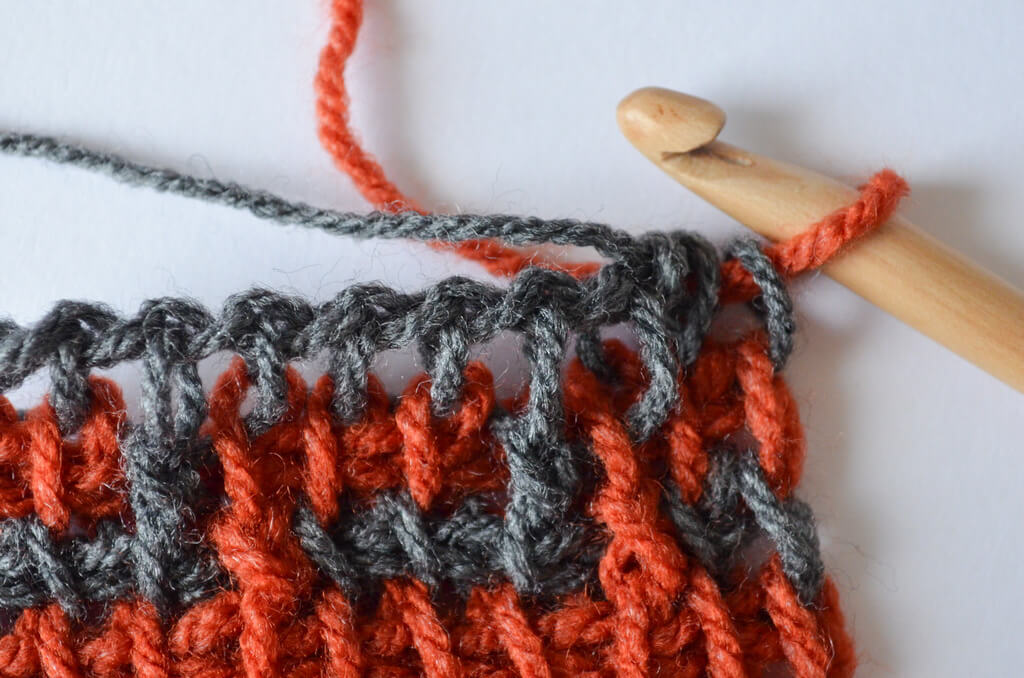
Row 5. Repeat [3 Tss, 1 FpTEs] 2 times, 1 Tss, Ls, R, finishing with CC.
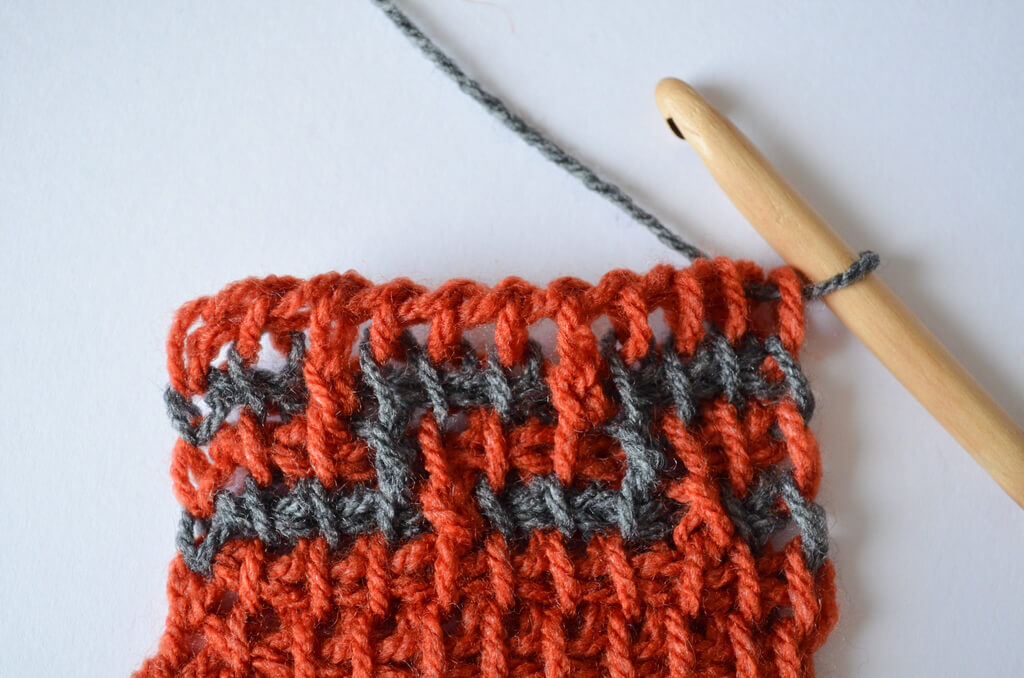
Row 6. 1 FpTEs, repeat [3 Tss, 1 FpTEs] 2 times, Ls, R, finishing with MC.
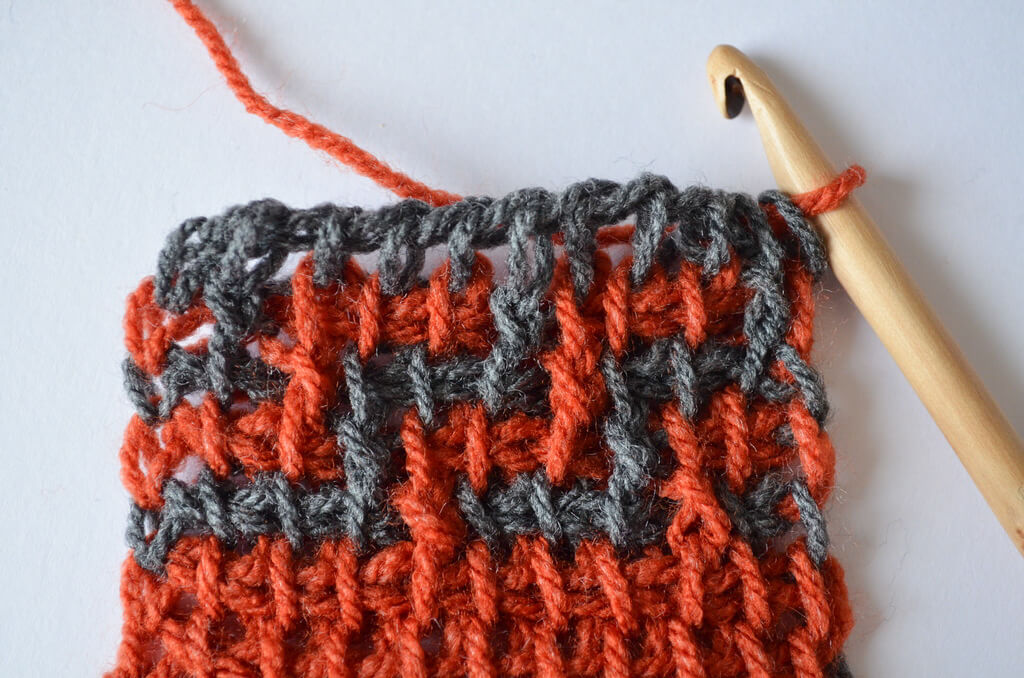
Row 7. 1 Tss, repeat [1 FpTEs, 3 Tss] 2 times, Ls, R, finishing with CC.
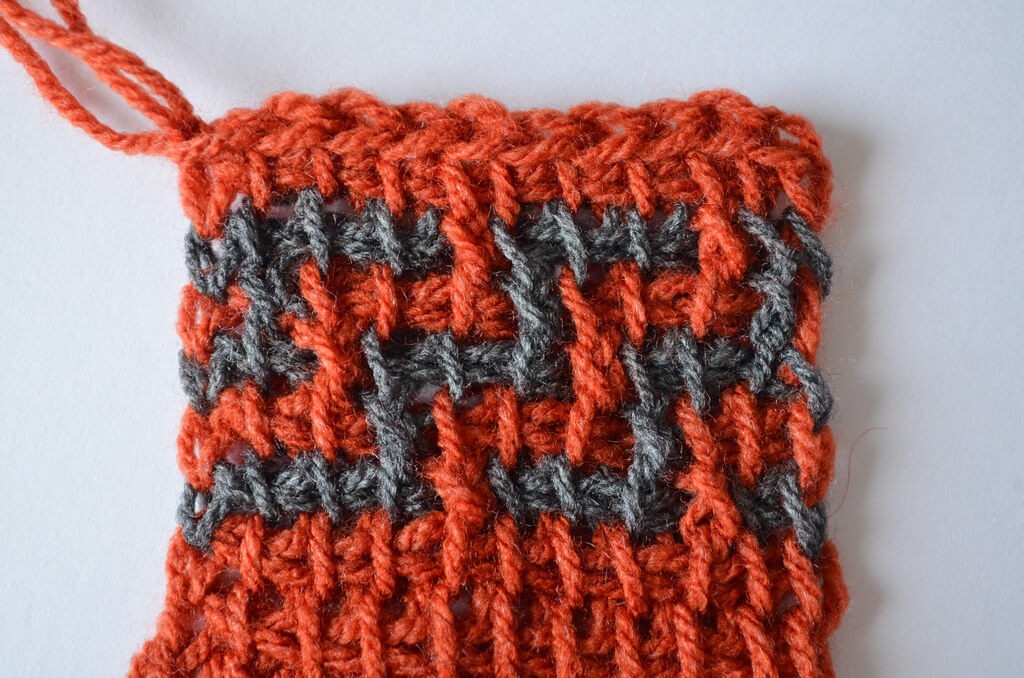
Row 8. 2 Tss, 1 FpTEs, 3 Tss, 1 FpTEs, 2 Tss, Ls, R, finishing with MC.
Repeat Rows 3-8 until you are satisfied with the length of your project.
In the photo above, I cast off after Row 7 to show you what the fabric looks like.
Video on how to make Tunisian crochet mosaic
I’ve prepared a video tutorial as well so you can learn how to read charts in Tunisian crochet mosaic.
Here’s the video and below you can use the chart to follow along with the video.
Here’s the chart, with the legend attached and a watermark too because folks like to share my work without attribution.
FAQ about Tunisian crochet mosaic
Do you have many ends to weave in Tunisian crochet mosaic?
No, in Tunisian crochet mosaic you only have 4 ends to weave, plus any ends resulting from you changing colors or adding a new ball of yarn to your project.
Do you need to cut the yarn after each row in Tunisian crochet mosaic?
No, you can carry the yarn along the edge of the project, one row at a time. You should not cut the yarn after each row of mosaic in Tunisian crochet, unless you want to change the colors after each row.
Is Tunisian crochet mosaic difficult?
Tunisian crochet mosaic is one of the easiest ways to create mosaic fabric with a crochet hook, if not the easiest.
Is fabric made with Tunisian crochet mosaic very thick?
Mosaic in Tunisian crochet creates a relatively thick fabric, when compared to plain Tunisian crochet fabric. It can be up to twice as thick as the regular Tunisian crochet fabric. Mosaic in both crochet and knitting creates a thick fabric due to different colors of yarn overlapping.
Can I use regular mosaic patterns for Tunisian crochet mosaic?
Yes, any chart that works for regular crochet mosaic works for Tunisian crochet mosaic as well. Just keep in mind that in Tunisian crochet each row is worked from the beginning, without cutting the yarn. There is no turning.
Can I do Tunisian crochet mosaic in the round?
Yes, you can use a double ended hook to work mosaic in the round either flat, to make mosaic in a square or round shape, or in a tube, where you need to use two yarns for the forward and return pass in one color and two yarns for the forward and return pass in the second color. You would carry the yarn on the inside, in this case.
Can I use multiple colors for Tunisian crochet mosaic?
Yes, you can change color anywhere in the pattern, just keep in mind the continuity. For example, motifs isolated in the main color can be made in a different contrast color from the main contrast color.
What is the best yarn for Tunisian crochet mosaic?
Any yarn can be used for Tunisian crochet mosaic with the matching hook size. Try to find a hook size that creates a flat fabric that doesn’t curl and also doesn’t have holes in it.
What hook size should I use for Tunisian crochet mosaic?
The same as for Tunisian crochet, the best hook for mosaic in Tunisian crochet is one that is 1.5 to 2 mm larger than the hook size recommended on the label of your yarn. It should create a flat fabric without holes.
Is Tunisian crochet mosaic better than regular crochet mosaic?
Depending on what your goals are, Tunisian crochet mosaic might be better for you than regular crochet mosaic, especially given that you don’t need to cut the yarn or work on the back. Keep in mind that motifs in Tunisian crochet mosaic will show up larger than in regular crochet mosaic made with the same yarn and pattern, due to the hook size difference.
Final thoughts
I hope you enjoyed this tutorial on how to make mosaic Tunisian crochet projects and that you’ll try your hand at making a few projects in this wonderful technique.
I’ll be working up a few patterns and will let you know when they are available via my email updates, for which you can sign up here and get a PDF pattern too.
If you want to check out some more patterns and other Tunisian crochet techniques, here’s a selection of the latest blog posts.
Corner to corner Tunisian crochet scarf pattern
Nordic star Tunisian crochet baby blanket pattern
Tunisian crochet cat ear beanie free pattern
Free wavy mosaic Tunisian crochet pattern
Feather and fan Tunisian crochet pattern for a washcloth
Tunisian crochet asymmetrical rounded triangle shawl tutorial
How to start a Tunisian crochet project in a magic ring
How to make different shawl shapes in Tunisian crochet
How to sew Tunisian knit stitch row to row
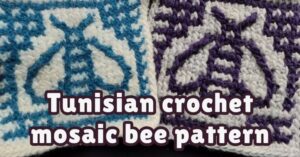
How to make a Tunisian crochet mosaic bee potholder
That’s it for now, take care and I’ll see you soon!
Hugs,
Andrea



correction for my comment: SPOREPRINT sweater pattern. Not Spores! Sorry!
Thank you for sharing this Andrea! Your dark grey Spores Tunisian crochet sweater is absolutely gorgeous with this design at the bottom of the sweater. I’ve already started one with self striping yarn, I’ve done the front and I’m halfway on one sleeve but I’ll probably make one similar to yours with dark grey and rainbow yarn for the design after I finish the one I’m working on.
I’ve worked Tunisian before, knit stitch and the fabric was very thick. I’m working this jumper with a light acrylic with Angora like fibers and is coming out so light and thin that I’ve changed completely my view on Tunisian crochet! With the right yarn you can get beautiful, light, airy fabric! Your pattern is wonderful! When I’ll finish I’ll post some pictures and tag you! Thank you for sharing and helping!
Thanks for the tutorial! I have looked at several and I’m still confused about converting a regular overlay mosaic crochet pattern to tunisian. Most regular patterns have one beginning stitch and one ending. So when you’re casting on, if you pattern is 20 sts, that includes the first and last. Can you explain the conversion to tunisian a bit more, please.
Thanks!
By regular do you mean crochet where you join yarn at the beginning of each row and only work on the front?
In Tunisian the equivalent would be the first and last loop (Fs and Ls), which have the main color of the row. The rest of the stitches are worked according to the chart.
In my charts, I represent all the stitch counts in each row by adding an R symbol at the end. You count all the stitches and that way you know how many loops you need to have on the hook.
For mosaic I could replace that with an F symbol at the beginning, for the Fs, but in the end it’s the same thing.
I’m not sure if I’ve answered your question, though, as I don’t use regular crochet mosaic charts, I draw directly Tunisian crochet mosaic charts.
I will assume that if your pattern has 20 stitches in regular crochet, you want 20 loops.