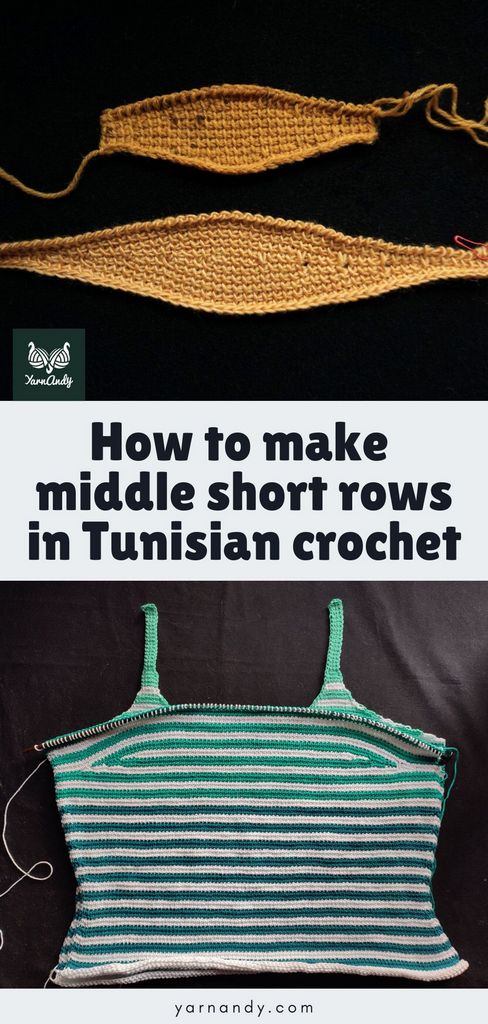
Did you know you can use middle short rows in Tunisian crochet to add volume to the front or back of a garment, without affecting the side seams?
In this article, I want to give you the math you need to calculate your own short row bust shaping or some other kinds of shaping that you can use in your Tunisian crochet projects.
I will show you how to calculate the number and size of your short rows, with two practical examples, one with a step by step video and one that I used to add short rows to my own Tunisian crochet summer top.
Contents
What are middle short rows anyway?
You may have read my previous two articles about forward pass short rows and return pass short rows in Tunisian crochet and are now wondering what these middle or center short rows are.
These are incomplete rows that are isolated in the middle of a row, so they don’t touch either end of the row.
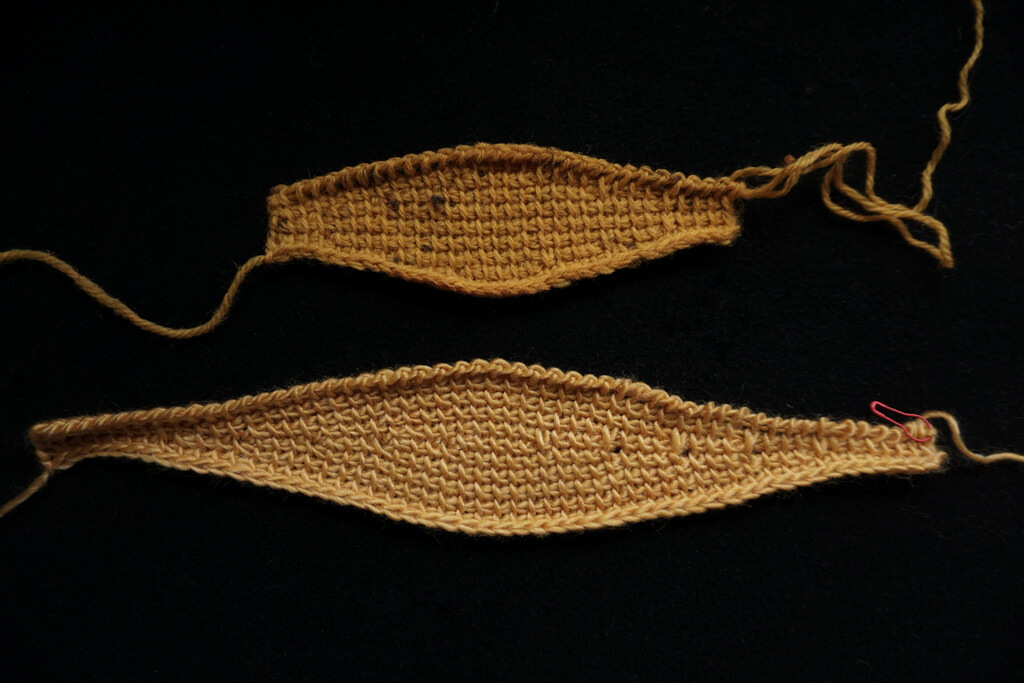
They can be isolated between full rows, or they can be stacked to create various shapes in fabric.
They create height in the middle of the row, but this height is not also found on the edge of the work, so you can add “pockets” of fabric anywhere (including literal pockets, but for that you’ll want all your middle short rows to have the same length).
When working in the round with a double ended hook, short rows are always middle short rows because of the nature of the fabric, where you don’t have a first or a last stitch, like when working Tunisian crochet flat.
What are center short rows used for in Tunisian crochet?
Despite what the drawings below might suggest, middle short rows in Tunisian crochet are not just for making bust adjustments in garments.
But they are excellent at doing just that. Here’s an example in my latest Tunisian crochet summer top pattern (coming soon).
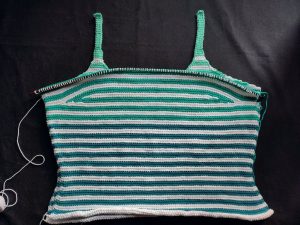
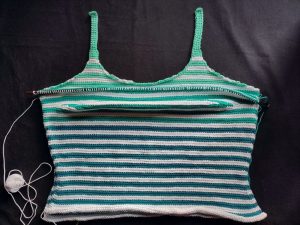
That is one great application and I will give you an example with stitch counts from one of my projects, but you can use these short rows for much more.
You can shape the back of a round yoke sweater, in order to lift the back of the neckline, so the sweater fits more comfortably.
Or you can use short rows to create shoulder shaping, like in this Wirambi top by AbbeyMade. The short rows in this case are used to create a trapeze shape that follows the natural shape of some people’s shoulders.
For a maternity top or for a sweater that needs to accommodate a belly in general, you can add short rows to the abdominal area to extend the length of the front of the garment, without having to adjust the side seams and without affecting the back of the garment.
You can use middle short rows to create leaf-like shapes, waves and other whimsical additions to fabric, which can be very pretty when worked over a large surface. There are many examples of such patterns in knitting, so I hope some will show up soon in Tunisian crochet as well.
Calculating middle short rows for bust shaping
Most projects that require short row shaping will have a similar approach to calculating the needed number of rows and the length of short rows.
Some will form a kind of pocket in the fabric, like the short row bust shaping, some will form a bulge, and some will just form an extra piece of fabric of a specific shape.
You can use this approach for any type of such shaping, but the example I’m giving here is for a short row bust shaping, as there are a few things to take into consideration.
First off, the height of the short row section. This assumes that the project is worked top-down or bottom-up.
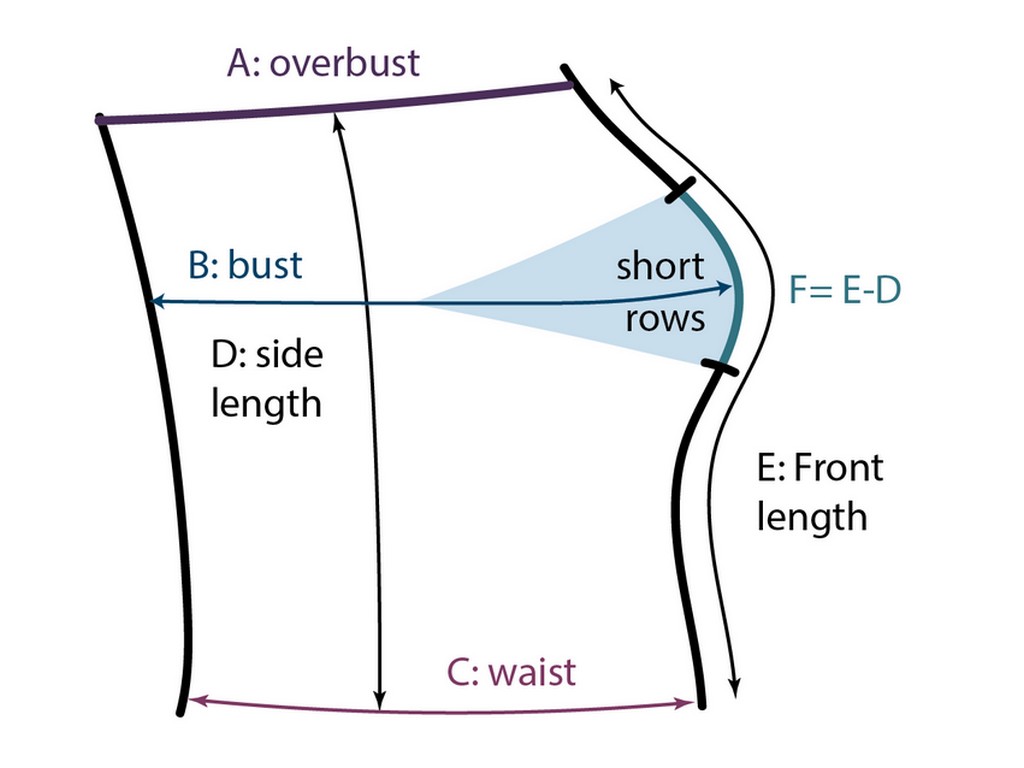
In the sketch below, I marked a few measurements you need to keep in mind.
The letters don’t correspond with the ones in the guide for how to measure yourself, since they are not the same. You will need to measure D and E for this calculation
In the drawing below we have the following points and measurements:
- A – overbust line (horizontal);
- B – full bust line (horizontal);
- C – waist line (horizontal);
- D – side length (vertical measurement);
- E – front length (vertical measurement);
- F – height of short row section (vertical calculation);

You measure the value of D, between lines A and C, on the side of the body. Then you measure the value of E, also between lines A and C, on the front of the body, across one apex of the bust.
Then you use the simple formula F=E-D to calculate the maximum height of the short row section.
Now you need to keep in mind that ease also contributes to the fit. So I recommend decreasing the value of F somewhat to account for ease.
I would remove 1 cm for every 4 cm of ease in the pattern. This is based on experience, not on mathematical reasoning.
Using cross multiplication, the new F value, and your gauge, you calculate the number of short rows needed.
For example, let’s say that final F is 20 cm and your gauge is 10 rows and 10 stitches for a 10 cm by 10 cm square. You will need about 20 short rows.
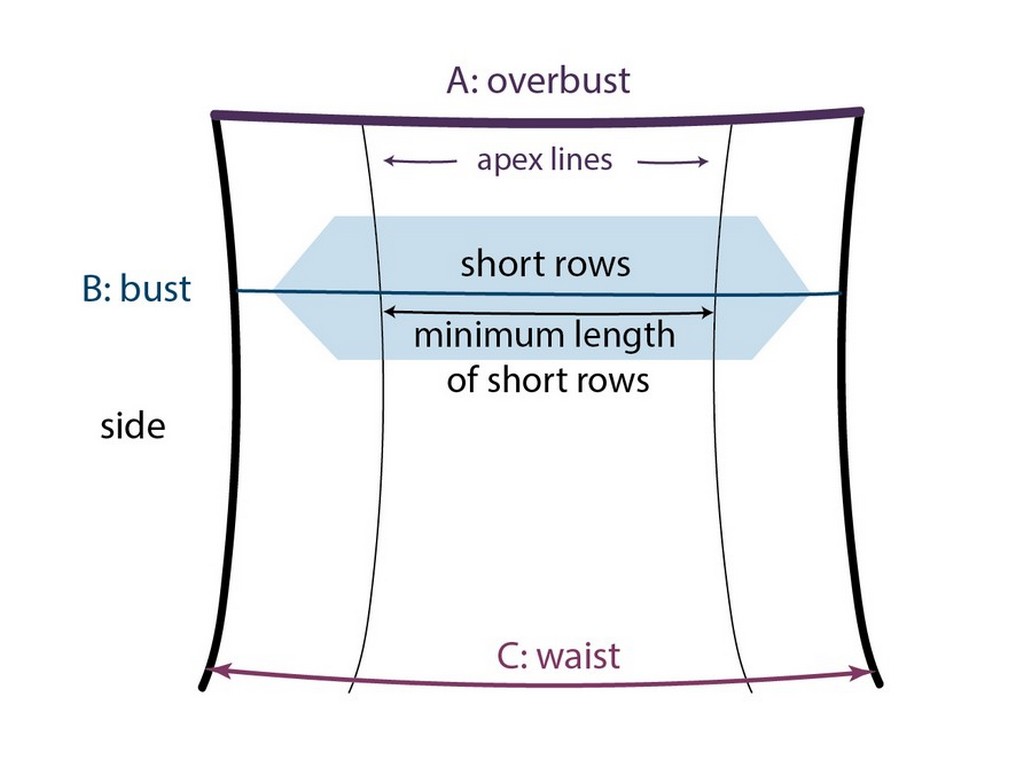
Now you need to calculate how wide your short rows should be. For this, we use another measurement.
First divide the B or bust circumference in half. This will be your front piece. Then measure the distance between the two apexes.

Half of B minus 8 or 10 cm will be the maximum length of the short rows and the distance between apexes, plus 4-5 cm, will be the minimum length of the short rows.
In our hypothetical example, let’s say that the B measures 120 cm, so half of that is 60. The maximum length of the short rows will be between 50-52 cm.
The number of stitches for that is 50-52. I’m leaving this open because it’s better to be flexible when calculating short rows.
Let’s assume a distance of 20 cm between the apexes. That means the minimum length of the short rows will be 24-25 cm and the minimum number of stitches will be 24-25.
We know we need about 20 short rows with lengths that vary between 24-52 stitches.
I like to have the shortest row in the middle, so we will need an odd number of rows. Let’s go with 19. That means 10 rows that decrease in length, down to the 24-25 stitches, then 9 rows that increase in length, back to the maximum of 52.
You can also go from short to long to short, but that leaves less room for the bust.
Now we calculate the difference between the two (maximum length minus minimum length). This results in the difference from one short row to the next.
In our example, we take (52-24)/9=3.1. So we know that the rows need to decrease by 3 stitches every row to reach the shortest row, which should be 25 stitches long (52-3*9).
Now for a result that’s closer to an even number, we can go with that. Since we have an odd number and we can’t skip half a stitch, we need to decide how to proceed.
You can remove a few rows to make the differences in length between the short rows bigger, or you can make staggered short rows. Shorter by 2 for one row, then shorter by 4 for the next, 5 times, until you reach the 25 stitch length.
This way, the short rows will have 52, 50, 46, 44, 40, 38, 34, 32, 28, 26, 28, 32, 34, 38, 40, 44, 46, 50, 52 stitches. We have a 26 stitch short row in the middle because again, we can’t skip half a stitch.
It’s easier if you draw all of this as a pyramid or on the chart that I provided for this purpose (see below).
Now that you know how many rows and how many stitches per row, it’s time to get to it. First of all, learn how to make the short rows with a practice swatch that I demonstrate in the video below.
Video tutorial for middle short rows
There is only a right handed video for these middle short rows because I can’t flip the video due to there being drawings and text involved in making this video.
However, if you don’t mind the flipped text, I will export and upload a left handed version, just let me know.
See below the chart used in the video, plus the detailed stitch counts.
Chart example of middle short rows
In the video, I demonstrate how to make several short rows on a small sample and below you will find the chart if you want to follow along with the video and have the chart in front of you.
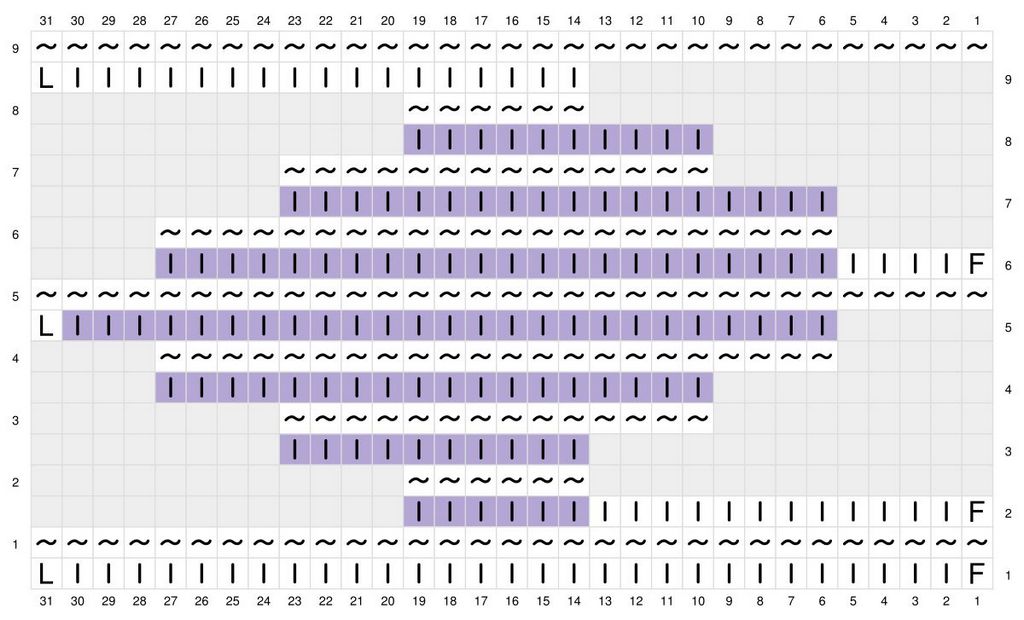
You can download or make a copy and edit the chart I used in the video.
The legend is below and you’ll notice that on this chart I included the first stitch, to keep the loop count correct.
I also included the return pass stitches because the return pass in incomplete.
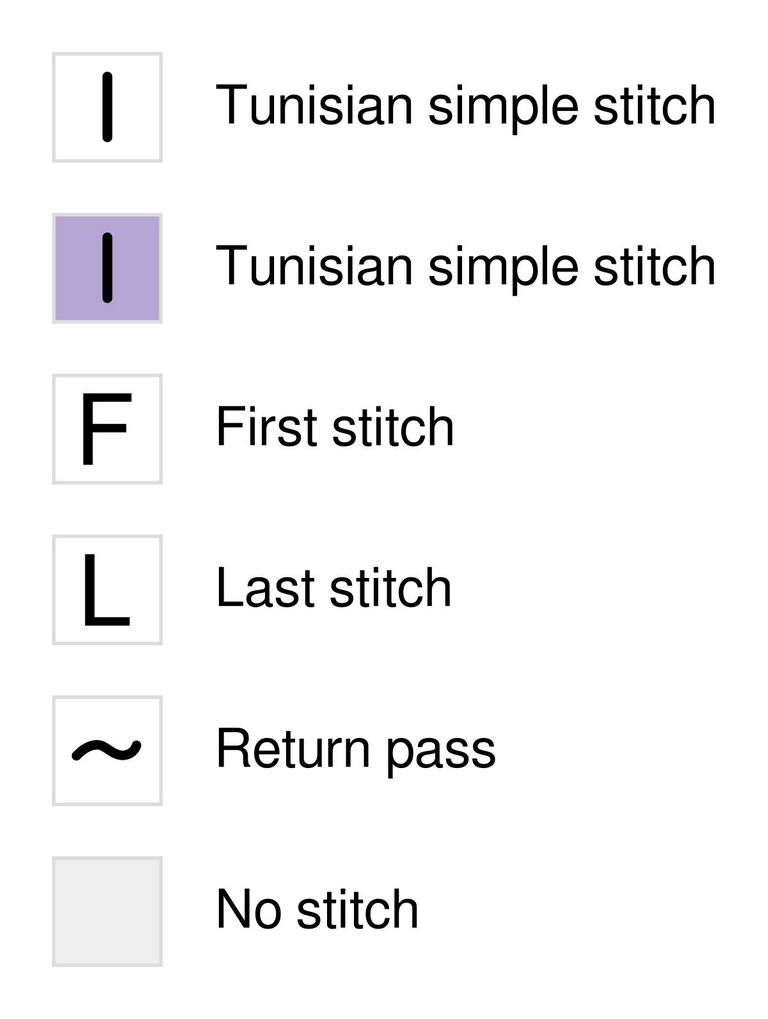
Normally I don’t include the return pass stitches on charts because all return passes are the same, but here they are as important as the stitch counts when working the forward pass.
You will also notice that I used two colors for the background of the Tss (Tunisian simple stitches), but they are all made the same.
I only wanted to highlight the stitches that belong to the short rows, but maybe I’ll update the colors to reflect which stitches belong to which rows in the final work. I’m still learning as well, and teaching short rows is a process.
Stitch counts for middle short rows – as seen in the video tutorial
The rows and stitch counts below are based on the chart above and are the ones used in the video tutorial.
They create a leaf-like shape, wider in the middle. See abbreviations in the previous example.
Abbreviations
- Ch – Chain;
- FP – Forward pass;
- Ls – last stitch: insert the hook behind the two vertical bars at the end of the row and pick up a loop;
- Rep – Repeat;
- RP – Return pass;
- YO – Yarn over.
From short to long short rows
The first number in the (round brackets) is the length of the short row, which you only get once you do the return pass for that particular short row.
Row 1 FP. Start with a foundation row of 31 stitches, including the last stitch — 32 loops.
Row 1 RP. Ch 1, Rep [YO and pull through 2 loops] until 1 loop is left on the hook
Row 2 FP. Pick up 18 loops — 19 loops
Row 2 RP. Rep [YO and pull through 2 loops] 6 times (5+1) — 13 loops
Row 3 FP. Pick up 10 loops — 23 loops
Row 3 RP. Rep [YO and pull through 2 loops] 14 times (13+1) — 9 loops
Row 4 FP. Pick up 18 loops — 27 loops
Row 4 RP. Rep [YO and pull through 2 loops] 22 times (21+1) — 5 loops
Row 5 FP. Tss across, Ls — 31 loops
Row 5 RP. Rep [YO and pull through 2 loops] until 1 loop is left on the hook
Row 6 FP. Pick up 26 loops — 27 loops
Row 6 RP. Rep [YO and pull through 2 loops] 22 times — 5 loops
Row 7 FP. Pick up 18 loops — 23 loops
Row 7 RP. Rep [YO and pull through 2 loops] 14 times — 9 loops
Row 8 FP. Pick up 10 loops — 19 loops
Row 8 RP. Rep [YO and pull through 2 loops] 6 times — 13 loops
Row 9 FP. Tss across, Ls — 31 loops
Row 9 RP. Rep [YO and pull through 2 loops] until 1 loop is left on the hook
In the video, I made another repeat of rows 2-6, just to show how the shape changes when the shortest short row is in the middle.
As you can see from the chart, there is one complete row in the middle, but that’s because the foundation upon which I worked was the same as the longest short row.
Practical example of short row bust shaping
Now that you have the little swatch done, you can also try a bigger one.
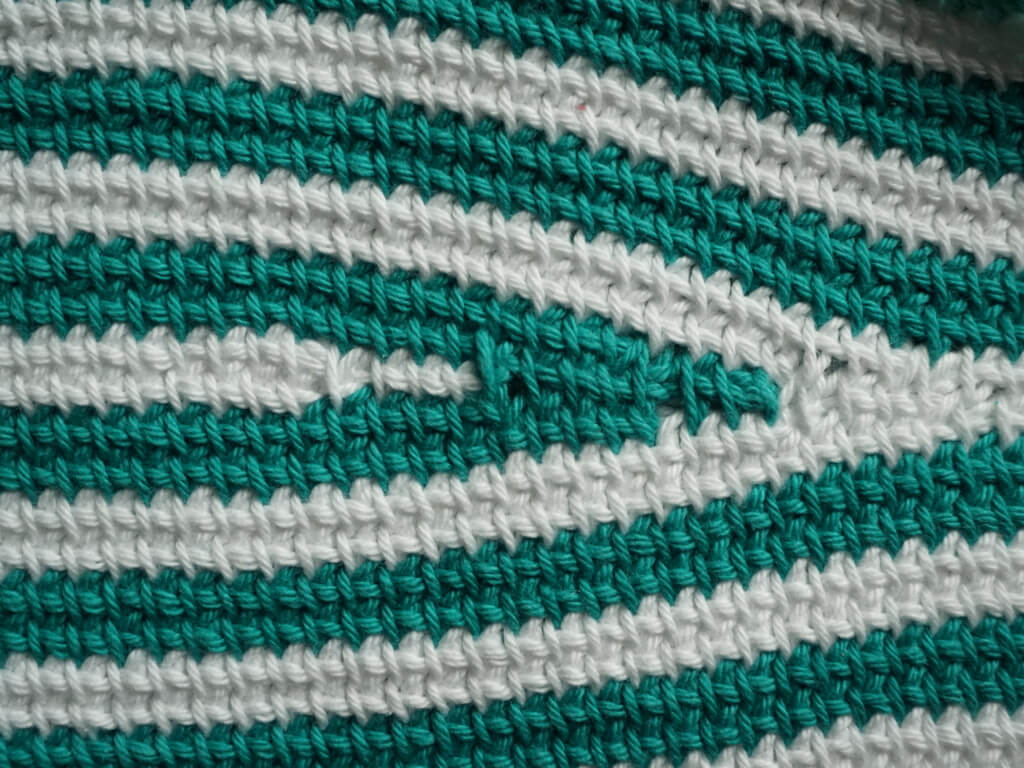
This is the pattern I used to make the short row bust shaping for my own top worked bottom up in stripes. The gauge for this is 18 stitches by 18 rows and the full bust measurement is 113 cm, including ease.
I would have made an odd number of short rows if I hadn’t decided to make the stripes double (two rows per color) or if I didn’t care for the sides to match perfectly when seaming.
As it is, the top includes a section of 8 short rows, with colors changing every second row. It was a little mind bending to plan the matching of the colors for the short rows, but in practice it worked much easier than expected.
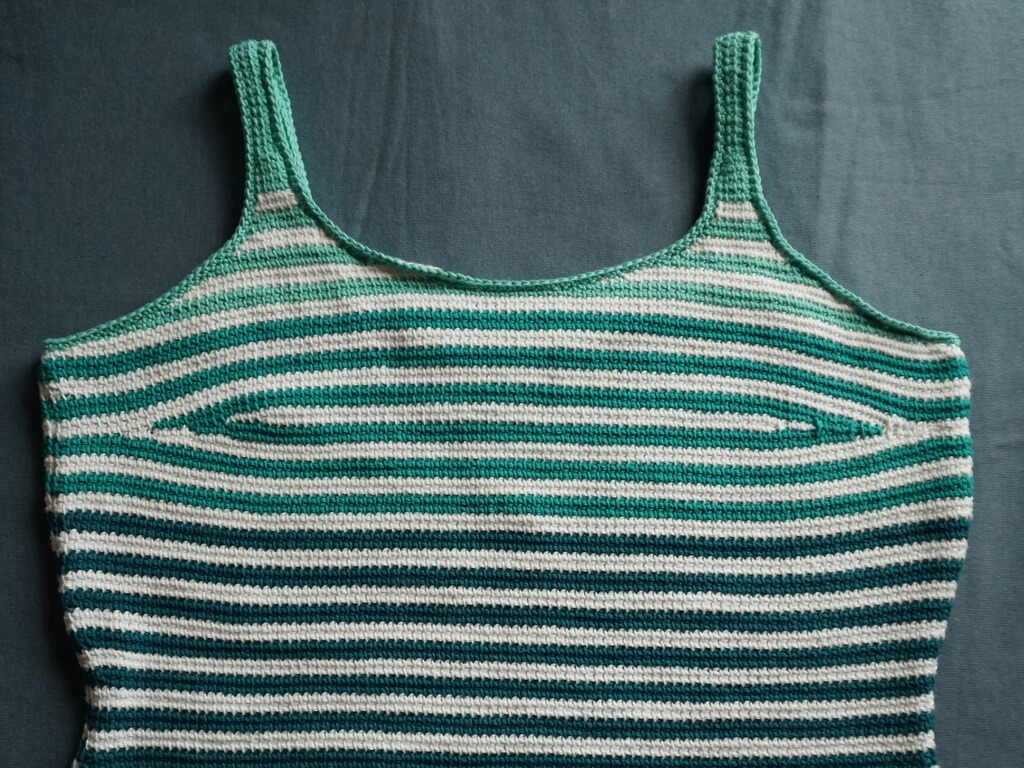
I recommend that you do this with one color of yarn or a highly variegated yarn, so the short rows will blend in.
I chose to work in stripes in order to show the short rows as obviously as possible. They are not very visible when the top is worn, however. When I wear the top, you just see the regular stripe pattern from the front.
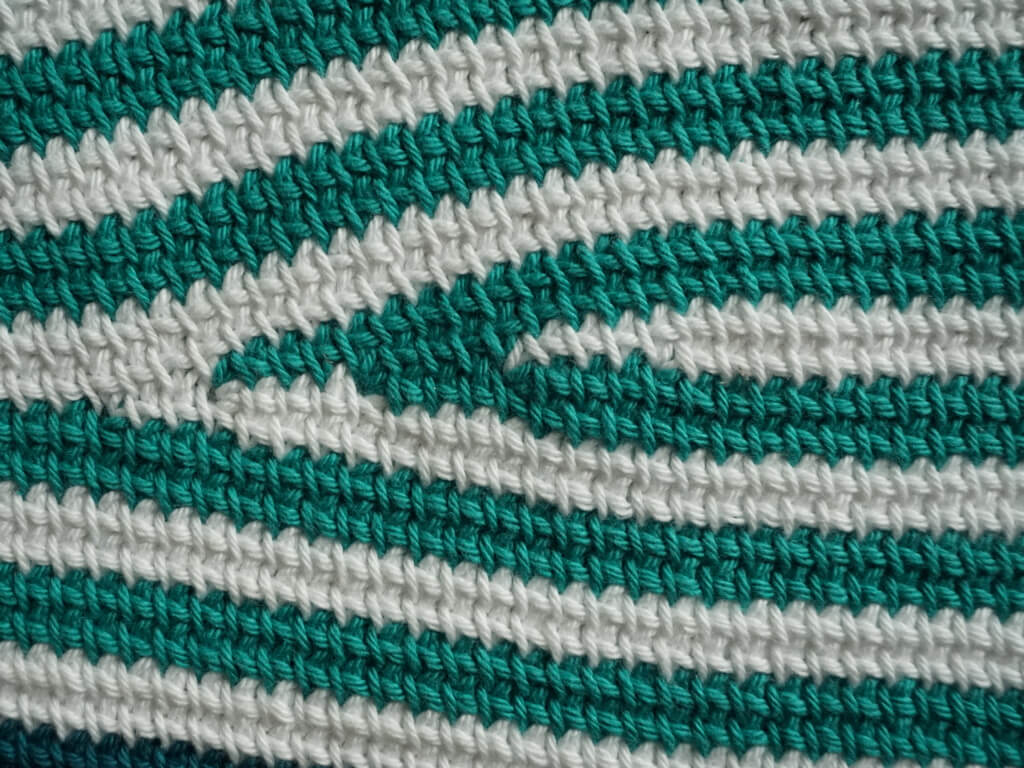
Observations
You need to have a foundation to work these rows on. In my case, I made size 4, which has 103 loops.
In this top I used the Tunisian modified simple stitch, but this pattern works for other stitches as well.
At the end of each forward and return pass, you have the number of loops left on the hook.
The instructions include the math I used to calculate the number of loops needed to be picked up and bound off. Hopefully you will notice a pattern. I will explain for the first few rows in text.
Pattern
Row 1 FP. Pick up 7+87+1 loops (95) — 96 loops
First off, 8 loops were picked up and set aside for the full row on top of the short row section. Then 87 loops were picked up for the short row and 1 loop for the short row return pass.
Row 1 RP. Rep [YO and pull through 2 loops] 88 times (87+1) — 8 loops
88 loops were bound off for a short row of 87 stitches, and 8 loops were left on the hook.
Row 2 FP. Pick up 4+79+1 loops (84) — 92 loops
4 loops were picked up for the full row, then 79 loops for the short row and 1 loop for the short row return pass.
Row 2 RP. Rep [YO and pull through 2 loops] 80 times (79+1) — 12 loops
80 loops were bound off for a short row of 79 stitches (shorter by 4 stitches on either end than the row before) and 4 more loops were left on the hook.
We continue in this manner, decreasing 8 stitches per short row, until the shortest short row is completed.
Row 3 FP. Pick up 4+71+1 loops (76) — 88 loops
Row 3 RP. Rep [YO and pull through 2 loops] 72 times (71+1) — 16 loops
Row 4 FP. Pick up 4+63+1 loops (68) — 84 loops
Row 4 RP. Rep [YO and pull through 2 loops] 64 times (63+1) — 20 loops
Row 5 FP. Pick up 4+55+1 loops (60) — 80 loops
Row 5 RP. Rep [YO and pull through 2 loops] 56 times (55+1) — 24 loops
This has been the shortest short row, at 55 stitches. From now on, all short rows will be longer.
Row 6 FP. Pick up 60 loops — 84 loops
Row 6 RP. Rep [YO and pull through 2 loops] 64 times — 20 loops
Short row of 63 stitches completed, with 20 loops left on the hook.
Row 7 FP. Pick up 68 loops — 88 loops
Row 7 RP. Rep [YO and pull through 2 loops] 72 times — 16 loops
Row 8 FP. Pick up 76 — 92 loops
Row 8 RP. Rep [YO and pull through 2 loops] 80 times — 12 loops
Once you made a few short rows, you should notice the pattern in which loop counts change from one pass to the next.
Final thoughts
I hope you can use the information in this article to make the short row adjustments needed to make garments fit you as nicely as you want them to.
It takes a little bit of time and experience to get good at short rows, but hopefully the tools I gave you in this article are enough to get you started.
Once you actually make a few, you’ll see that they are much easier to do than to read about (or write about, in my case).
If you want to explore more articles related to Tunisian crochet fundamentals, check out the blog posts below:
Corner to corner Tunisian crochet scarf pattern
Nordic star Tunisian crochet baby blanket pattern
Tunisian crochet cat ear beanie free pattern
Free wavy mosaic Tunisian crochet pattern
Feather and fan Tunisian crochet pattern for a washcloth
Tunisian crochet asymmetrical rounded triangle shawl tutorial
How to start a Tunisian crochet project in a magic ring
How to make different shawl shapes in Tunisian crochet
How to sew Tunisian knit stitch row to row
How to make a Tunisian crochet mosaic bee potholder
Also make sure you subscribe to my email updates if you want to be notified whenever I publish something new for you, be it a tutorial, a new pattern, videos, or a testing call.
I’ll see you soon with more content!
Hugs,
Andrea
Pin this tutorial to try later.
