In this article we explore short row bust shaping in knitting with a specific example, one of my WIPs.
If you have a large difference between your bust measurement and the under bust, you might have the garment you want to make ride up in the front.
If you want to make a sweater or a top or even a dress fit properly over your bust, so you don’t constantly have to adjust the front of your garment, add some short row bust shaping.
I have a relatively small difference between bust and over bust, but can benefit a lot from adding short rows to my projects, like the dress I used as an example here.
You can see how I calculated everything necessary to get a perfect fit around my figure and use these steps to make your own custom fit garments.
All you need to have is your measurements, a piece of paper and a pen, and a little patience.
Why share how to add short row bust shaping to knit garments?
I really want to make clothes that fit, especially since making things by hand, like knit tops and dresses, are supposed to be customizable.
But there aren’t many tutorials out there on how to do this for yourself. I know there are some books, but they aren’t exactly accessible to me here in Europe.
So I decided to just do it myself and, while I’m at it, I intend to share the process with you, over several garments that I customize to my size.
There aren’t many specific tutorials that show you exactly what to do to use short rows in projects, or I can’t find them, but this is what I did, based on my own knowledge in the realm of design and shaping.
You can use these instructions to customize your own garments. As we know too well, patterns are guidelines, not rules. They give you the structure and you build a custom item on top of that.
Today we’re tackling short rows for bust shaping, why you need them, how to make them in knitting. The same principles can be applied in Tunisian crochet.
Introduction to my current WIP
Remember that WIP parade I showed you recently? Yeah, the one with 6 WIPs. Well, guess what. I only finished one and started another project…
In the meantime I finished another one, so I’m down to 5 active WIPs, but still.
This project is a knit test for someone who posted in the Facebook Pattern Testers group (where I sometimes post testing calls if I can’t find testers in my subscriber list, so if you want to test for me, make sure you’re subscribed to my emails). I saw it, I wanted to make it, that was it.
I’m quite advanced in knitting, but can’t for the life of me stick to larger projects, so having a tight deadline is a good motivator to just do it.
The designer is Yvette Kim and you’ll find her work here.
The design is a tube dress and the construction is exactly that. A tube with some shaping in the important parts.
It’s worked top-down and has a calculator for you to calculate increases and decreases based on your specific shape. So you only have a few instructions and the rest is completely customizable.
But since there’s no shaping until the bust measurement and I have some experience with not accounting for bust volume and getting folds in the back of garments (while sewing and crocheting, even knitting in this project, where we had short rows at the top of the back), I decided to add short rows to the front to make space for my chest.
It’s also possible to do it with vertical darts by doing the same shaping that is used in the pattern to shape the hip area, but there’s only so much you can increase at the sides over a short distance without distorting the whole garment and messing up the stitch counts.
Like this, you create a “pocket” of fabric anywhere, without altering the stitch counts, can make it as large or as small as you need it and it’s a little visible (in my case, because I’m still new to short rows), but in the end looks exactly like a bust dart looks on fabric clothing.
About short row shaping
Short row bust shaping sounds scary until you actually do it. Then it’s an “Aha!” moment and you’ll never want to go back to unshaped garments.
You can add short row shaping to any part of a pattern that needs it, such as heels on socks, the lower front of a garment to accommodate a belly, at the top of the back to accommodate a hump, at the side of a sleeve to accommodate an upper arm flap in a straight sleeve (a flap which, by the way, is a lot more common than you think, but you never see one even on “plus size” models).
Short rows are magic and the only trouble you’ll ever have with them is including them in lace or colorwork, but even those can be figured out with some patience.
They can be made in any craft, not just knitting. For example, in Tunisian crochet they are very easy to make and to add to anything. In regular crochet, shaping is easier with vertical darts, so you increase on each row either at the end of the row or close to the bust apex.
I will write separate articles about bust shaping in crochet garments. For now, we’ll concentrate on my tube dress example.
How I did short row bust shaping on my tube dress
Since you can add short row bust shaping to anything, first you’ll need a pattern and some measurements.
I will base all my examples on the tube dress pattern.
You have the places where to take measurements on the schematic below.
These measurements are done with arms down/relaxed and while wearing your preferred underthings for the specific project you have in mind.
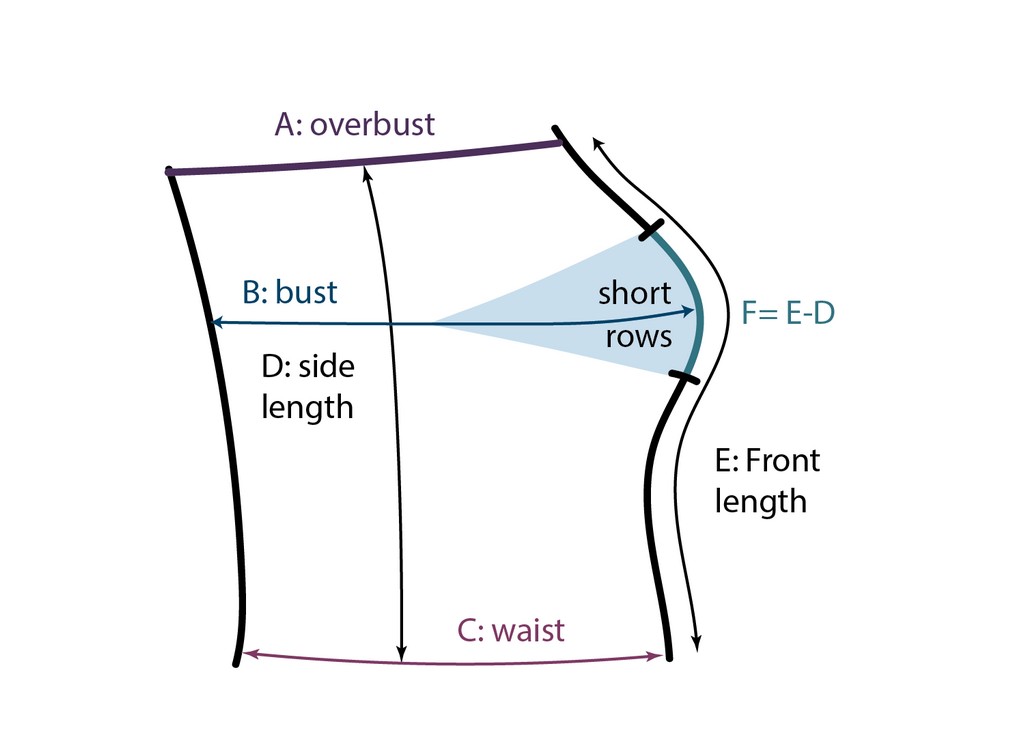
A is the overbust circumference measurement, in this case the point where you want the dress to start, since it’s strapless. I chose the count that works for my size, about 98 cm or 38.5″. You won’t need it for sweaters, for example, where you have other points of measurement.
B is the maximum chest circumference measurement. At this line you will create the short rows.
C is the waist circumference. You will use this line to measure the side length and the front length.
D is the side length, from A to C. This will inform the number of rows you need to make to reach the waist.
E is the length along the front of the body, also from A to C. You measure along one breast, not between them.
F is the difference between E and D and will inform how many short rows you will make for the short row bust shaping.
Once you have all your measurements, you can visualize them nicely in a table.
| Measurement | Value (cm/”) | Rows |
| A: overbust | – | |
| B: bust | – | |
| C: waist | – | |
| D: side length | ||
| E: front length | ||
| F: short rows (E-D) |
Use the stitch gauge from your pattern to calculate how many rows you need to have in the short row section.
Here’s what the table looks like for me.
| Measurement | Value (cm) | Rows |
| A: overbust | 98 | – |
| B: bust | 104 | – |
| C: waist | 84 | – |
| D: side length | 20 | 64 |
| E: front length | 28 | 90 |
| F: short rows (E-D) | 8 | 26 |
Use the gauge to figure out the starting stitch count and pick the appropriate size from the pattern.
Then work in pattern until your reach the point on the side where you took measurement B.
Now you begin the short rows to create the space for the bust, without altering the stitch count.
Measurement F tells you how many short rows you need, so all you need to figure out now is placement.
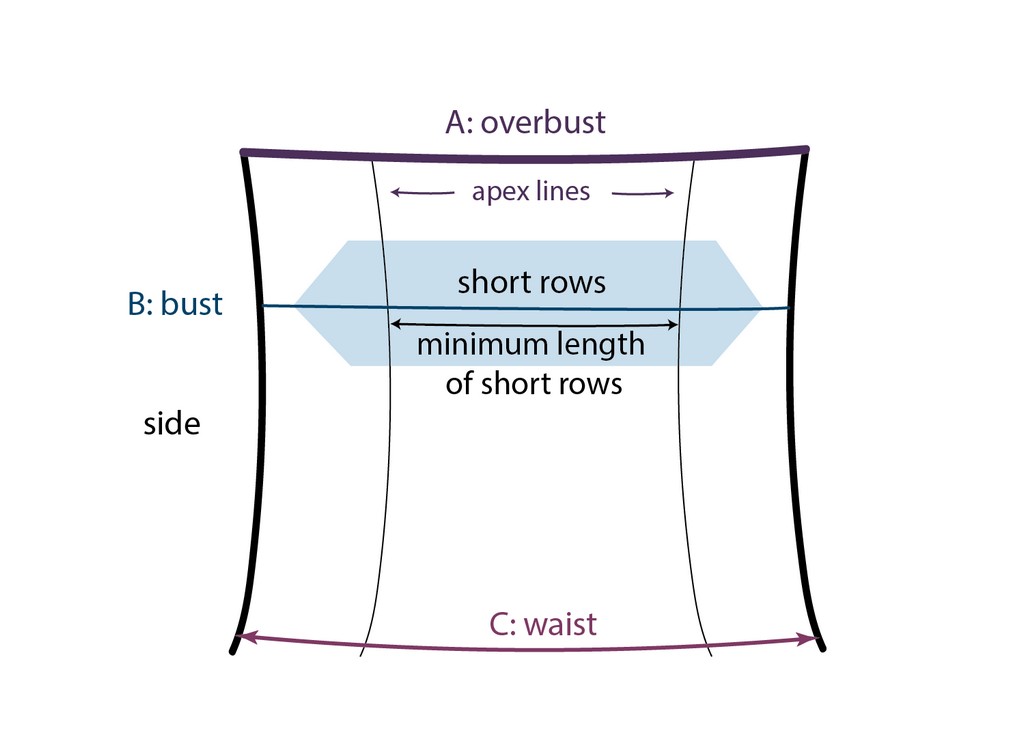
I will assume you want to make an “hourglass” type of short row bust shaping, where you start with the longer rows, make shorter rows, then increase the length until you reach back to the original length of the row, like in the drawing below.
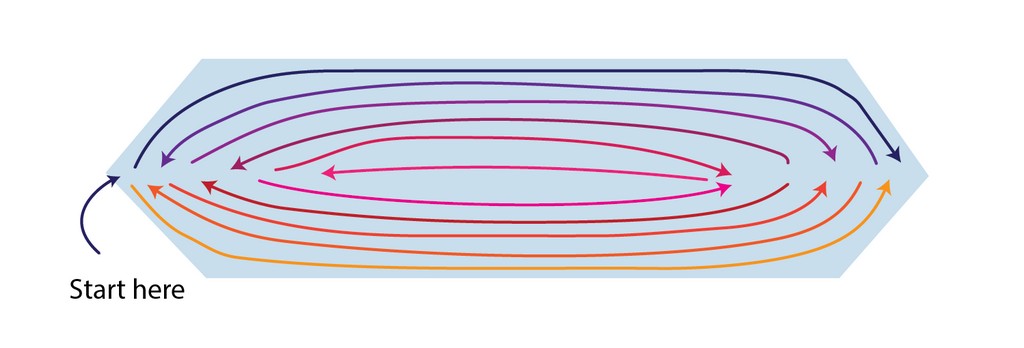
There’s also an option of making only one trapeze shape, instead of two, like in the hourglass, but I will not discuss it here (see the end of this article for a link to a tutorial on that shape).
Placing the bust shaping short rows
The bust short rows need to start about 2-4 cm from the side seam, towards the front, and end about 2-4 cm before the apex on each side. That means that the shortest short rows will not be much shorter than the longest ones.
You need to take decisions here based on how many stitches you have on your needles.
First, place a stitch marker at the side seam, if you haven’t already. The beginning of the row stitch marker will count as the other side seam marker (in this pattern, in any other pattern place two stitch markers, one at each side).
Use your gauge, the bust (B) minus 2-4 cm on each side (B minus 4 to 8 cm), and the distance between the apexes, plus 2-4 cm on each side (apex distance plus 4 to 8 cm), to calculate how long the longest and the shortest short rows need to be. You can tweak the numbers if you need to.
In my case, I chose the longest to be 100 stitches and the shortest 76.
You take the difference between those two stitch counts (24 in my case) and spread them out across the number of rows you have, considering that you need two of each if you want to make the “hourglass” shape and not just a trapeze.
I need to make 13 pairs of short rows, so the whole section would be worked over 26 rows and would give me a “pocket” that’s 8 cm wide across the front and 100 stitches wide at the widest point.
I made a table with the row counts, but messed something up, so the next best thing was making a chart. With a chart you can visualize exactly which stitch does what.
The wrapped stitch is not worked and not counted as part of a short row where it appears.
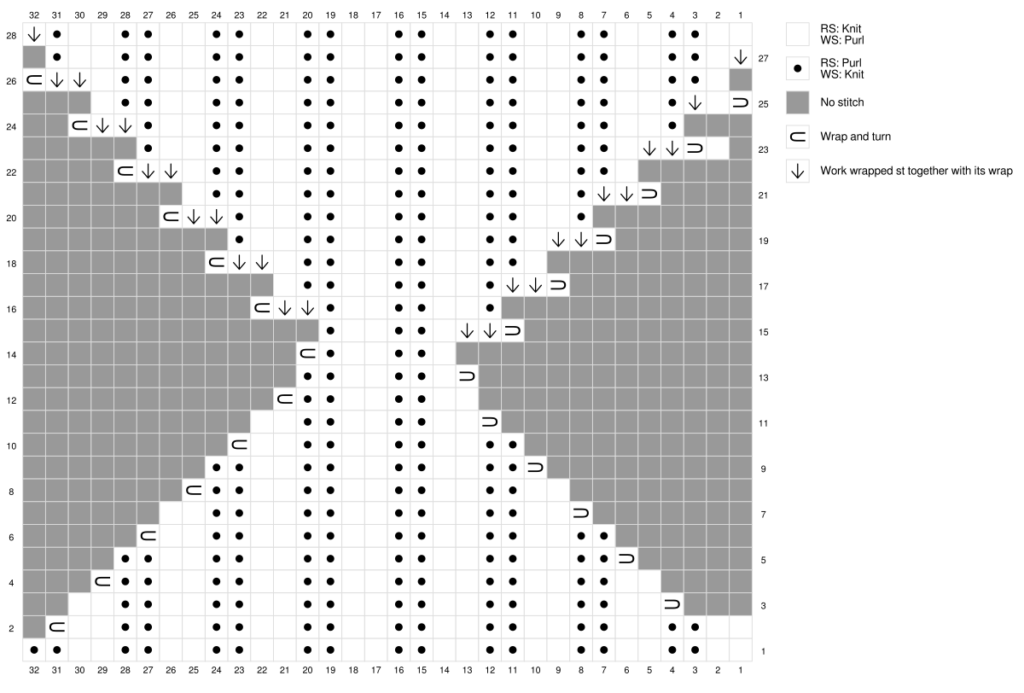
After you reach the middle of the short row section, you increase the length of the short rows and start working the previously turned stitches.
That means that you need to work the first turned stitches into the new rows, as well as the just turned stitches.
This tripped me up a bit, but the chart fixed everything. Here’s the correct stitch counts for each row.
| Row | Sts | Row | Sts | Row | Sts |
| 1 | 100 | 11 | 80 | 21 | 90 |
| 2 | 98 | 12 | 78 | 22 | 92 |
| 3 | 96 | 13 | 77 | 23 | 94 |
| 4 | 94 | 14 | 76 | 24 | 96 |
| 5 | 92 | 15 | 78 | 25 | 98 |
| 6 | 90 | 16 | 80 | 26 | 100 |
| 7 | 88 | 17 | 82 | ||
| 8 | 86 | 18 | 84 | ||
| 9 | 84 | 19 | 86 | ||
| 10 | 82 | 20 | 88 |
You will notice that rows 12-15 are not exactly symmetrical, that’s because I wanted to offset the turning stitches so I wouldn’t have to turn over them again.
I used the table to tick off worked rows and stitch markers to keep track of the short rows.
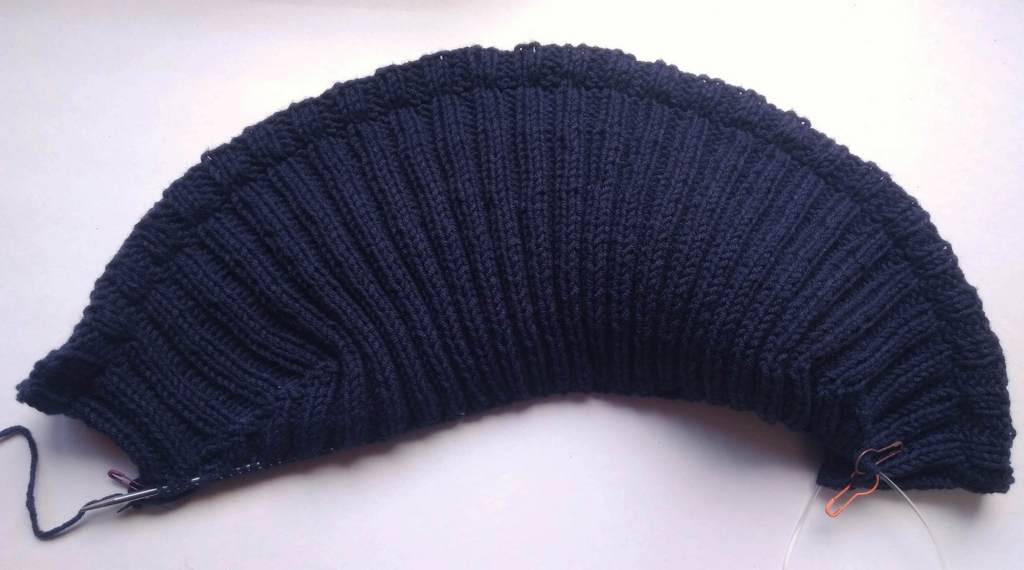
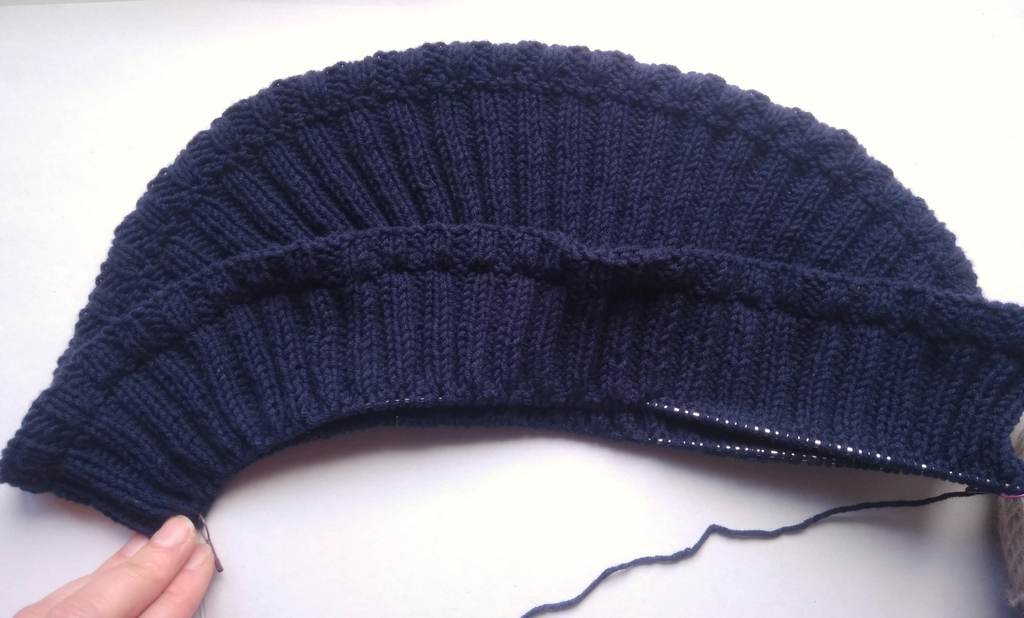
If you have a similar difference (measurement F) as me for this pattern, you can use these numbers, but you can also use them as a starting point to make your custom table of stitch and row counts.
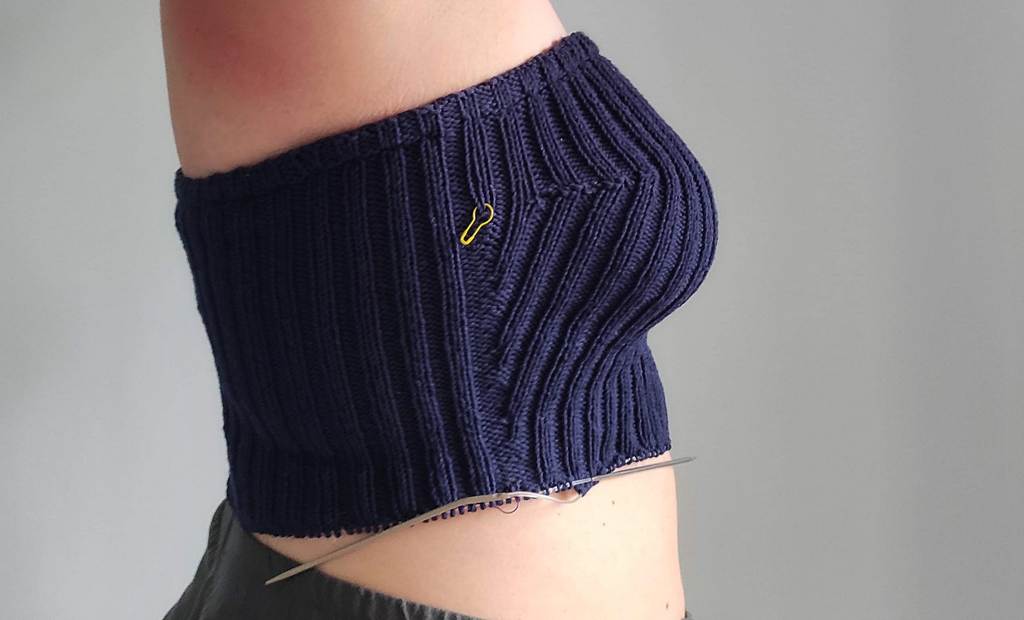
In my project, the turning points for the short rows are slightly visible because I had no idea what I was doing (I told you I messed up the second part of the hourglass), but this is a lesson learned and from now on I’ll have this tutorial to follow for future projects.
A calculator for short row bust shaping
Amber Hastings has created an excel calculator that you can use to make your short row calculations without messing with a chart, like I did.
You input your measurements (in inches only and you can use the diagrams and tables above to figure out which measurements you need) and you get instructions.
Some abbreviations need explanations (I will assume SWSR means Shadow Wrap Short Rows), so you need to poke around a bit to figure out how to use the calculator.
I might make my own version with centimeters because I don’t like inches and would prefer to make this more accessible world-wide (also, you divide by 10, not random multiples of 2). But that’s going to take a while, so until then you can use this calculator.
After you open the link in the Ravelry (or click here if you don’t have a Ravelry account or can’t use it), you need to make your own copy to use the calculator. Go to File/Make a copy and save that copy in your Drive (yes, you’ll need Google Drive to use it).
Alternatively, go to File/Download/Microsoft Excel to get an .xlsx file that you can use in Excel.
Once you have your copy, you fill out only the yellow cells and you get instructions in the second half of the sheet, with custom numbers in the blue cells. Do not edit those blue cells or you’ll lose your data.
How to turn when making short rows
There are different ways of making short rows. I used German short rows for this project, because that’s what I knew, but there are at least 5 short row turns and probably more that I don’t know how to find.
Here’s a list article with examples of 5 ways to turn short rows (there are no tutorials there, but you can look them up based on the names or see below).
Here’s a video that shows you how to make the different kinds of short rows and a comparison between them.
You can try them all and see which one makes the most sense.
I’ll probably try the Wrap and Turn method on my next project with short row shaping.
Here’s one article that I found very useful for explaining the Wrap and Turn method and how to make the ends of the short rows invisible.
Here’s another article I found about short rows and an actual example of them being used for bust shaping in the trapeze shape. If my overly verbose explanations don’t make sense to you, maybe try their method.
Wrapping up
Now I’m off to working on increases in my project, as the deadline is really tight and knitting is slower than other crafts, even for a quick knitter like me (who am I kidding, I’m off to edit a pattern).
I used the same table structure to map out decreases towards the waist and increases towards the hips, so I’d recommend you do the same.
When the dress is finished I’ll add a few photos here.
For now, I hope this helps you figure out how to use short row shaping for your own projects and please let me know if I can make things clearer, if you have questions or suggestions, my comments are always open.
Hugs and happy crafting,
Andrea

Thank you so much for this! This is fantastic! I’ve recently started knitting because as a ‘currently unfashionable’ shape (short torso, long arms, bigger than B-cup), no clothes ever fit. But of course most patterns are fashionable, for obvious reasons, so they don’t fit either.
I have ADHD so I get stressed when I can’t move freely in my clothes, and close fits provide the most freedom of movement, so sadly “Embrace the baggy” isn’t a great option for me.
I’m building a collection of techniques from generous internet denizens like yourself with the intent of one day being able to make myself custom clothes that fit. Posts like this give me hope that it’s going to be possible 😀
Hi, fellow short-torsoed ADHDer who likes to wear fitted clothes! I’m glad you found this helpful, but what I recommend is that you start on one project and then go through your collection to find the techniques you need. It’s so much easier to problem-solve when you have a problem in front of you.
Even if your first few projects come out looking/feeling weird, they are tools for learning and are necessary to figure out what you actually like and how to get there.
I’m here to support you if you need encouragement along the way and if you subscribe to my emails you’ll get notified when I publish my guide for customizing the fit of garments, which I’m working on right now. You can ignore all the crochet stuff, but the guide might be very useful to you. I hope to have it ready in the next couple of weeks if all goes well.