The easiest shape to make into a beanie is a rectangle. When you seam the sides, the two corners that stick up look like small cat ears, which is what gives this beanie shape its name – the cat ear beanie.
The sideways construction allows for easy size customization. Start with a different stitch count for a different depth, and make more or fewer rows for a different head circumference.
The pattern is highly adaptable for many different yarn thicknesses, but on this page the stitch counts I provide are for fingering weight yarn.
Tunisian crochet is pretty thick to begin with, so a double brim is really warm, even in fingering weight yarn.
The sideways construction is perfect for showing off hand dyed yarn, as the natural pooling in this type of yarn creates stripes that resemble those on the faces of tabby cats.

Contents
About this Tunisian crochet cat ear beanie
This is a simple square beanie with an elastic brim that can be folded over.
The easy stitch pattern is slightly more textured than plain Tunisian simple stitch, as it uses a mix of Tunisian simple stitches and Tunisian knit stitches.
To make this beanie fit perfectly, you can start with a longer chain and fold the ribbed brim up slightly more.

Since Tunisian crochet has very little give horizontally, but a lot of elasticity vertically, working this hat sideways ensures a snug and comfortable fit.
The yarn choice also helps in making the hat fit better. I made mine in a sock yarn, which has natural elasticity due to the way it’s spun.
Any yarn with similar characteristics (4 or more plies and high twist), like many merino yarns, will give the same effect.
PDF version of the cat ear beanie pattern
If you prefer a PDF version, you can get it for free on Ravelry, or you can buy it on Etsy or Payhip.
The links are below.
Size and measurements
Check out the table for head sizes and finished sizes.
The sizes range between head sizes of 41 and 64 cm (between 16″ and 25″) with no ease or slight negative ease.
The table provides sizes for the height of the beanie. You can change the length of the hat by changing the starting chain.

Pick your size based on your measurements and desired length.
The stitch and loop counts are shown in pattern as follows: A, B (C, D) [E, F].
The schematic shows the sideways construction of this beanie, with a ribbed brim on either end.

Skill level
Intermediate in Tunisian crochet, due to working with various types of stitches.
Gauge
21 Tss and 22 rows for a 10 cm by 10 cm square (4″ by 4″).
Make a gauge swatch by following these instructions.
Row 1. Ch 25, pick up 25 loops in the back bumps of the chains, R –– 26 loops
Row 2. 24 Tss, Ls, R –– 26 loops
Repeat Row 2 another 24 times for a total of 26 rows.
Block the swatch by washing it and laying it flat to dry.
Measure a 10 by 10 cm (4″ by 4″) square in the middle of the swatch and count the stitches and rows.
Notions
Yarn: fingering weight or size 2, with 420 meters per 100 grams; approximate usage per size: 210, 250 (290, 330) [370, 400] meters or 45, 55 (65, 75) [85, 90] grams.
Hook: 5 mm Tunisian crochet hook with cable, or long hook, or hook that gets you gauge.
Tapestry needle, scissors, tape measure.
In sample: hand dyed sock yarn 75% wool, 25% Polyamide, 420 meters per 100 g. Size D made of 75 g.
Observations
This hat is worked flat, then seamed. See the provided tutorial on how to seam up the two edges.
You can make the hat taller or shorter by varying the number of chains you start with and varying the number of stitches in the middle section.
Make a gauge swatch before you start. Measuring the starting chain does not provide any information on the actual size of the project.
Repeats are shown between *asterisk symbols*.
The loop count, including the first loop before the return pass, is constant from one row to another and it is noted in the first row, after the –– symbols.
Abbreviations
- Ch – chain;
- MR – magic ring;
- R – regular return pass: Ch 1, Rep *YO and pull through 2 loops on hook* until 1 loop remains;
- Rep – repeat;
- SM – stitch marker;
- St – stitch;
- Tks – Tunisian knit stitch: insert the hook between the two vertical bars of the next St, YO and pull up a loop;
- Trpks – Tunisian reverse purl knit stitch: bring the yarn to the front of the hook, insert the hook from back to front between the 2 vertical bars of the next St, YO and pull up a loop;
- Tss – Tunisian simple stitch: insert the hook under the vertical bar of the next St, YO and pull up a loop;
- YO – Yarn over.
Instructions
Highlight the stitch counts relevant to your chosen size and only follow those instructions.
Start with a slip knot on the hook, leaving a long tail for seaming.
Row 1. Ch 89, 93 (97, 101) [105, 109], pick up 89, 93 (97, 101) [105, 109] loops in back bumps of chains, R –– 90, 94 (98, 102) [106, 110] loops
Row 2. 16, 18 (18, 20) [20, 22] Tks, Rep *1 Tss, 1 Tks* 28, 28 (30, 30) [32, 32] times, 16, 18 (18, 20) [20, 22] Tks, Ls, R
Row 3. 16, 18 (18, 20) [20, 22] Trpks, Rep *1 Tks, 1 Tss* 28, 28 (30, 30) [32, 32] times, 16, 18 (18, 20) [20, 22] Trpks, Ls, R
Repeat Rows 2-3 another 42, 49 (55, 60) [64, 68] times. Repeat Row 2 once more. Do not bind off.
Leave a long tail for seaming.
Seaming
Fold the hat along the middle, aligning the two sides to prepare them for sewing.

Rotate the hat and start seaming on the edge with the first row.

Make an invisible join at the bottom where the two sides meet, using the tail.

The steps will be demonstrated below for the brim.

Steps 1 and 2 show the creation of an invisible join on the edge.
Step 1. Thread the needle with the tail left from the first chain and go around the second St on the second side.
Step 2. Return to the first side and go back through the first stitch to make the invisible join.
Start seaming the fabric.
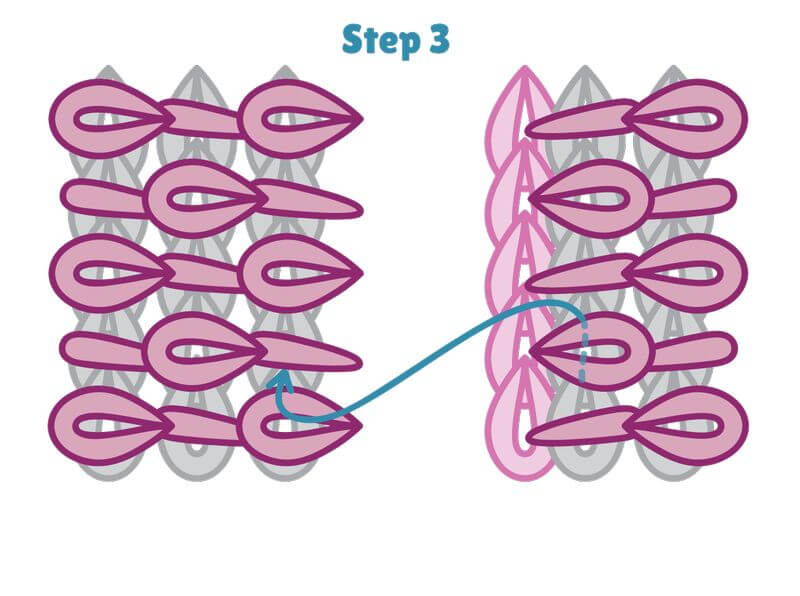
Step 3. Go with the needle under the first Tks on one side (the side with the first row).

Return to the first side and insert the needle between the 2 vertical bars of the first stitch and come back up between the 2 vertical bars of the second stitch.
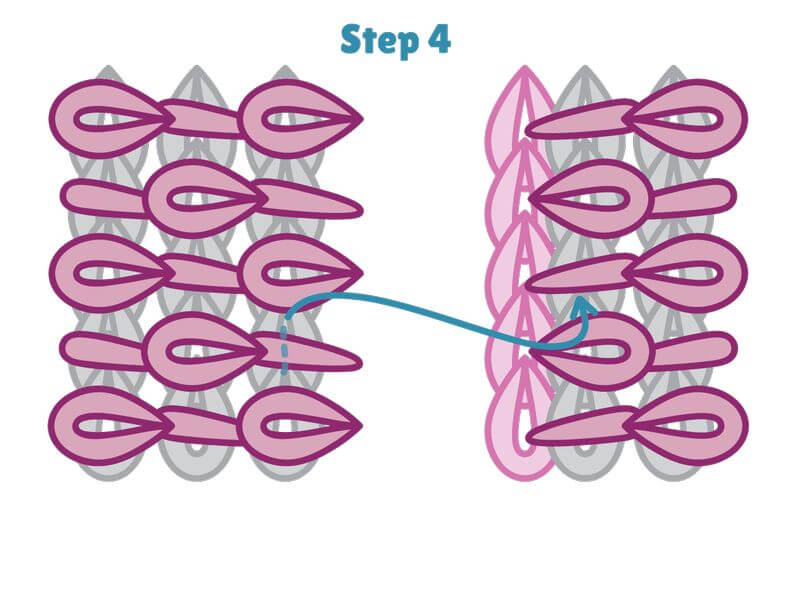
Step 4. Go with the needle under the second Tks on the first side.

Step 5. Return to the second side and insert the needle between the 2 vertical bars of the second stitch and come back up between the 2 vertical bars of the next stitch.

Return to the first side.
Step 6. Go with the needle under the second Tks on the first side.

Return to the second side.
Continue working in this manner until you run out of stitches in the brim. Pull on the tail to close the gap.

The starting chain should move to the back of the fabric or the inside of the hat.
Continue in a similar way for the main fabric.
Step 1. Go with the needle first through the return pass chain and under the first stitch on the first side.

Step 2. Go under the corresponding stitch on the second side, then return to the first side.

Steps 3-4. Repeat this action, by going through the return pass chain and under the stitch on one side, then under the stitch on the other side.
Pull on the tail regularly to close the gap. The starting chain should move to the back of the fabric.
Repeat the seam on the other side. Weave in the ends.
The beanie is finished and ready for gentle washing and wearing.
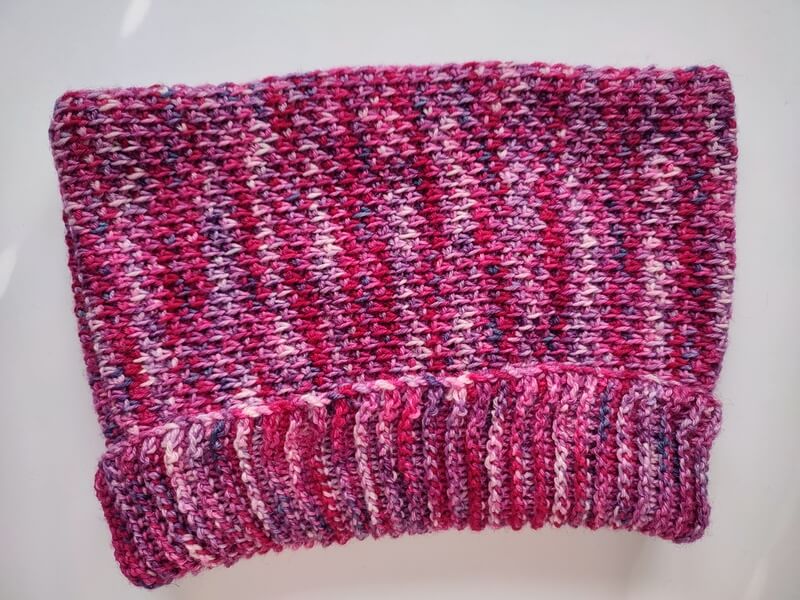
Below you have the finished beanie on the left and the beanie turned inside-out on the right. You will notice that the very elastic ribbing tends to pull the brim inside.
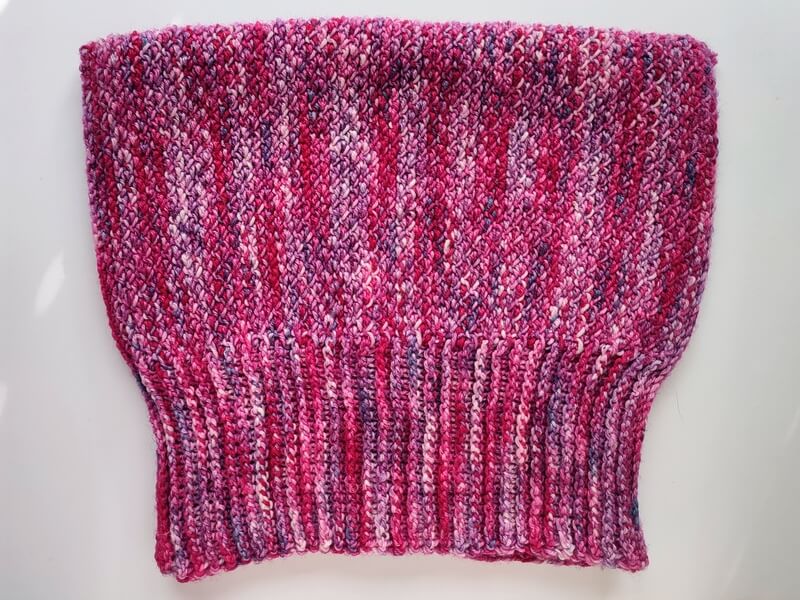
The “wrong side” of the fabric also looks good, if you want to use that instead of the “right side”.
Video tutorials
These video tutorials will be helpful if you are new to Tunisian crochet or haven’t made some of the stitches in this pattern before.
The first link is the right handed version, the second the left handed.
Tunisian simple stitches.
Tunisian knit stitches.
Tunisian reverse purl knit stitches.
Weaving in ends.
If you want to, you can also add a soft lining to your finished beanie. I showed in a separate tutorial how easy it is to add lining to a beanie.
Other patterns you might like
If you enjoyed this pattern, here are some more Tunisian crochet patterns for the cold weather that you might enjoy:
- Cowl and headband set
- Beanie pattern in 9 sizes for chunky yarn
- Silver Spruce cowl with fun textured stitches
- Houndstooth fingerless mittens with video tutorial
- Beanie pattern with elastic brim and rounded crown
- Fingerless mittens with lace



And if you’d like to know when I publish more patterns on the blog or if you want to test a pattern for me, sign up to my email updates below.
I’ll see you around!


This looks really good, I am going to try it. Thank you for sharing.
Thanks, Cynthia! Enjoy!